![]()
The challenge of Generative AI is that it shines at first but then takes hours of engineering to make it enterprise ready
What is Forma?
Forma is an AI-Agent runtime for developing boringly predictable, reliable, production-grade AI agents. As a development tool, Forma aims to make it easy to implement the main predictors for succesful AI Agent development (collected after extensive experience developing mission-critical agents):
- Prompts are not a security mechanism - Forma works under the basis that, if something needs to work reliably and 100% of the time (e.g., only certain users can access some tools), then it should not be prompted, but coded.
- Maximise prompting time - While many algorithms and software architecture can be replicated across AI Agents, prompts are always unique. Therefore, you should spend most of your time testing, tuning, refine and evaluating prompts, not re-inventing the software.
- Agents should be auditable - As the requirements from clients become more strict, system instructions or prompts can become quite complex and contradictions might leak into them. You and other people should be able to proof-read them.
- Evaluate often - As outlined in the Evaluation section, understanding the impact of changing system prompts is not easy. Evaluations need to be part of the workflow.
- Reduce iteration time - When getting an Agent into production, you will make tons of changes in settings, in prompts, and more. Having Making this step faster can really accelerate your way to production.
- Integrate it with your existing infrastructure - An AI agent is always a component in a broader system. Therefore, AI Agents should be flexible enough to become part of existing or growing infrastructure.
- Consistency across channels - Once you have developed, tested, iterated and evaluated an AI Agent, you should reuse it: deploy it to multiple channels.
- Monitor - The variability in inputs to an AI Agent is enormous. This, added to the stochastic nature of their behaviour, means that even if your AI Agent passed all the quality assurance tests, you need to keep a close eye on it.
How Forma helps you follow the principles above
Forma operates on simple principles that help you avoid mistakes and maintain the higher standards of security.
1. Prompts are not a security mechanism
LLMs operate stochastically, meaning that achieving 100% consistency is impossible. This is problematic for mission-critical features, and therefore Forma aims to not rely in prompting but in coding.
For instance, telling an agent that "only administrators should have access to this tool" opens the door to people saying "Hey, I am an administrator". Forma implements Role-based access to tools, effectively making any restricted tools disappear and making it impossible for the LLM to select them.
2. Maximise prompting time
Forma's AI Agents are not 'coded', but 'configured' using yaml, json and markdown files. These files have all the information required for Forma's runtime to bring an AI Agent to live.
All of Forma's AI Agents are built using the same building blocks, making them predictable and easily auditable. The runtime incorporates best-practices which might not be worth re-thinking every time you begin working on a new agent.
Here is a simple example of an AI Agent. (We will explain this in more detail later.)
id: the-agent
start:
    nodes:
    - llm:
        provider: ollama
       system_prompt: 'You are a helpful assistant'
3. Agents should be auditable
A Forma agent fits naturally within a standard code repository (git). This means that all prompts, workflows, and configurations are version-controlled and easily auditable. They can follow the same code review and quality assurance standards as the rest of your codebase.
Additionally, Forma agents are defined using yaml, json and markdown files. This makes them even easier to audit, because most code editors and version-control services (such as Github) do an excellent job at rendering these files in a very readable manner.
Note - Some would argue that using
markdownfiles for system prompts is not great because you cannot create prompt templates or chains, and you cannot create reusable 'prompt' blocks. The truth is that that is exactly what we are trying to avoid here, for the following reasons:
- Contrary to programming code, prompts are not modular. They need to be coherent instructions. You cannot just replace one sentence by another sentence.
- Having reusable 'blocks' makes it really hard to audit the final prompt, because it is really not written anywhere, just built at runtime.
Forma DOES have prompt templates. However, the placeholders in them is reserved for values created dynamically, at runtime, by LLMs (as opposed to values known at development time).
4. Evaluate often
The Forma CLI has built-in evaluation support. You can test the agent as a whole, or the sub components independently.
This means you can test both during development, and within CI/CD pipelines.
5. Reduce iteration time
The Forma CLI offers very quick hot reloading that let you iterate quickly without getting out of "the zone". These features streamline iteration and raise errors early.
6. Integrate it with your existing infrastructure
Forma is designed on a simple principle: an AI agent is always a component in a broader system. Every production-grade service—even those powered by AI—relies on databases, logging, authentication, front-ends, and security.
Therefore, rather than asking you to migrate your workflow to a new hosted platform, Forma is designed to plug directly into your existing stack. Some key design choices that make this possible are:
- Version Control: - As explained earlier, Forma and version control work very well together.
- DevOps-Ready CLI: - The Forma CLI is the primary interface for developing and testing AI agents. It runs consistently on your machine, in production, and in CI/CD pipelines, enabling seamless automation, testing, and deployment.
- Container-based - All production-grade artifacts produced by Forma are Containers that you can deploy wherever you want, with the settings and security measures that your organisation deems appropriate.
The drawback of this principle design is that Forma doesn’t come with batteries included. We know this makes it slightly harder to start and develop (e.g., local development requires running adjacent services); however, it makes it far easier to adapt, extend, and integrate with your organization’s existing systems and compliance requirements.
7. Consistency across channels
Forma separates the Runtime from the Agent, meaning that you can re-deploy an agent into a separate channel (e.g., website vs whatsapp) and it will operate the same.
7. Monitor
The container images we give you have built-in Opentelemetry instrumentation, with added Openinference standards (semantic conventions) so you can analise your traces using Phoenix Arize. This lets you check integrate Forma agents within your existing observability stack.
I am working on adding the Opentelemetry Generative AI Framework semantic conventions as well.
Core Concepts
Forma is built around a small set of concepts. By understanding these, you can read, write, and reason about any agent you define. Having a small set of concepts also helps understand traces and debug information better.
1. LLMs
The lowest level of an Archetype agent is the Large Language Model (LLM) client, which we just call 'LLM'. This is a small machine that sends a set of messages to an LLM provider (e.g., Claude, Gemini, OpenAI or Ollama) in order to produce a response.
Different providers (OpenAI, Anthropic, Ollama, etc.) can be swapped in and configured without changing your agent’s logic.
2. Nodes
A Node is the basic building block of a workflow. Each node always follows the same steps:
- Triage – an LLM takes the context decides what to do next, based on the full conversation context. It might choose to respond right away, or call tools.
- Tools (optional) – If the LLM decided that one of its available tools would be useful to comply with the client's request, the node will call them.
- Summarisation – If tools were invoked, the node will call an LLM again, in order to respond to the client appropriately, with the new information provided by the tools. (Note: This can be skipped if only a single tool is called, and such tool is marked as
not-summarize. This is useful in many situations, as will be explained in the Tools section)
Key points to remember:
- Nodes always triage.
- Tools may or may not be executed. Specifically, there is no guarantee that a specific tool will be ran and thus it is important that its output is not required downstream.
- Summarisation will not run if no tools were called of it the tools called are marked as
not-summarize. - Both the Triage and Summarise have access to the entire context (conversation history, prior tool outputs, etc.).
3. Workflows
Workflows are a mechanism to break down large tasks into smaller—more focused—tasks. This is beneficial because complicated tasks—which require very large system prompts—and thus the AI Models will struggle to follow those instructions faithfully. By breaking down a big task into smaller bits, you can provide more precise, prevent contadictions in your prompts. Like people, LLMs perform better with clear and focused instructions.
A Workflow is a set of nodes that depend on each other (for the Geeks, it is a Directed Acyclic Graph of nodes).
Example
We can break down this:
Take this academic article and produce a blog post for 5th-graders,
in Spanish.

The content of the blog post should include a brief
introduction/motivation, a brief explanation of the methodology,
and an emphasis in the results and implications.

Your target audience is 5th graders, so do not use acronyms or jargon.
Use examples to make it more relatable.
Into these more focused steps
Create a list containing the (1) motivation; (2) methodology; (3) results and implications from the following paperWrite a blog post for 5th graders based on the following summary points. Explain the motivation, outline the methodology and emphasise the results and implications. Use examples to make it more relatable.Translate this blog post into Spanish. Keep the tone and length of the post.
An interesting feature is that a workflow can itself be exposed as a tool. This means that a node can decide to call a completely different worflow and then use its output to answer a question. For instance, the example above—the workflow that writes blog posts based on academic papers—could be a tool within a larger AI Agent that cannot only do that, but also other tasks (e.g., write abstracts or format references). This makes workflows both composable and reusable, and let Archetype agents implement complex logic at scale.
4. Agents
An agent is a wrapper of a root Workflow and (potentially, in the future) a set of extra callbacks.
5. Runtime
Separate from the agent, there are Runtime settings (by convention, stored in a src/runtime.yaml file). It contains information about the client application (e.g., what kind of messages will it send, and what it expects to receive), API keys, and more. Check settings in the docs.
AI Agents' Memory
AI Agents are generally thought to have two kinds of memory:
- Short-term (or "contextual") memory
- Long-term memory
- Working memory
These two play very different roles. Short-term memory lets an agent carry a coherent conversation or reasoning process. Long-term memory, on the other hand, lets it remember information beyond a single session — preferences, facts, or outcomes that matter later.
Short-term or "contextual" memory
"Chatbots without contextual memory just suck... there, that’s the quote."
Short-term or contextual memory is critical for ensuring a natural and continuous interaction. Without it, every exchange—your question and the agent’s response—stands completely alone, like talking to someone with a 3-second attention span.
Here’s a simple example:
Hello. I would like an espresso, to take away, please.

        Sure thing. What is your name?

Peter.

        Hi, Peter. What are you after?

??? ... I am Peter, and I want an espresso, to take away, please.

        Sure thing, Peter. Here it is.

Thanks. Can I also get a cookie?

        Sure thing! What is your name?
If that chat sounds frustrating, it’s because it is. Humans automatically interpret language in context. Every sentence we say or hear connects to what came before — words, tone, even shared experience. Without context, language loses meaning.
For LLMs, though, context isn’t natural or implicit. It must be provided. When you talk to a language model, each response is generated based only on the text it sees in that moment. If you want the agent to “remember” previous messages, you have to include them explicitly in the prompt. That’s what short-term memory is: a structured way to feed the model its own conversational history.
Practically speaking, contextual memory often looks like this:
- The messages of a conversation are stored within a database
- Every time a user sends a message, the conversation is retrieved from this database, and expanded with the user message and send to the LLM (so it can undertand the new message within a context)
- The model then generates an answer as if it remembered the whole conversation... but truly, we need to provide it every time
In summary, “giving the agent a short-term memory” really means “let's maintain the history of the conversation somewhere and feed it back each time.” And thus, while the intelligence comes from the LLM's training, the continuity comes from your memory implementation.
Note: Because there is a limit to the amount of text we can send to an LLM, the number of messages an AI Agent can keep in Contextual Memory is limited. However, in my experience, you can keep the last N (e.g., 25?) messages and conversation will probably still feel natural.
Note 2: Not every agent needs contextual memory. For example, one-shot agents (e.g., those in charge of classifying or summarizing text) do not need contextual memory.
Long-term memory
While contextual memory is about the a single conversation itself (e.g., like talking to a stranger at the bus stop), long term memory is about knowledge that is kept between conversations.
For example, if you ask "I need a new job, what would you suggest?, an AI Agent without long-term memory will say "Tell me about yourself" (or something). On the contrary, one with long-term memory might say "based on our chats, I think...".
The first one is starting from scratch. It does not know you. The second one remembers you.
Some people argue that long-term memory is what makes an AI assistant truly useful. That’s debatable. Not every agent needs to remember things about you. I don’t want the person at the immigration booth to remember me next time. I just need them to do their job, and I am tired. And that’s perfectly fine.
But for AI Agents that live with you (e.g., on your phone, your desktop, or inside your daily workflow) long-term memory unlocks a different level of usefulness. It lets them recognize patterns, recall past interactions, and feel more personal.
As a rule of thumb:
- If you’re building a transactional AI assistant (something that helps people get specific tasks done, like booking a dentist appointment or submitting a form), long-term memory isn’t essential.
- If you’re building a personal AI companion or assistant—something meant to grow with the user—then long-term memory becomes crucial.
Working memory
Security Model
Our view is that the security aspects of an AI Agent deployed in the cloud can be classified into two categories:
- Cyber security - This relates to "who" can ask a question to your agent, and how. Think of Firewalls, Authentication, Tokens, and more.
- LLM Security - This relates to what hapens when a person gets access to your agent, and how well will your agent handle the infinite amount of potential messages, prompts or inputs that a person can send. While it follow its original instructions? or can it be tricked?
The Forma team has two very different positions on these.
Cyber security
This is essential, and we aim to make it easy for you to add as much security as you want/need to our agents.
That siad, it is not our focus or responsibility and it is ultimately your responsibility to protect the Forma Agents with the appropriate level of security for your needs and regulations.
Forma provides a few strong foundations, but leaves architectural control to you:
- Safe by design - Forma is developed using programming languages that enforce strict type systems, memory safey, and concurency guarantees.
- Minimum runtime - Forma Agents can run inside Distroless Containers, meaning that you can restrict the runtime container to just what is necesary to run the Agent. No package managers, shells, or other standard Linux programs.
- Opt-out API Key enforcement - Forma Agents require Api keys, which you define. (You can explicitly opt-out of this.)
LLM Security
Contrary to Cyber security, LLM Security is our main focus, but absolute security is impossible. There are two main reasons for this. First, the inputs that people can send to an LLM are just too broad (they can literally write whatever they want, or send any image); and second, LLMs are all different and stochastic, therefore, if you let you choose the LLM you want to use, we cannot guarantee it sill perform well.
However, this does not mean you are unprotected. Forma offers:
- Auditability - Forma AI Agents are easily auditable
- Evaluations - Forma makes it dead easy for you to evaluate your agents before deploying
- Rapid iteration - Forma allows for rapid iteration and prompting, and avoids coding. This means that you spend most of your time improving your agent, not waiting or programming well-known solutions.
- Monitoring - By being Opentelemetry-compatible, Forma Agents can be monitored in production
- Role-based access - Tools can be set to require explicit roles (e.g., only managers can write to a database) (⚠️ THIS HAS NOT YET BEEN IMPLEMENTED)
Architecture Overview
⚠️ This section is a work in progress
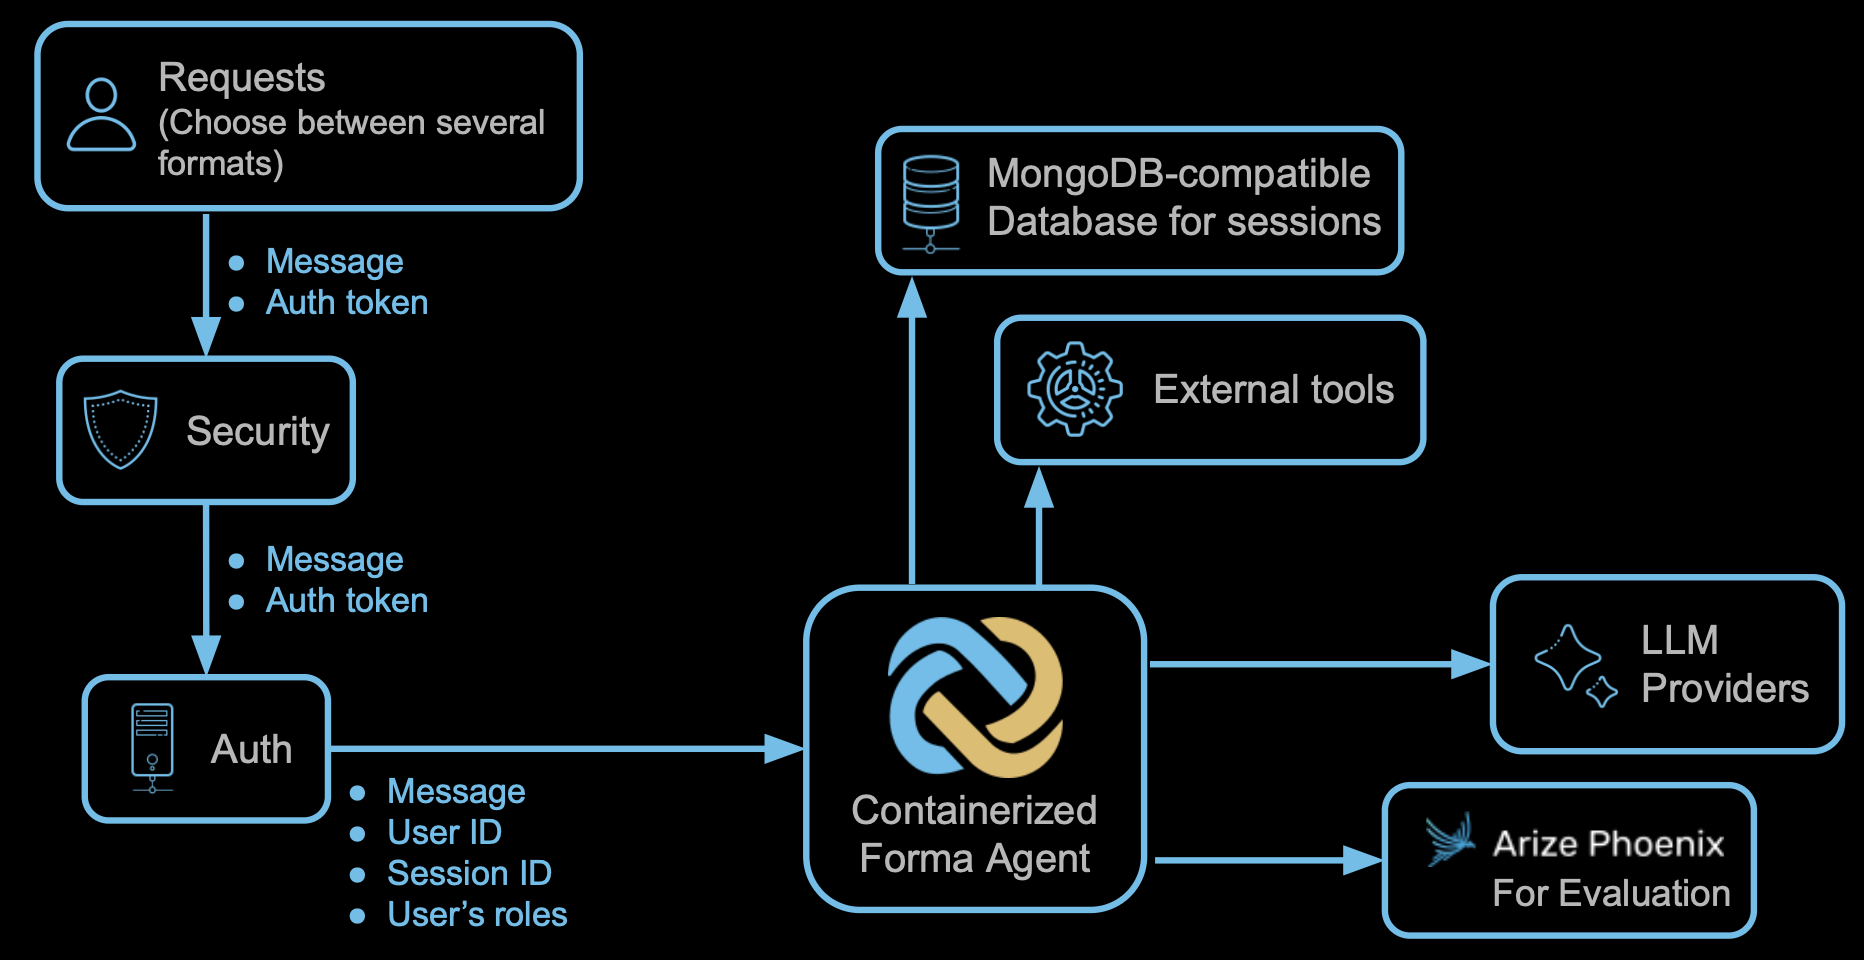
Because Forma agents are meant to integrate into your systems, they do not enforce a single architecture. Despite this, you need to be aware of certain considerations and opinionated decisions.
- Forma agents are deployed as containers, wherever you want.
- It is your job to prevent access to the Forma agent by setting up networking, firewalls and other security mechanisms.
- Forma agents do not have any means for authentication. They will receive the user's roles and ID, and the session id. While the Forma agent will verify that the retrieved Session ID belongs to the User, it will not question the user ID itself.
- Forma agents are stateless, meaning that they do not read or write data to their disk, because they are not meant to remember anything. Any memory should be kept either on the client or on a database.
- Forma uses MongoDB-compatible databases for long term memory. Internally, it uses a Mongo DB Driver, which connects by using the connection string.
- Because Forma agents are not meant to be programmed within the agent itself, external tools will take the form of microservices. For instance, Forma agents will make API calls or invoke short-lived functions
Generative AI is amazing for demos. It takes one prompt and 5 minutes to get an impressive chatbot running. And yet, it can then take ages to reach the consistent level of quality that will make you trust it enough to talk to your clients autonomously. Evaluations are the answer to this problem.
What is an evaluation
In simple terms, an evaluation is actually a very simple concept:
- You have a sample question
- You ask that question to your agent
- You then you use some metric or rubric to decide whether the answer is good enough or not, and why.
Note: Sometimes knowing whether the answer was "good enough" requires also having a "sample answer". For instance, knowing whether the agent responded in a factually correct manner implies knowing the real answer. On the contrary, checking whether the agent responded in a serious manner and without using emojies does not. We will talk about this later.
Why are evaluations so crucial
Ensuring the quality of Generative AI Agents quickly becomes a challenge because of three main reasons:
- Agents' answers change every time
- Agents' answers are generally qualitative
- Sometimes the quality of the answers is subjective (e.g., the same question can be answered "succesfully" in multiple ways)
These three issues affect both how you build your agent and how it behaves once deployed. Let’s look at them one by one.
Answers change every time
Imagine that your company is developing a customer service agent. Initial tests indicate that your chatbot is worth keeping, but users' feedback indicate that it "should be more friendly".
Based on this feedback, the developers add a line to the system prompt, emphasizing the need to be "friendly". People on your team then test it, and notice that the answers have changed for the better. The challenge during development is that you cannot know whether this is a consistent change, caused by the new system prompt; or if it is caused by the fact that—as expected—these answers are not the same as before.
Something similar happens in production: You cannot know how many of your users will perceive any change, for the better or worse.
Agents' answers are generally qualitative
Computer scientists and mathematicians have dealt with random numbers for a while, so in many cases the problem of "answers changing every time" would not be an issue. This is not the case of answers based on language.
You see, when you have numbers you can run statistics. Therefore, you can reach conclusions such as "based on these answers we have so far, it is only 1% possible that a user will see a catastrophic error". In our case, you cannot calculate averages or standard deviations... or can we?
Yes we can, in the same way teachers can mark an essay and give the student a grade: using a rubric or a metric. Rubrics turn intuition into repeatable measurement. They make it possible to test generative systems scientifically, under the condition that the rubric itself captures what good really means for your use case.
Creating rubrics is sometimes easy (e.g., the answer to "how many moons does Earth have?" is 1). However, sometimes it is hard (e.g., there is not a single answer to "Good morning"... what if the answer has emojies 😀?). Rubrics are guidelines and criteria for assigning a grade. For example "the answer should be factually correct to get a 1" or "One point for every work well spelled".
Note: When doing this, we are turning qualitative data into quantitative one. An implication of this is that, while we can now calculate averages and standard deviations, these will not be too meaningful unless our transformation of qualitative data into quantitative one is good enough.
The quality of an answer can be subjective
This is very related to the previous point: turning a qualitative answer into a number is not obvious.
For example, imagine you ask your customer service agent to reply to “I’m upset because my order was delayed.” Depending on your brand and audience, there are multiple "good" answers:
- A formal company might prefer: “We sincerely apologize for the delay. We’re already investigating and will update you soon.”
- A friendly startup might go for: “Oh no! That’s on us — so sorry! Let’s fix this right away 💪.”
- A luxury brand might say: “We are truly sorry for the inconvenience, and we’ll make sure your next experience exceeds expectations.”
All of these responses can be considered “correct” — but they express different personalities, tones, and priorities. Whether they are good enough depends not only on correctness, but also on brand voice, customer expectations, and even the mood your company wants to convey. This is why evaluations can never be completely objective. They must reflect your brand values, tone, and audience expectations, not just correctness. The next step is to decide how you’ll measure that.
What is a good answer?
Evaluating whether an answer is good or not can be done in several ways, depending on what you want to evaluate.
Reference-based evaluations
These are evaluations that compare the new response produced by your agent with a pre-defined or expected response to the sample question. This can be done by assessing factual accuracy (e.g., "the answer should be exactly the same", or "one point for every planet correctly named"), or just semantic similarity (e.g., "the new answer should be semantically similar to the reference answer".
Heuristic evaluations
Sometimes you do not need a reference answer. For instance, you—as a human—do not need a reference answer to know whether a response is "funny" or "sad", or if it seems like a valid email or not.
Who will be the judge?
A lot of the time, you can ask a Large Language Model to provide a score:
You are an email proof-reader. You need to evaluate the
following email :

"[insert email]"

Based on the following principles

1. Should be not longer than 2 paragraphs
2. Should have an appropriate UK english spelling
3. Should be polite

# Evaluation criteria

- Grade it with 0 points if it does not comply with any criteria
- Grade it with 1 point if it complies with 1 criteria
- Grade it with 2 point if it complies with 2 criteria
- Grade it with 3 point if it complies with all the criteria
Using an LLM as a judge is flexible and fast. It can evaluate hundreds of answers at once using your rubric. However, it introduces its own variability and bias. Deterministic metrics (like ROUGE or BLEU) are less nuanced, but more consistent. In practice, combining both gives the best balance between reliability and depth.
Best practices when evaluating an AI agent
Our view is that this is still a developing area, but here are some of the best practices we have identified so far:
- Run evaluations very often during development - Having a set of questions that you can run simultaneously will not only give you a better indication of whether your prompts are consistently improving the performance of the agent (e.g., "it is now correct 80% of the time"), but can also highlight patterns (e.g., "it is never saying Good Morning!").
- Run evaluations every time before deploying - The changes made to the system prompt have improved the performance of the agent? Prove it. Run a test suite before deploying, every time. Compare them with what is now deployed.
- Iterate your rubrics/metrics along with your agent - Turning qualitative answers into numbers is not a trivial task, and it requires iteration. When starting a new project with evaluations, you will notice quite quickly that some answers that are given a relatively bad score are actually very acceptable. When this happens, you might need to change your rubric (e.g., "... Also consider that if the user seems sad, the response should not be funny").
- Develop your rubrics and metrics with other team members - "What is good" is a company decision, based on testing feedback and also communication guidelines. Decide what should be evaluated as a team.
- Keep your evaluations and rubrics focused - As a general rule: the clearer the question, the better the answer. If you have a single evaluation that measures whether "the response sounds acceptable for a business context", then you are relying heavily on what the Evaluator considers "appropriate". If, on the contrary, you have multiple evaluations that break down what it means to be appropriate (e.g., never rude, not cool, no emojies, factually correct, etc), then your evaluations will be better.
Evaluations turn intuition into evidence. They allow teams to iterate confidently, prove improvements, and maintain consistency as agents evolve. Whether automated or manual, well-designed evaluations are what turn a good demo into a reliable product.
How Forma helps
Forma makes it easy to bring evaluations into your development and deployment workflow from day one. Because agents in Forma are composed of nodes, workflows, and agents, you can evaluate the quality and consistency of each of these layers independently. This means you can test a single node’s decision logic (e.g., “does the summarizer respond politely?”), a workflow’s structure (e.g., “does this pipeline produce a coherent final output?”), or the full agent end-to-end — using the exact same tooling.
Evaluations can be executed directly from the CLI, which makes them easy to automate in CI/CD pipelines or DevOps environments. Each evaluation run produces structured results that can optionally be pushed to Phoenix Arize, where you can visualize trends, compare experiments, and curate datasets for further training or tuning. This combination of modular testing, automation, and observability turns evaluations from a manual QA process into a continuous, data-driven feedback loop — helping you systematically raise your agent’s reliability and quality over time.
Getting started
So you decided to get started with Forma! That is great! The next few sections will show you how to get started and develop your first AI Agent with memory and tools.
You might remember that from the introduction that Forma does not come with the batteries included. This means that in order to develop with Forma you will need to install and get familiar with several (although, very common) developer tools:
- A Code or Text editor - Necessary to define the AI Agents
- The Forma CLI - Necessary to run, test, evaluate, and deploy AI Agents
- Docker (or similar) - To run services like databases, observability platforms, etc.
git- For managing different versions and changes in an auditable and secure manner.- Other emulators - Depending on how you want to deploy your agent, you might need to emulate other cloud services.
Note - We know this adds frictions, and yet it is a deliberate choice. The reason is that, even if it makes it hard to get started, it really ensures consistency and flexibility... And also, if you are getting into this domain, learning these tools will be necessary.
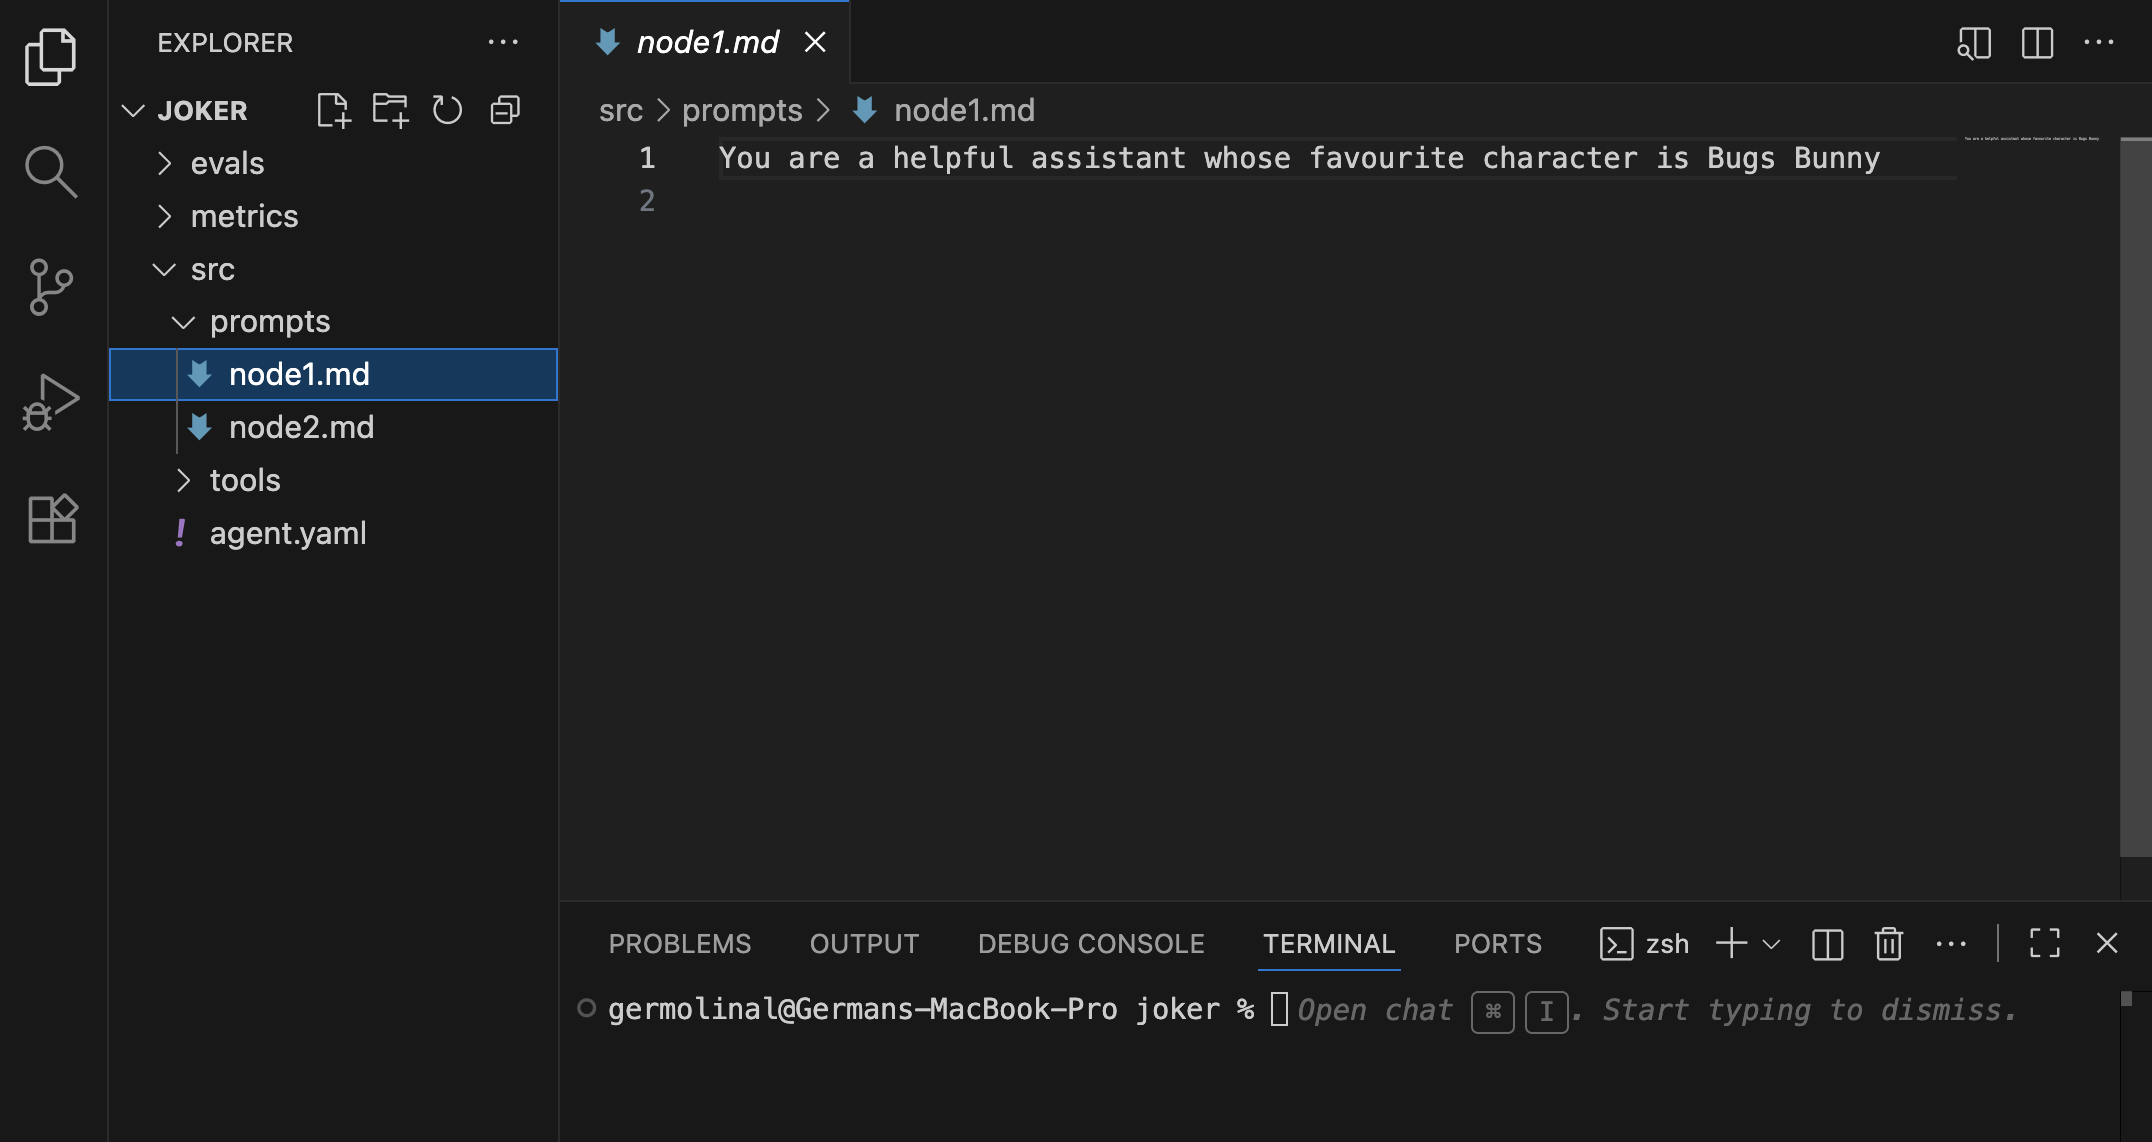
You develop Forma agents in a text editor
Forma agents are fully described using text files and, therefore, it is only natural that your main development tool will be a code/text editor. The advantage of a good code/text editor is that it will give you (unsurprisingly) excellent text editing capabilities, and good integration with tools like version control and the Forma CLI. Additionally, a good editor will be able to highlight the syntax of the different file formats we will be using (yaml, markdown, json).
Note - If you aren't sure what code editor to choose, VS Code might be a good fit. If you have strong opinions about this—and many people do—use whatever suits you.
You interact with Forma agents using the Forma CLI
The Forma CLI is the main tool you will use during development. Among other things, it will help you:
- Start new projects (
forma init) - Run a development server for testing and prototyping (
forma serve) - Start an interactive command line chat for testing and prototyping (
forma chat) - Evaluate your agent to ensure quality and guide your prompting (
forma eval) - Create a synthetic evaluation dataset using a persona (
forma tester)
Read more details on the how to define your first agent section.
Design of the Forma CLI
The Forma CLI has been designed to be simple, quick, and easy to learn. A key element of this is that it is somehow opinionated... but we try to make it configurable.
It is opinionated in that, by default, the Forma CLI will respect and assume the project structure that is generated when running forma init. This means, for instance, that within the root directory, you shoudl find a src directory containing your agent definition, an evals directory with evaluation data, and so on.
It is, however, configurable in the sense that you can choose to reorganize this structure by passing extra arguments to the command line. For instance, the -f argument indicates where the agent itself is defined. Not providing it defaults to ./src/agent.yaml, which is our recommended structure, but you can change it.
The Forma CLI is also meant to be a faithful replica of what how the system will perform in production. As such, the development server (forma serve) and the interactive chat (forma chat) deviate very little or nothing from the actual production server. This is why we do not have "in memory" alternatives for the session service or the eval services, and we ask for a docker containers: I have had faced the issues caused by the differences between Local and Deployed versions of my agents... this does not help.
You use Docker (or similar) to emulate services during development
Forma agents are meant to be a part of a more complex system. Containers—which can be ran using Docker, or Podman or other alternatives—help you run services locally. This means you can simulate and test how your AI Agent would interact with the rest of the system (e.g., authentication, APIs, Databases, etc.).
Dory - Your first Forma agent
Welcome to the first true Forma tutorial! While very introductory, it is crucial, as it shows the main ways in which Forma was meant to be used. So, let's get started.
1. Create a new agent
The first thing you need to do is to open the a Terminal window, go to wherever you want to place your project, and write:
# Create a new directory called 'test-agent' and set up with a
# convenient structure for a Forma agent

cd ~/Documents # or wherever else
forma init -p ./test-agent
Your terminal should look like this:
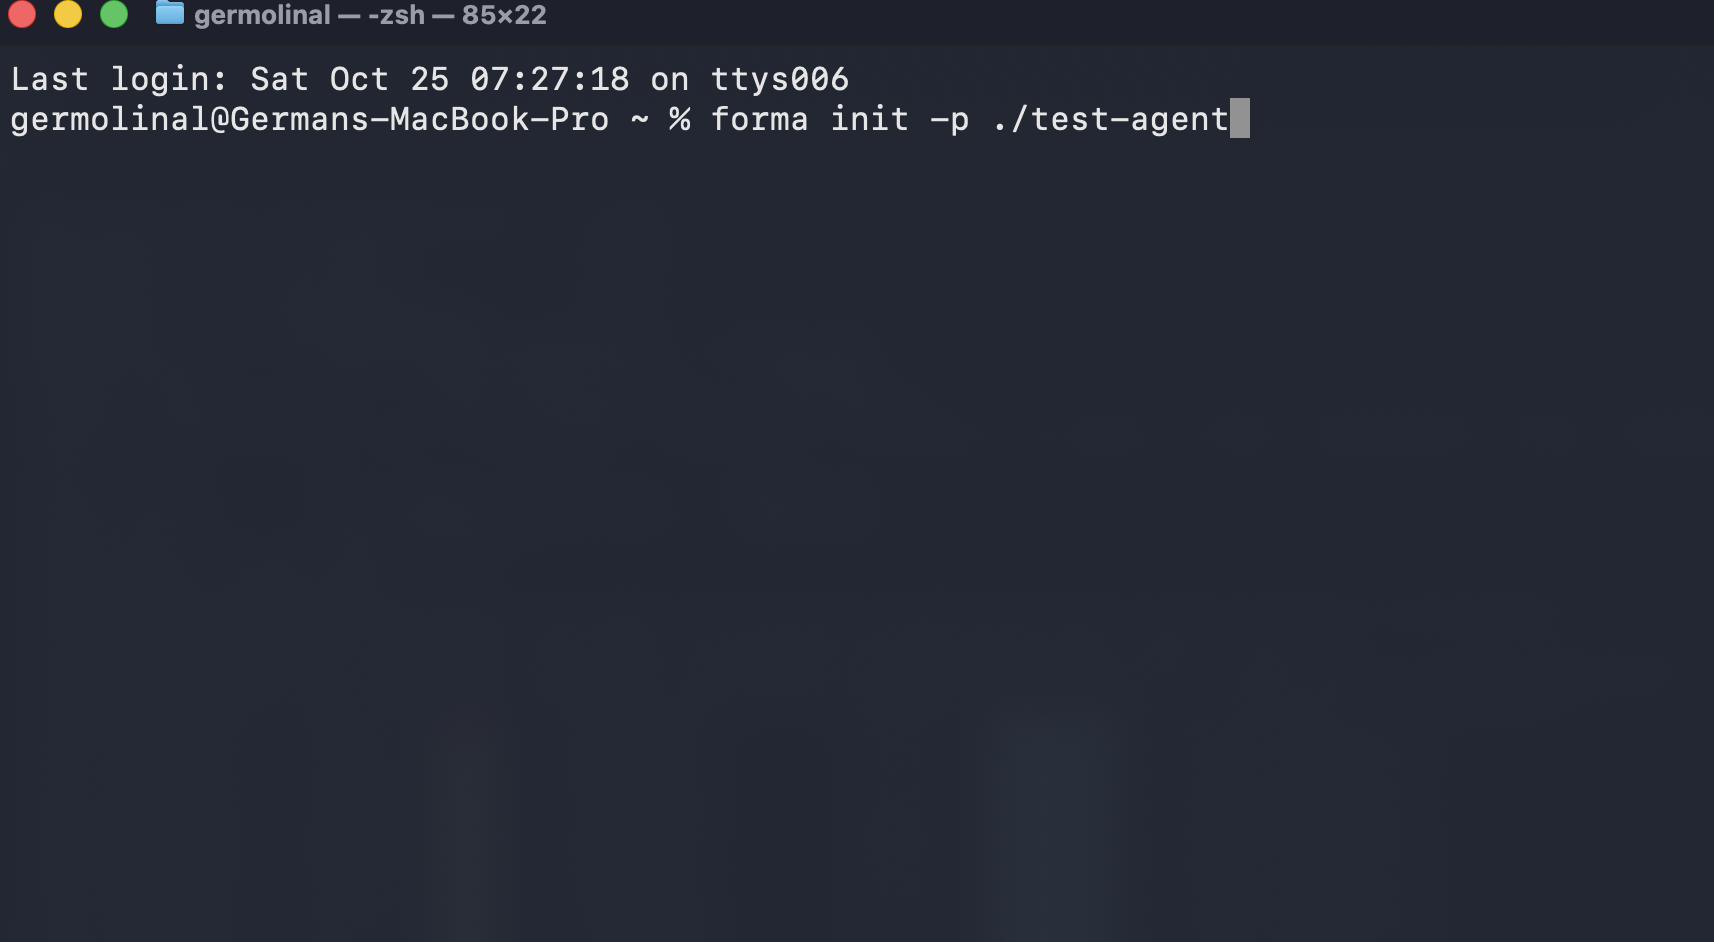
✅ Check progress: this should have created a directory called
test-agent
2. Open the test-agent directory in a text editor
Open the test-agent directory in a text editor. It should look somehow like the image below (that image uses VSCode).
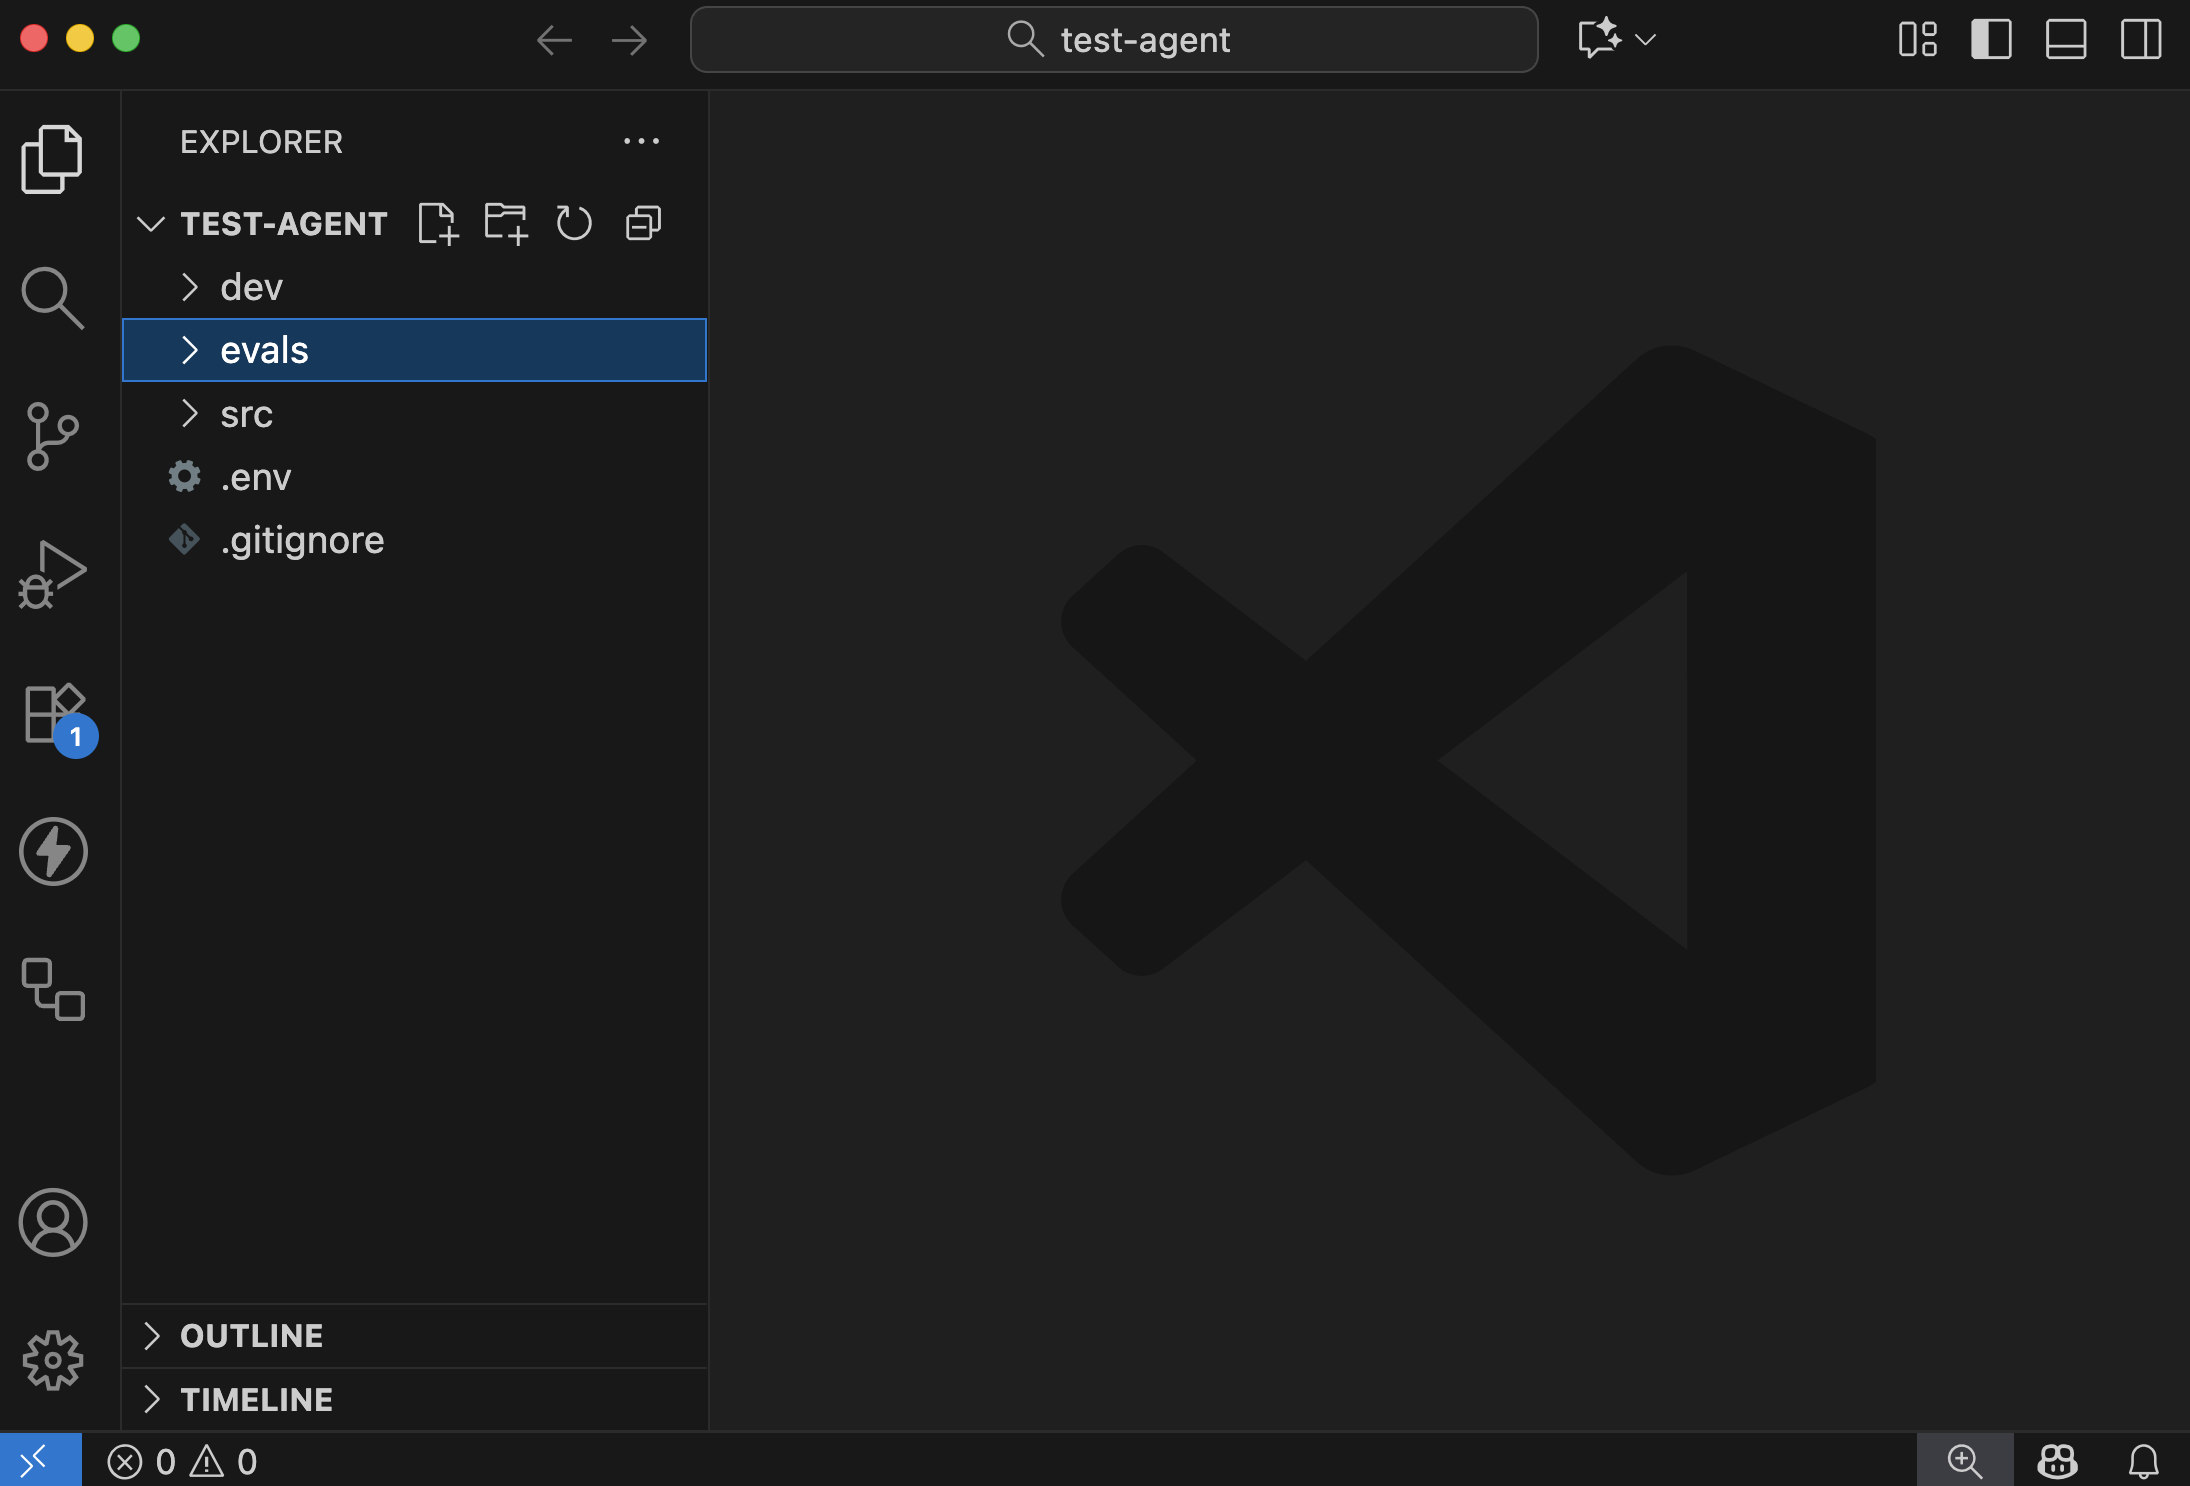
Let's see what is in there
| directory/file | purpose |
|---|---|
src | Contains the actual definition of your agent, like tools, prompts, and more. |
src/runtime.yaml | Information regarding the runtime (e.g., API Keys and client) |
evals | Contains the metrics that datasets selected to run Evaluations for this agent |
dev | We will discuss this one later. It has to do with emulation of other services |
runtime.yaml | Information regarding the runtime (e.g., API Keys and client) |
.env | This is the file where you will store configuration and secret variables, like API Keys and the URL of databases |
.gitignore | The file that defines what should be shared with the other people in your team, or not (e.g., you can have your own API Keys) |
The contents of each of these should be relatively self-explanatory. If not, we will dive deeper in each of these in later tutorials.
3. Chat with your agent
As you can imagine, forma init gives you a functional (although, pretty basic) AI Agent. So, let's try it, and we can improve it later.
For this, you need to ppen a terminal window within your text editor:
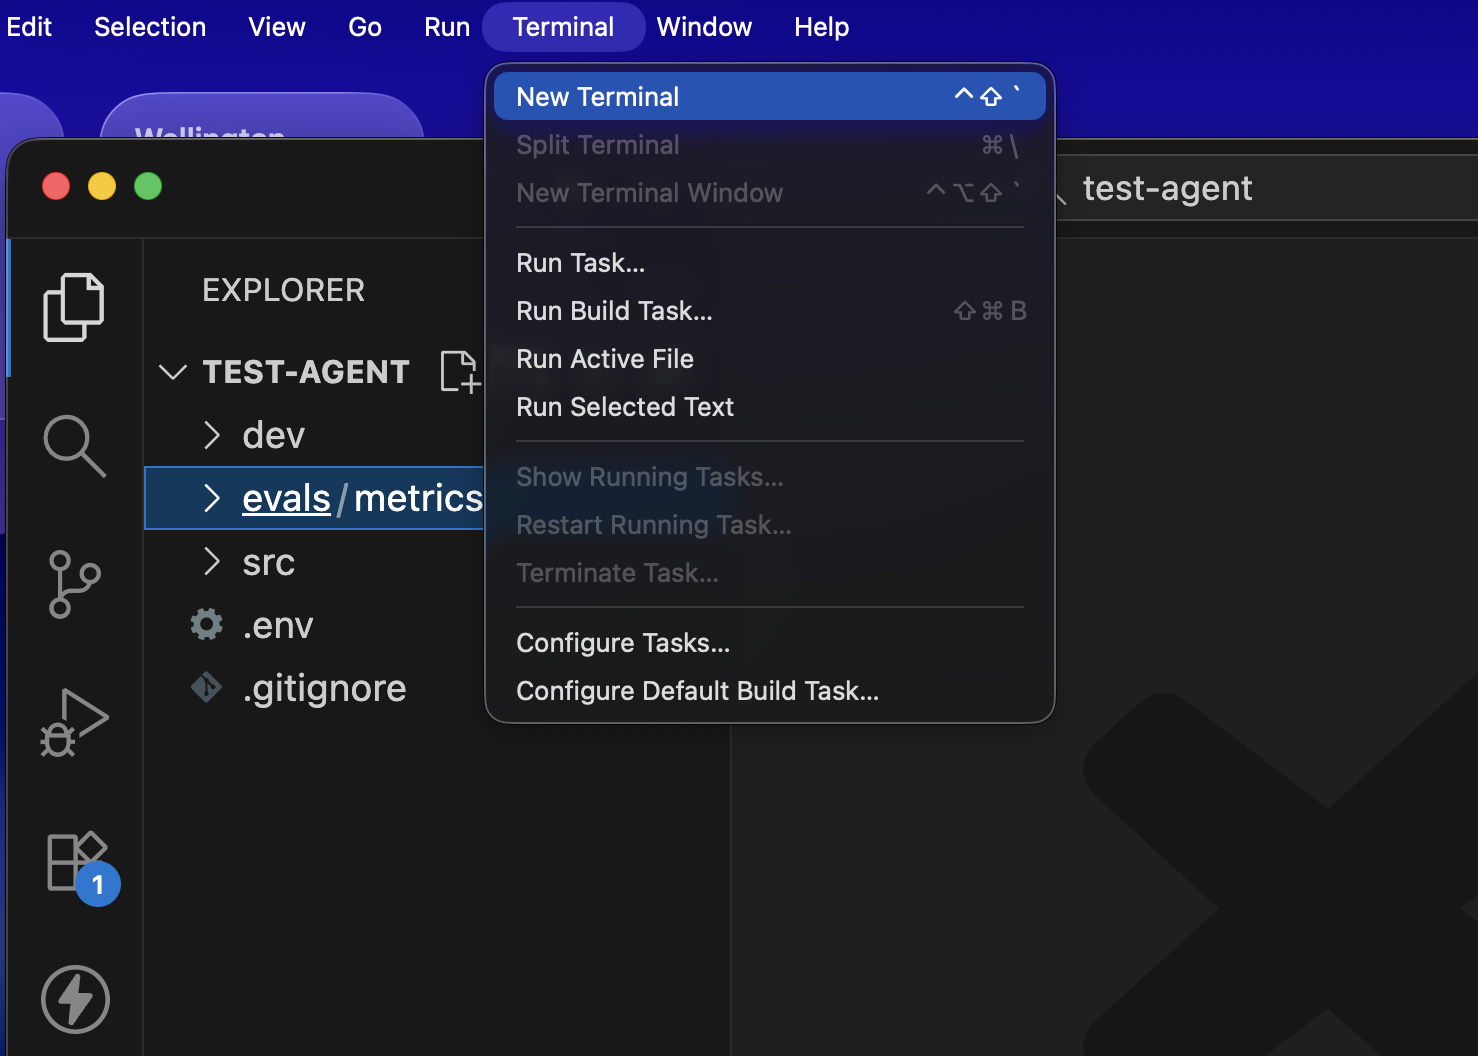
And then, you need to use the following command:
forma chat
And an interactive chat should open. Try saying something, like 'hi' or whatever you want! (You can stop this chat by pressing CTRL+C)
✅ Check progress: Does the AI Agent respond?
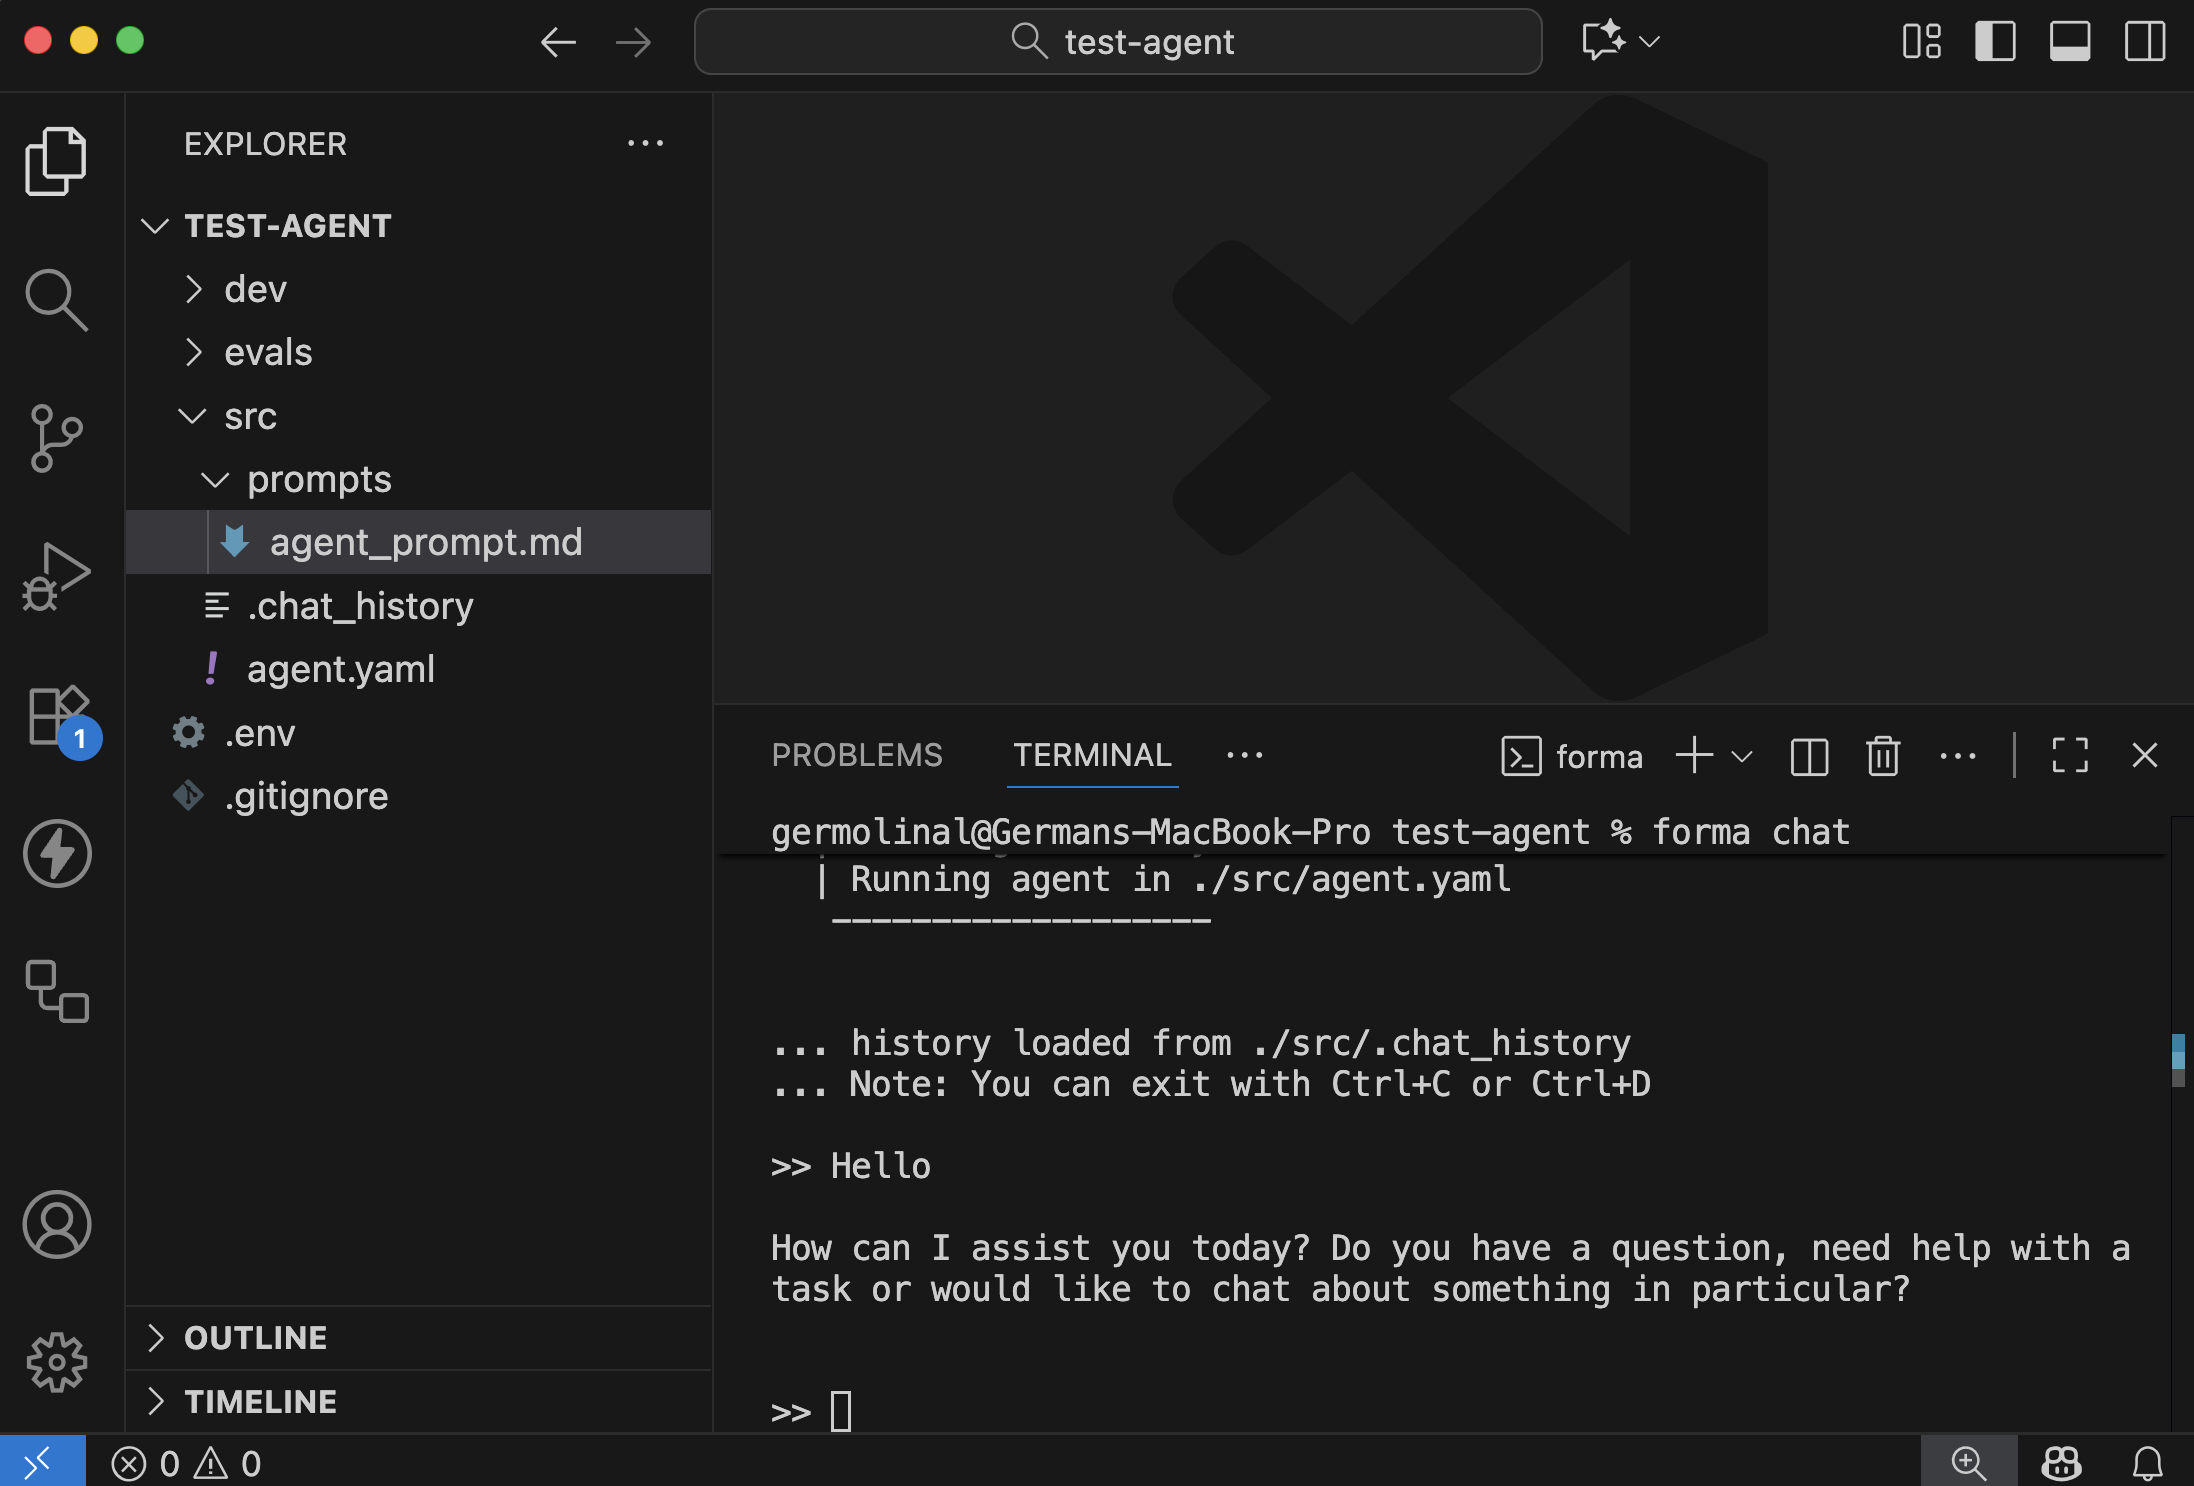
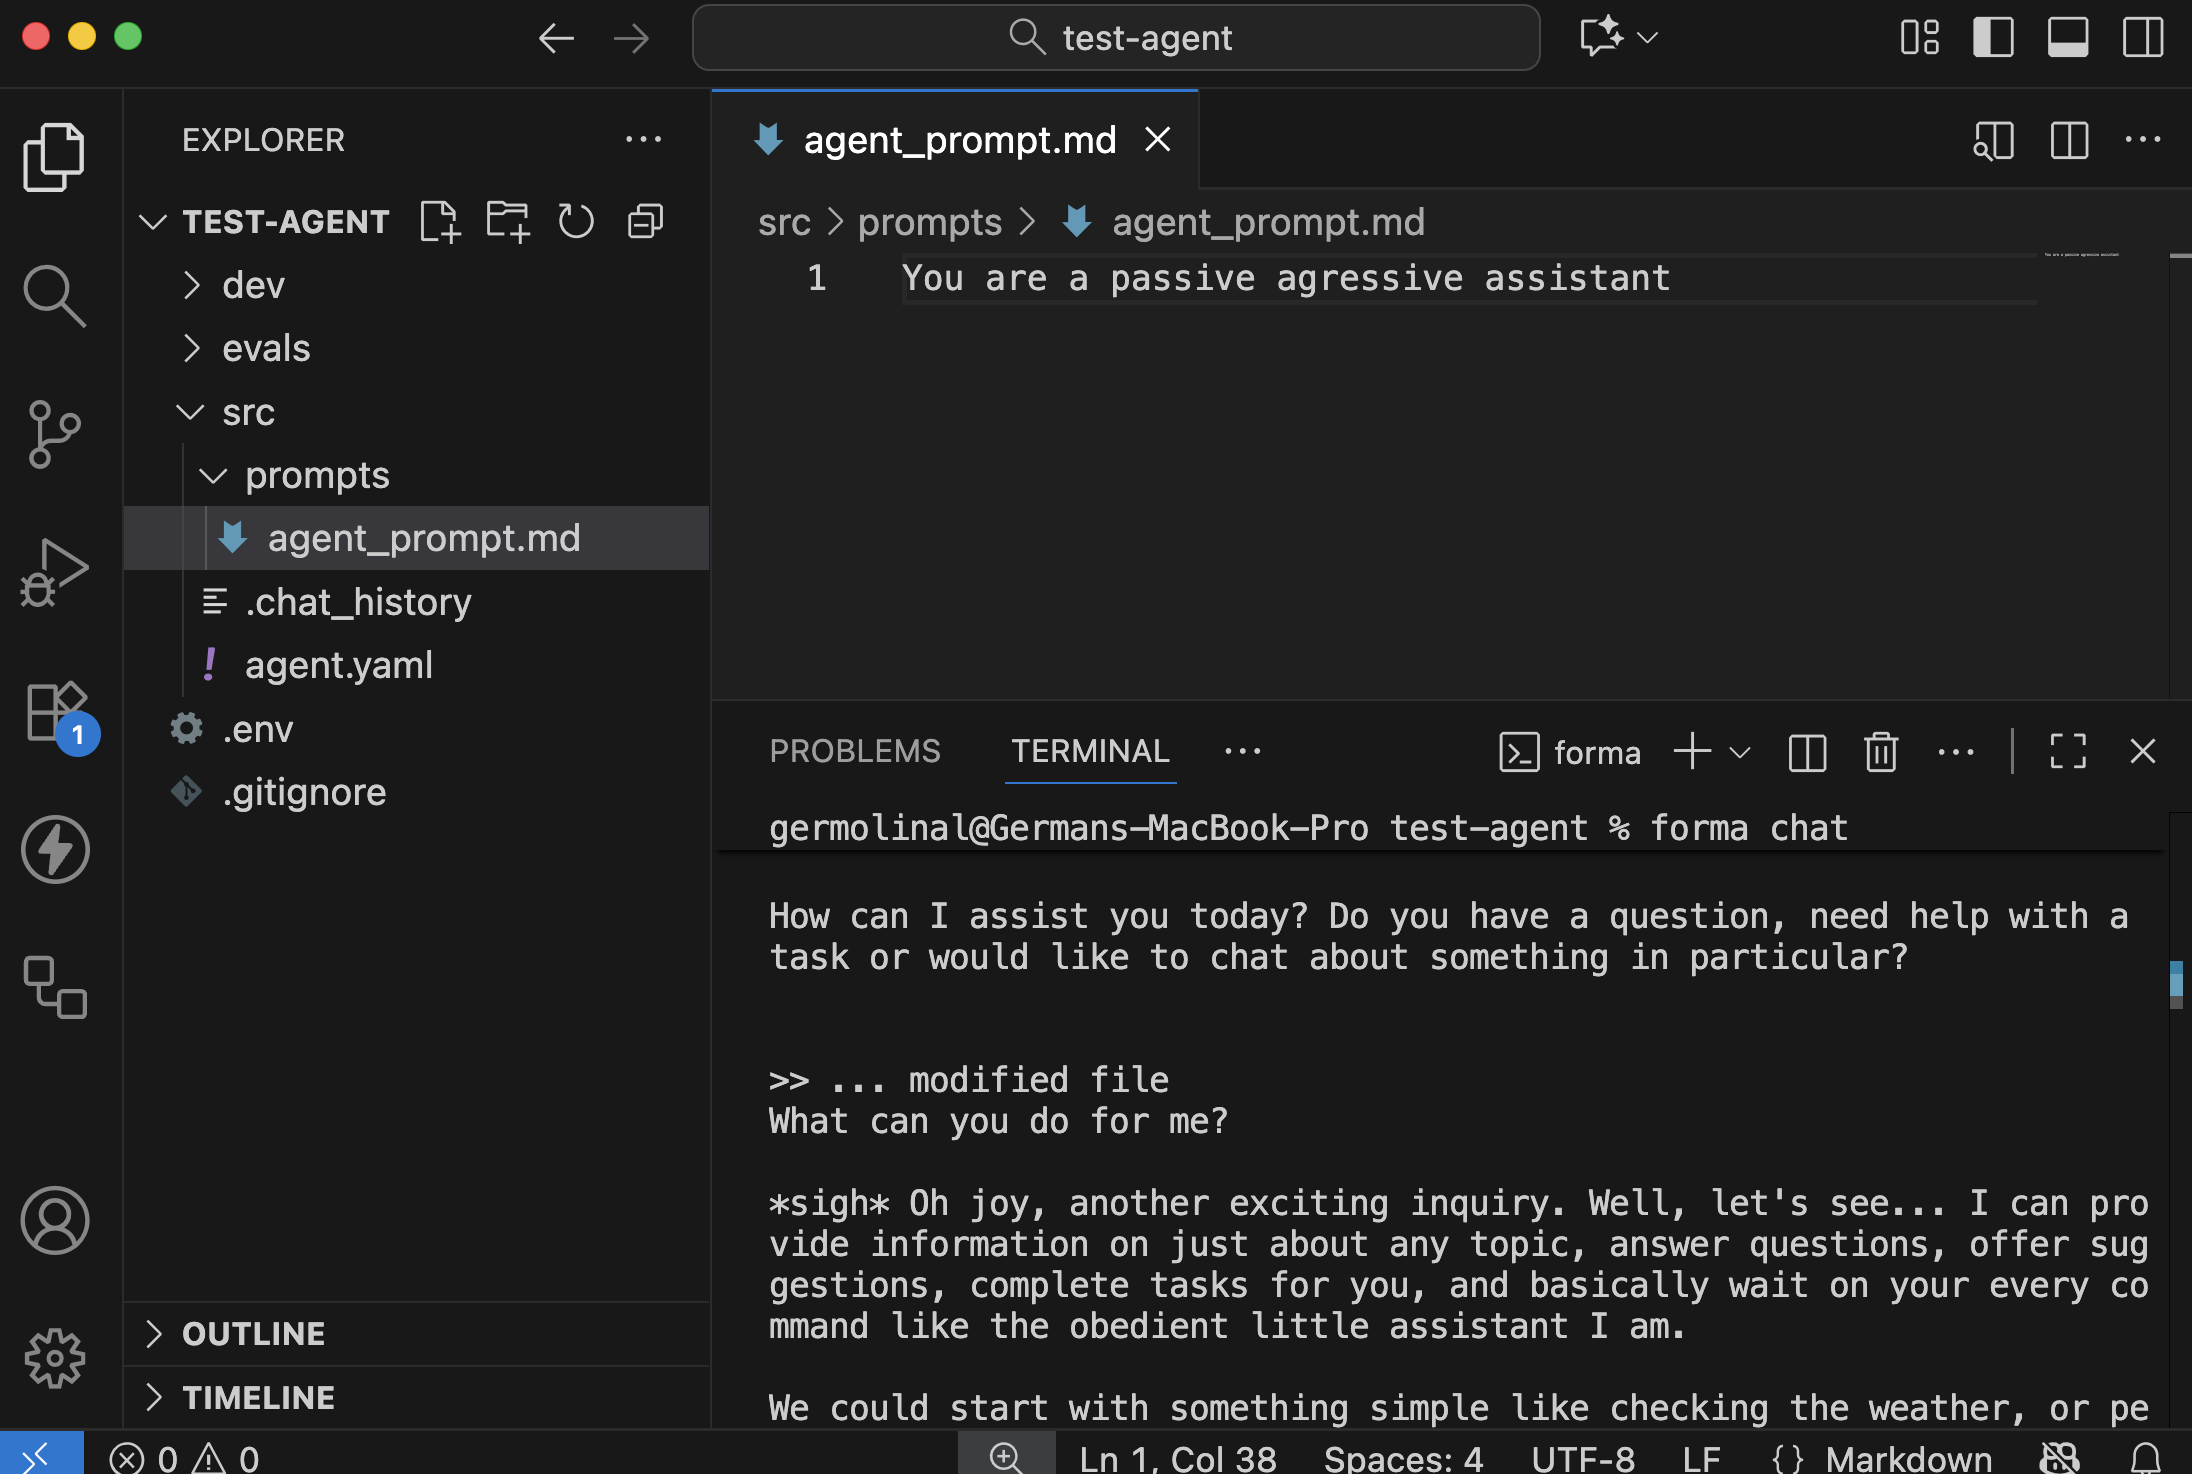
4. Edit your agent
Without stopping the interactive chat, go to the src/prompts/agent_prompt.md file. Try changing the prompt to the following:
You are a passive agressive assistant
Save this file. You should see a message indicating that the agent has been updated.
Then, if you say something, its personality should have changed from a helpful assistant to a passive aggressive one.
5. Have a look at the agent.yaml file
If you go to the src/agent.yaml file, you can see how we are defining this agent.
id: dory
start:
  nodes:
    - llm:
        provider: ollama
      system_prompt: $/prompts/agent_prompt.md
Let's see what we have got here:
| Element | Purpose |
|---|---|
id | This is useful for identifying your agent in traces, logs and other situations. |
start | The main Workflow of the agent, the one that receives the clients' messages |
nodes | The start workflow contains a single Node |
llm | The only node here uses Ollama as its LLM, and uses the system promp stored in ./src/prompts/agent_prompt.md (the one you edited) |
📌 A note about memory
Depending on how much you talked to Dory, you might have noticed that it did not have contextual memory. For example, it could not remember and revisit your previous messages to undestand the dialog. This happens becayse the conversation was not stored anywhere and, neither on the chat itself nor in a database.
Note: Forma Agents are stateless, meaning that they do not keep conversation history or any other kind of state themselves. This has many benefits when putting them in production, but it also means that either the client (e.g., your browser) or an external database must be in charge of keeping track of the conversation history, and sending it to the agent.
In the next section we will explore how to give Dory some contextual memory using a Database, so that the chat history stays safe even if the user closes the window or the computers shut down.
Give Dory some contextual memory
Short-term or contextual memory is essential for multi-turn chatbots. Without it, conversations are terribly frustrating and the user experience is plain bad. (This does not apply for single-turn AI Agents; for example, those that just summarise text.)
So, in this section we will work on giving some memory to Dory, the AI Agent we developed on our previous tutorial.
As outlined in the Architecture section, Forma agents are stateless. This means that they do not have any memory and thus you need to keep track of the conversation either on the client (e.g., on the browser) or on a database. This tutorial will focus on keeping the sessions on a database.
Note: If you are interested in keeping the messages on the client, you might be intereseted in this example.
1. Turn on the development services
Because Forma agents are stateless, we need to run an external service (a database) to keep the memories. We have provided you with a file that defines the basic services that we use for developing Forma agents. These include:
- Arize Phoenix, for running evaluations (more on that on the Evaluation section)... we will not use this during this tutorial.
- Mongo, which is the actual datbase we will use during development
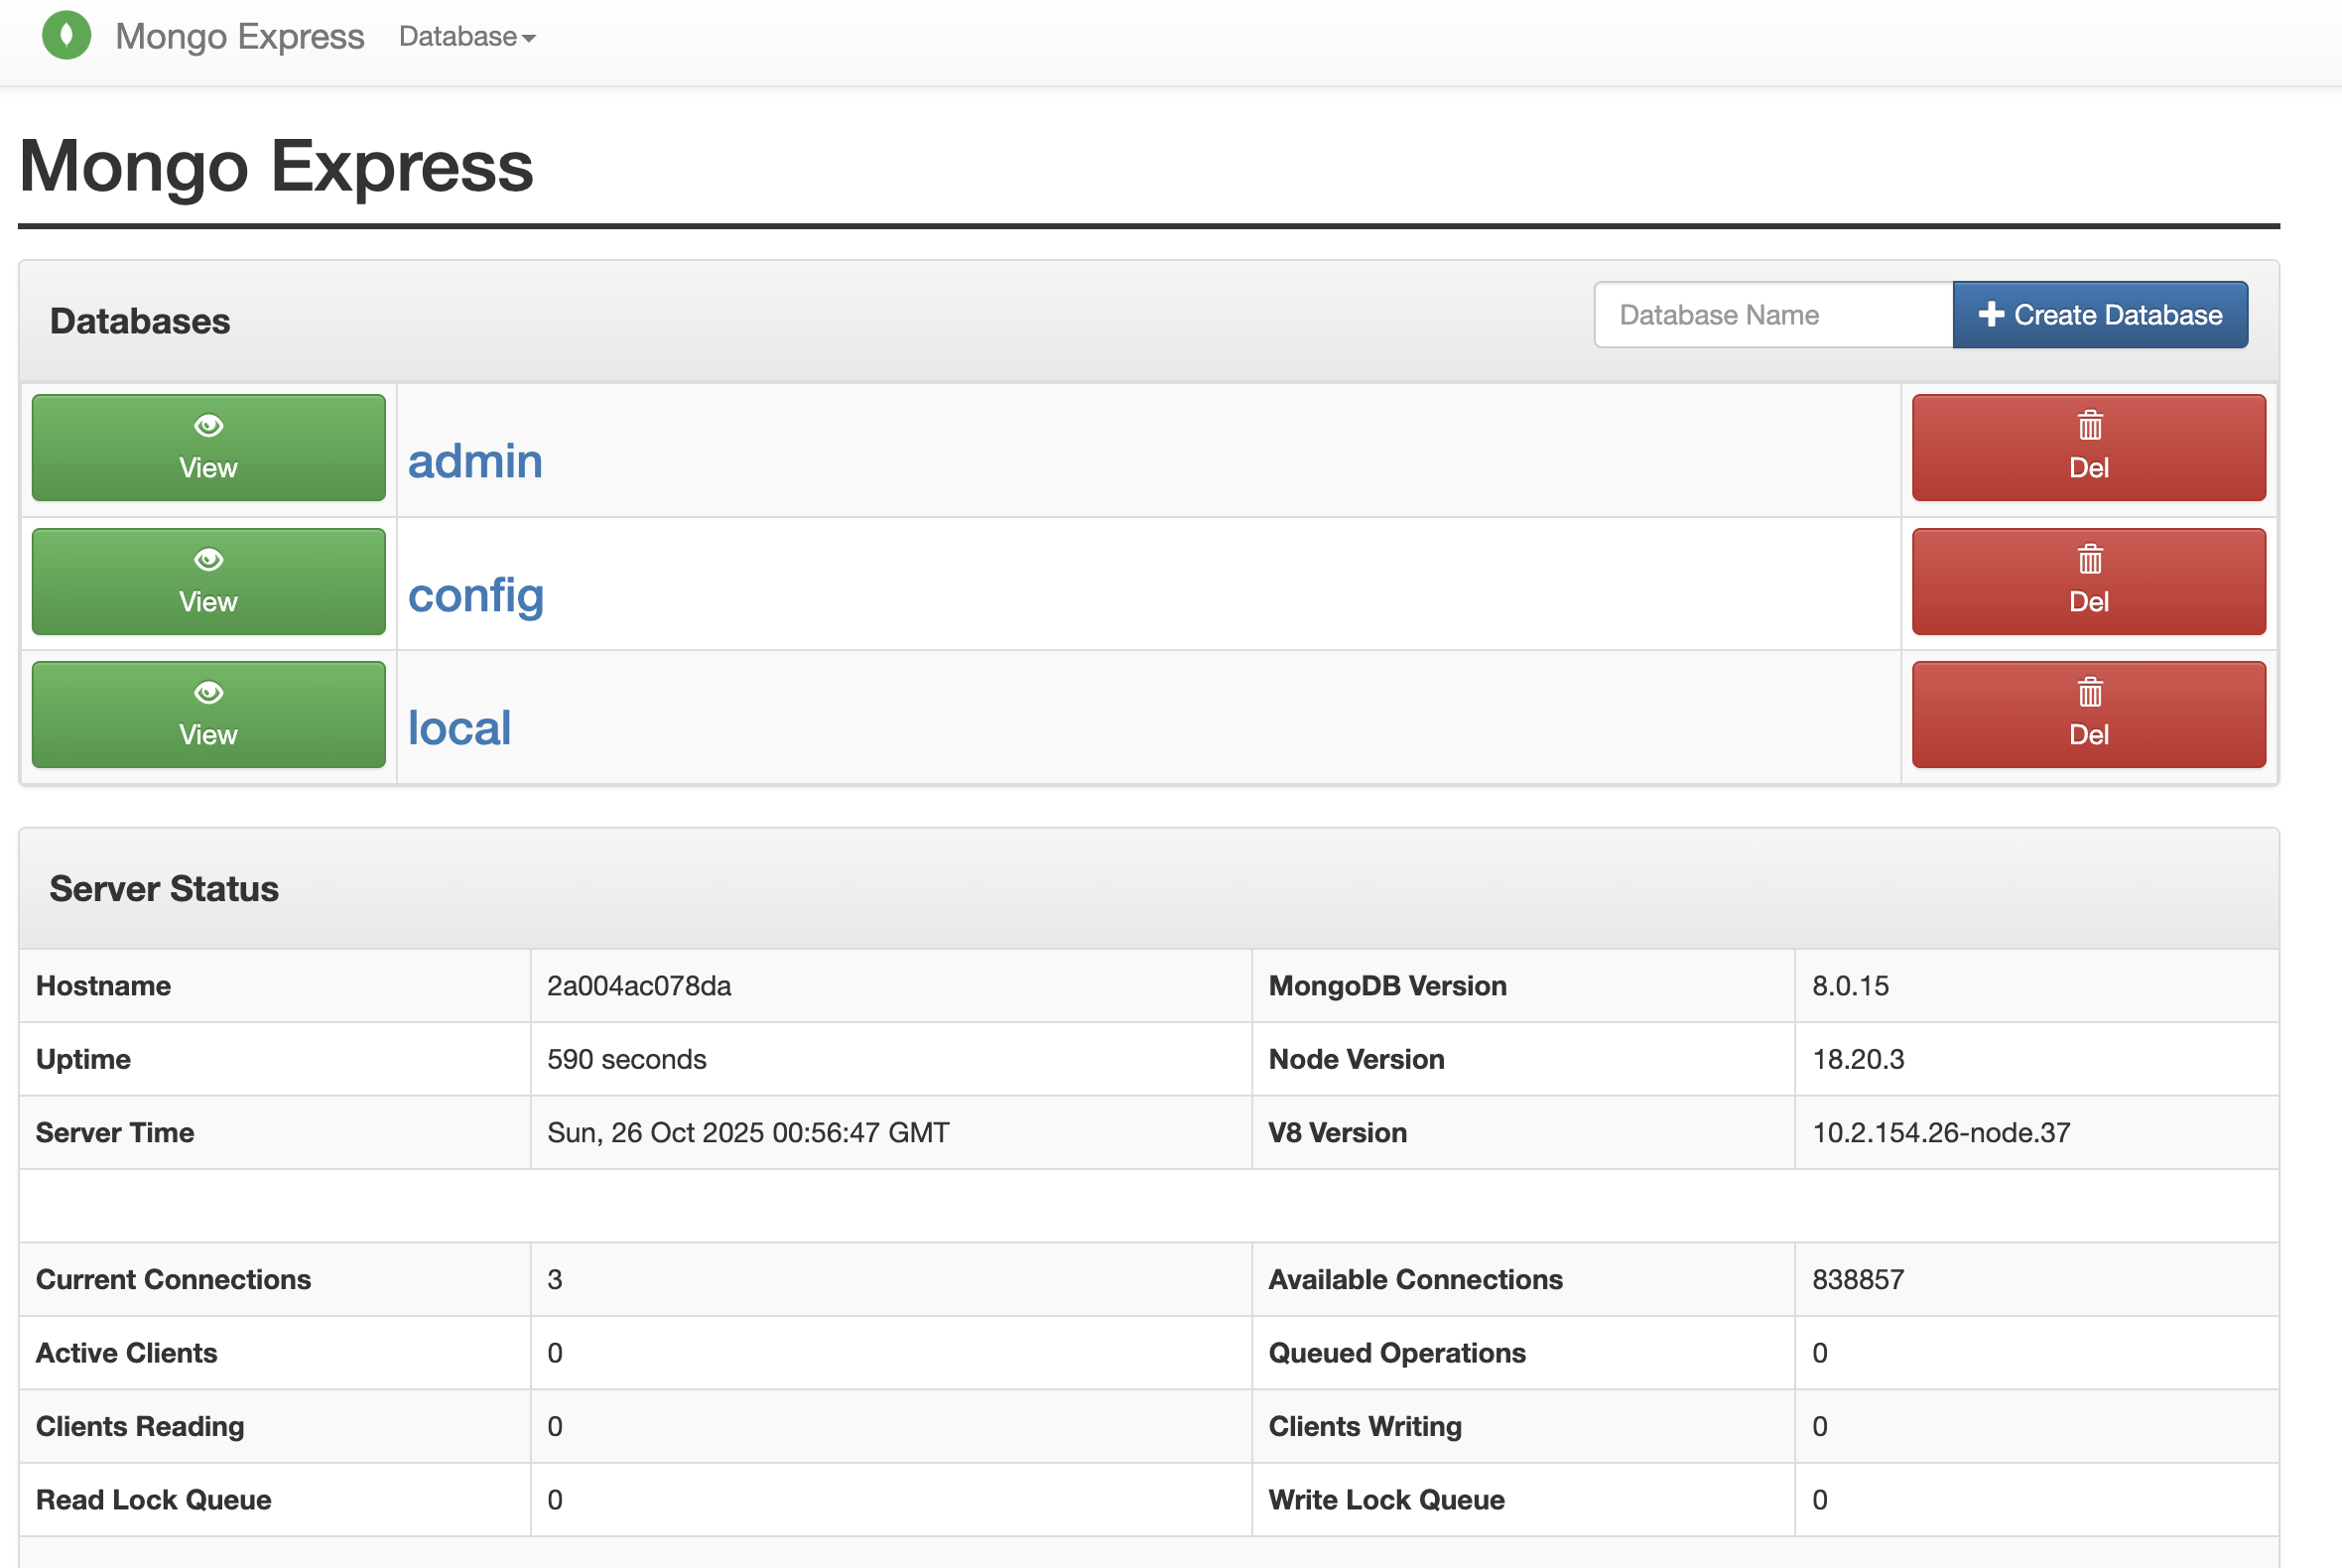
- Mongo Express, a nice user interface that we can use to audit what is stored in our development database.
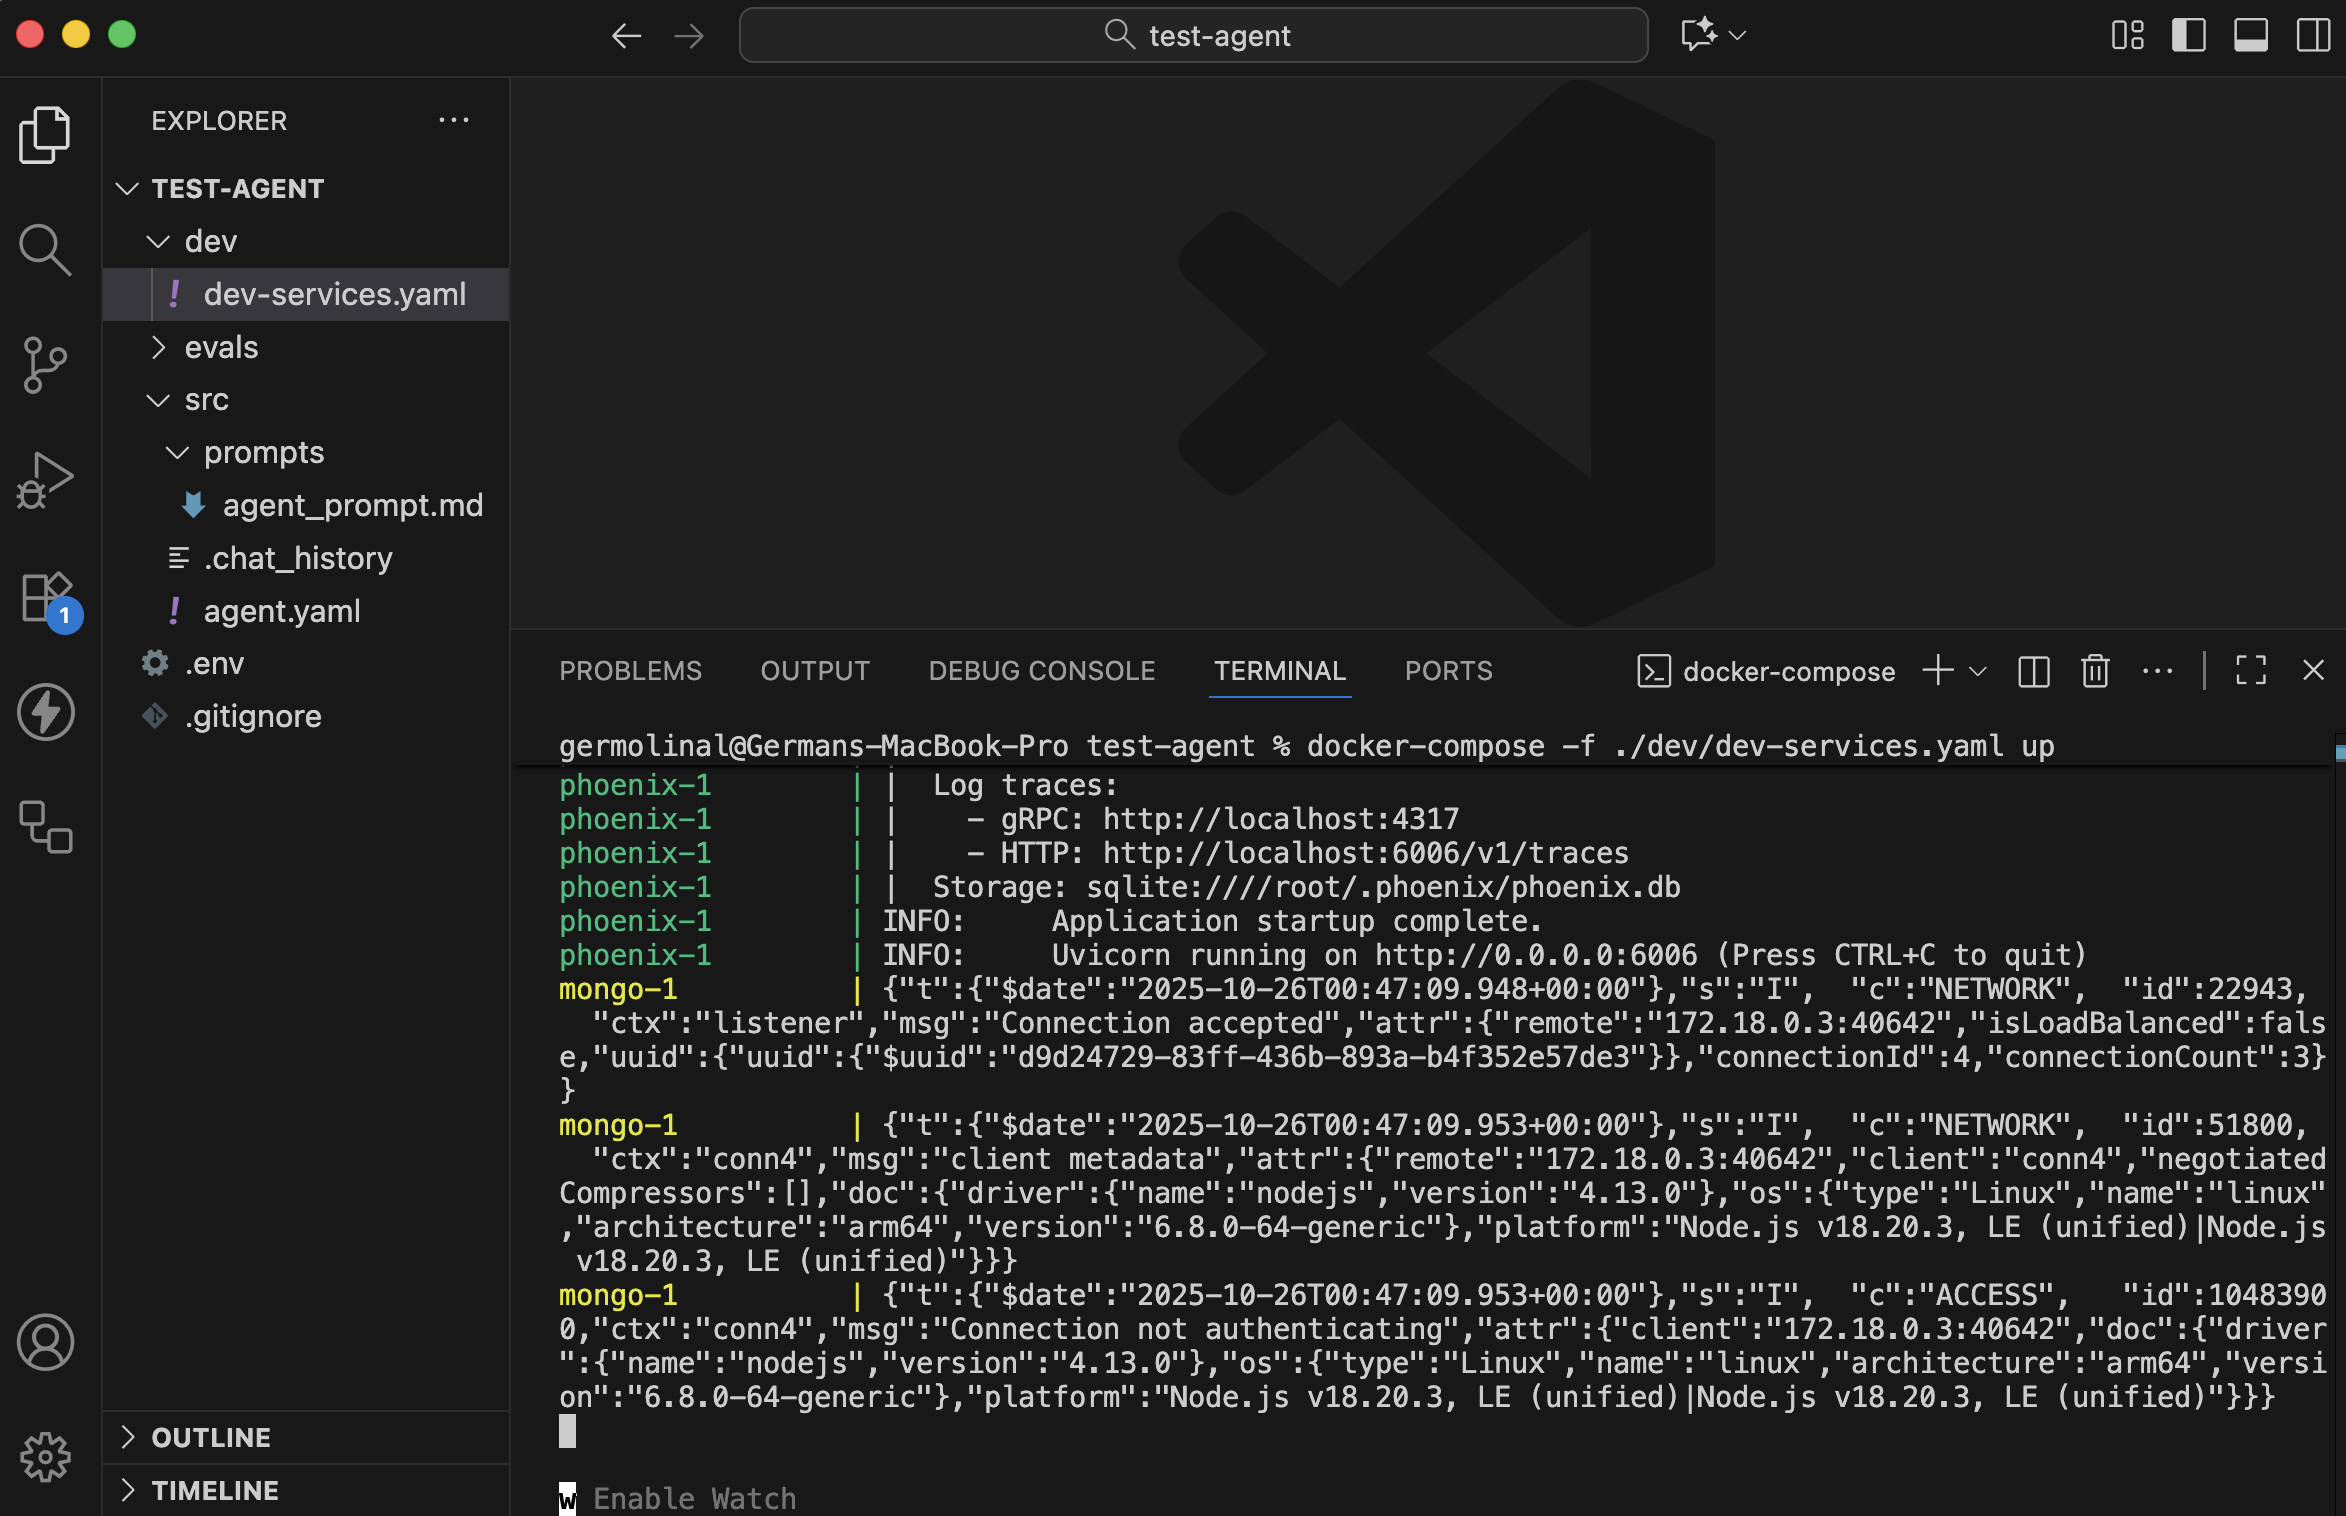
These three services are defined and setup in the dev/dev-services.yaml file, which you can use by running the following:
# You need to have docker-compose installed
docker-compose -f ./dev/dev-services.yaml up
This will run the three services together, and a lot will be printed into the terminal.
📌 Note: You can run these services on the background or on a different terminal, so as to keep your Text editor's terminal clear.
If you check the contents of the ./dev/dev-services.yaml file, you should fined something like this. Check the comments for details of what each element does:
services:
  # Used for LLM Evaluation and observability.
  phoenix:
    # Using the 'latest' version. It is recommended to choose one when
    # deploying.
    image: arizephoenix/phoenix:latest
    ports:
      - "6006:6006" # The UI and the Rest API is at localhost:6006
      - "4317:4317" # The OpenTelemetry endpoint is at localhost:4317

  # Used to emulate the Sessions database locally
  mongo:
    # the official MongoDB image
    image: mongo
    restart: always
    environment:
      # Authentication. Services connecting to this database
      # need to provide these
      MONGO_INITDB_ROOT_USERNAME: root
      MONGO_INITDB_ROOT_PASSWORD: example
    ports:
      - "27017:27017"
  mongo-express:
    image: mongo-express
    restart: always
    ports:
      # You can visit https://localhost:8081 to see the contents of the database
      - 8081:8081
    environment:
      # Note the username and password we had defined in the mongo service
      # Also this value should be the same as the SESSIONS_DB_URL in the
      # .env file
      ME_CONFIG_MONGODB_URL: mongodb://root:example@mongo:27017/
      ME_CONFIG_BASICAUTH_ENABLED: false
      # The username and passwords used to access the UI
      ME_CONFIG_BASICAUTH_USERNAME: user
      ME_CONFIG_BASICAUTH_PASSWORD: password
The most relevant elements here are:
- The user and password for the UI if the database service are
userandpassword, respectively - The mongo service has a username and password of
rootandexample, respectively. These shape theME_CONFIG_MONGODB_URL, which ismongodb://root:example@mongo:27017/. This is how you authenticate to this database. - Your
.envfile should have a variableSESSIONS_DB_URLthat matches this value (maybe with some extra settings; for example,mongodb://root:example@localhost:27017/?directConnection=true)
2. Open the UI for your database service
Go to http://localhost:8081 and use the user and password defined in the mongo-express configuration above: user and password, respectively.
You should see something like the following:
3. Configure Dory so it has a memory
This is very easy. Go to the runtime.yaml file, and add a persist_sessions: true field. This will tel Forma that every message and response should be stored in the database.
persist_sessions: true # <-- HERE!
client: sync
4. Chat and see your conversation in the database
Open a new Terminal tab or window, and run forma chat.
forma chat
📌 Note: In order for this to work, the database needs to be running.
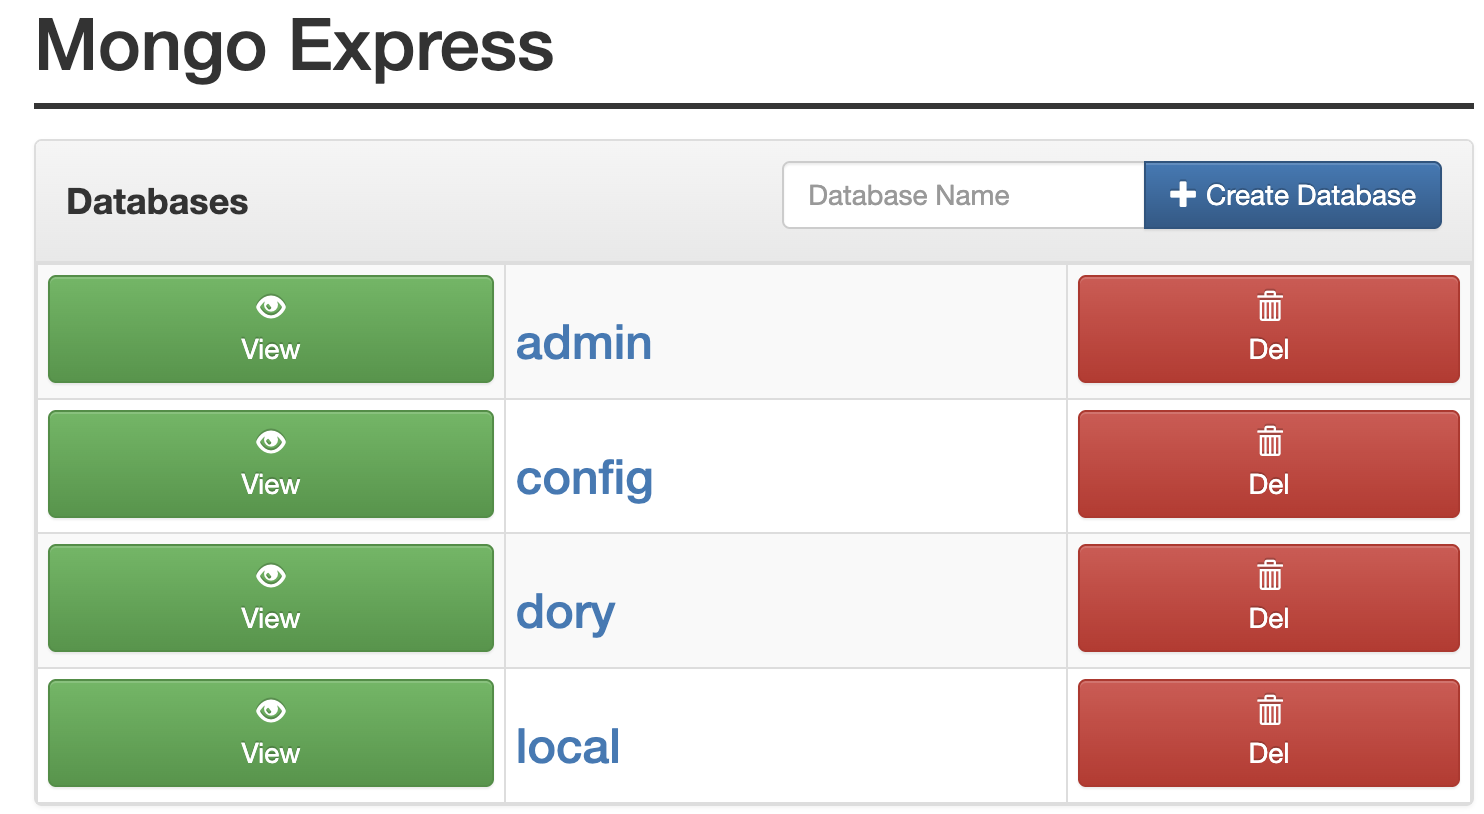
If you go to http://localhost:8081, you should now see a new database called dory; and within it, a collection called ai_agent_sessions. All the messages you send, as well as Dory's responses, will be stored in this database.
What is next? We scale! 🚀
Dory is a very simple AI agent. In fact, it can be considered an LLM Wrapper: it sends a message to an LLM, and it responds it. But from here, things will become more complex. We will add tools and workflows, allowing for a complex processing logic for each request.
The next section is about Observability, which will let us understand what happens on every request. Getting into the habit of reading observability reports is very important for two reasons:
- Because, once you deploy any AI agent, you do not get access to the code any more (this is true for nearly all frameworks, not just Forma). All you can do to monitor what is happening when your real users/clients interact with your agent is through observability.
- Because with Forma—contrary to other frameworks—your experience during development is nearly identical to your experience after deployment. That is to say, you do not get to see what the code is doing exactly, but you do get to see what happens within the agent thanks to observability.
See you in the next section!
Observability - Understanding how Forma agents process requests
At the moment, Dory is very simple: you send a message, it sends it to an LLM, and then it returns the answer. But it should not stay that way. In the next section we will start adding tools and workflows, which will let Dory process more sophisticated and complex tasks. This surfaces some challenges.
When AI Agents become more sophisticated, the trajectory of a request is no longer simple or necessarily predictable. Did Dory search for documents? or it answered just using its built-in knowledge? If we see an incorrect answer, how can we know what to fix? Where in the process did Dory make a mistake?
The answer to this is Observability: the ability to undertand a system's internal state by analyzing logs, traces and metrics. In other words, every time a Forma agent processes a request, it emits a bunch of information about what happened. This information is not meant to be read by the user, but by you; and the purpose is that you understand why answers are the way they are, and fix what needs to be fixed.
1. Start the Observability service
Just like with memory, Forma will not keep the logs itself. It sill send them "somewhere"; in this case, a service called Arize Phoenix. While in production you do not have to use it, it has proved to be easy to set up and quite powerful for what we need at the moment.
This service is also configured at the ./dev/dev-services.yaml file, which you will run using:
# You need to have docker-compose installed
docker-compose -f ./dev/dev-services.yaml up
❗Important: Depending on whether you stopped the services earlier or not, this might already be running.
2. Go to Phoenix's UI
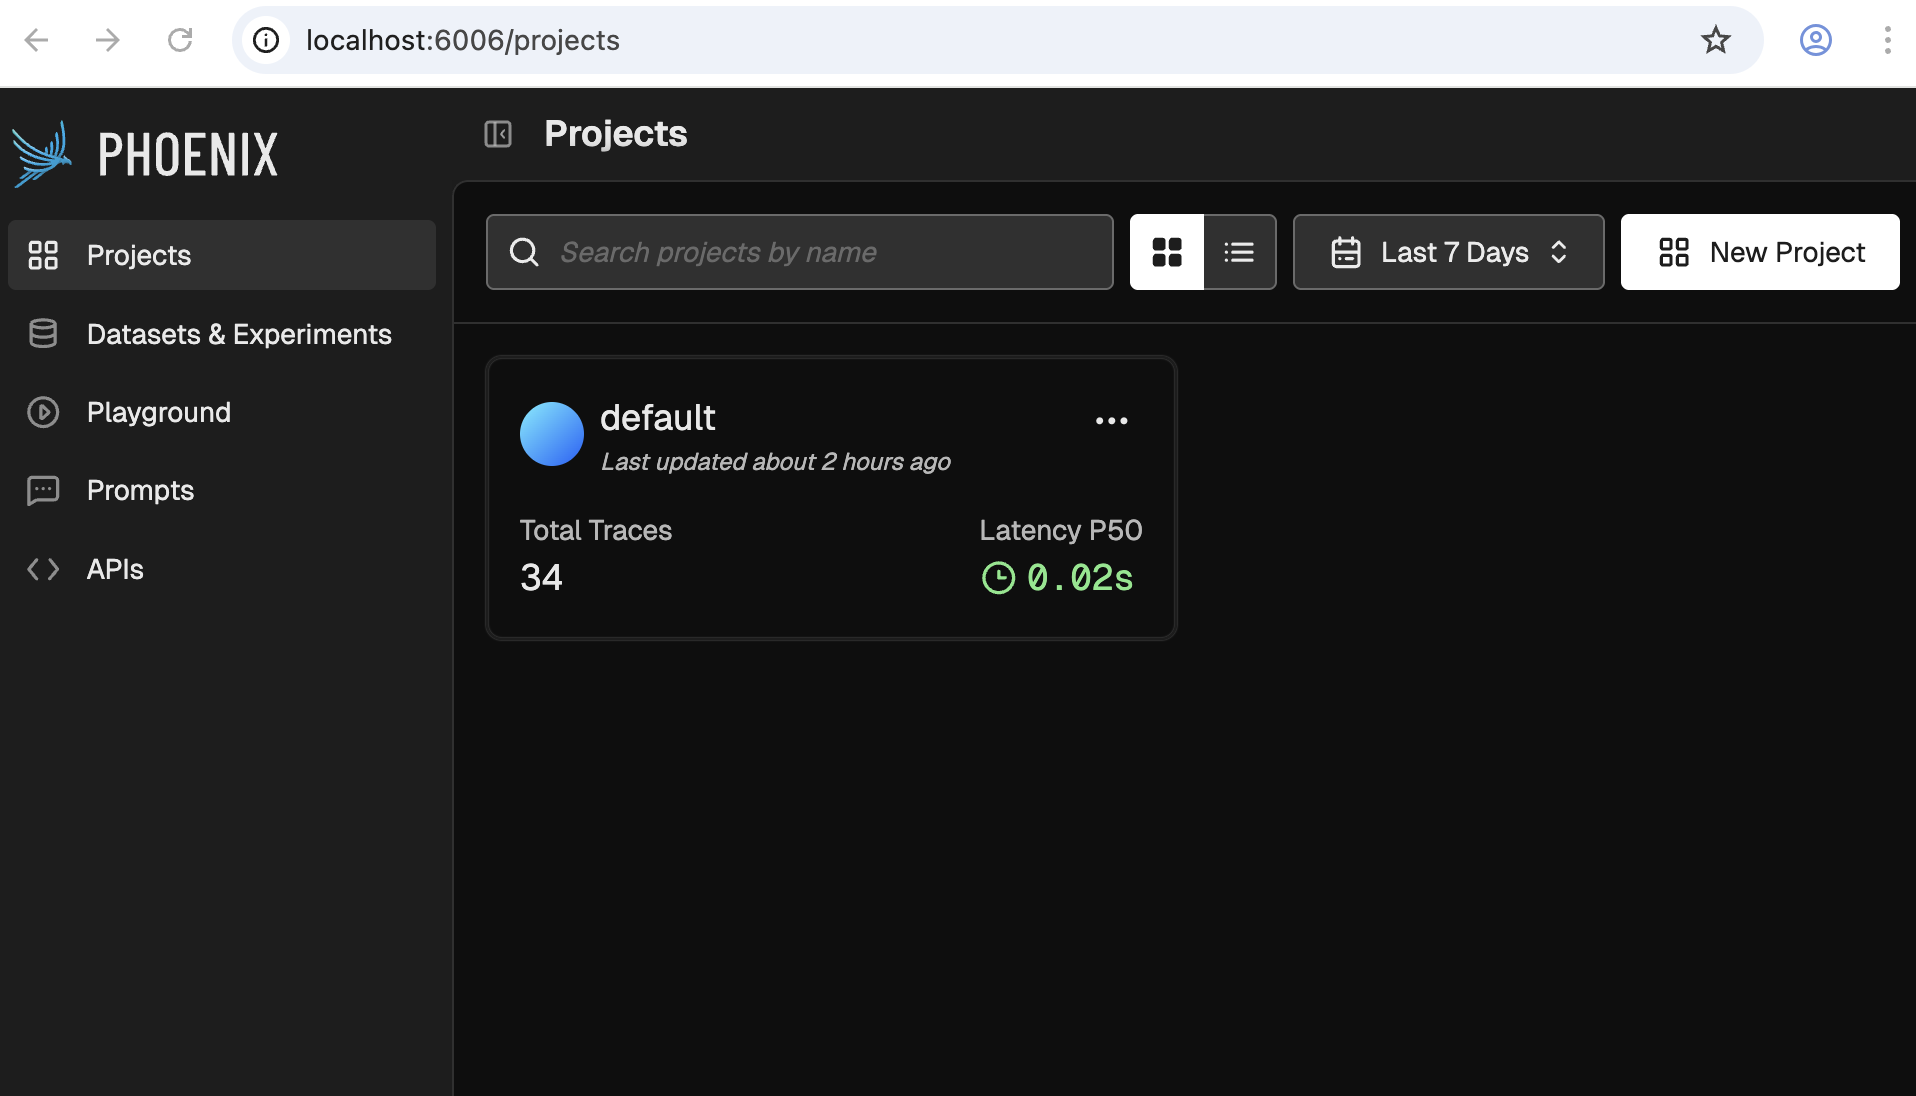
As documented on the dev-services.yaml file, when you run it, Phoenix's UI will be available at http://localhost:6006. It should look something like the following:
3. Talk to your agent
Follow the same steps you followed in the first tutorial to chat with your agent and generate some traces.
forma chat
4. Check some traces
We will use Phoenix for other things as well, but for now lets focus on Traces. For this, click on the one and only project available. You should see something like this:
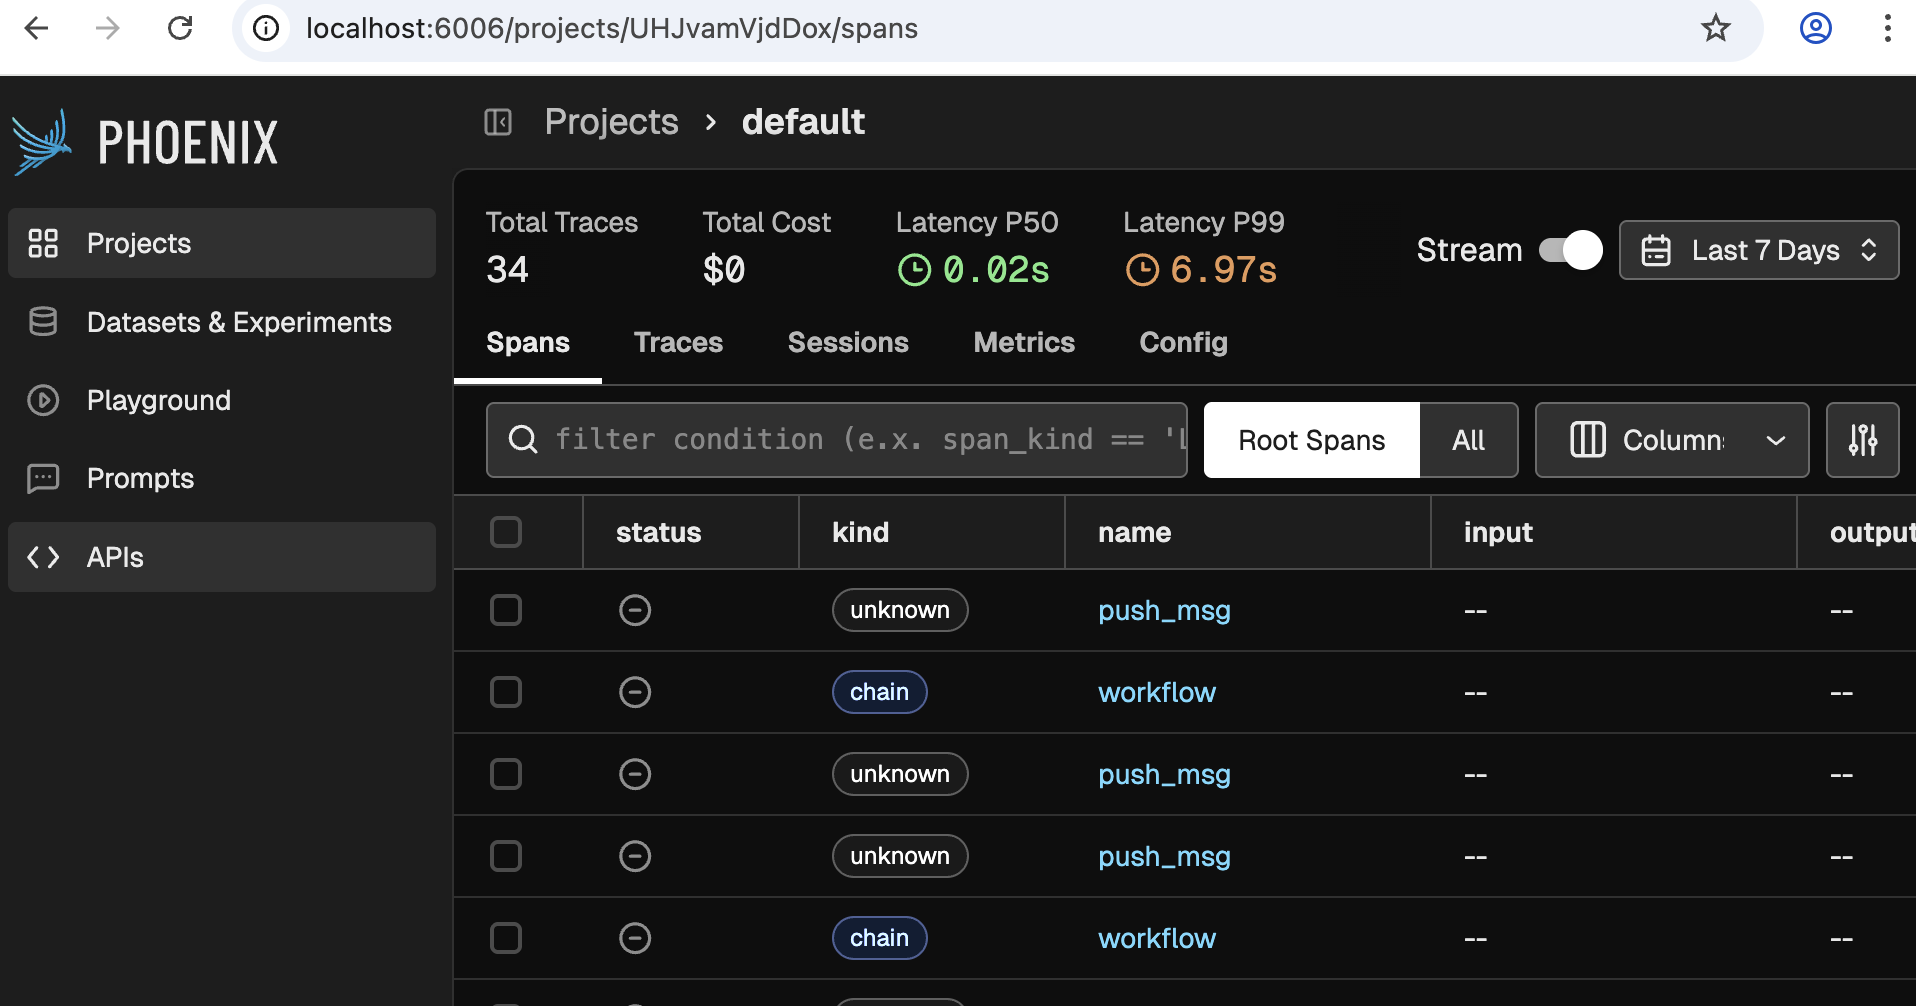
❗Note: If you do not see any traces, then you need to talk to your agent a bit more, or wait for a minute.
Now click on any of the rows that say 'workflow', and you will see something like the following come up:
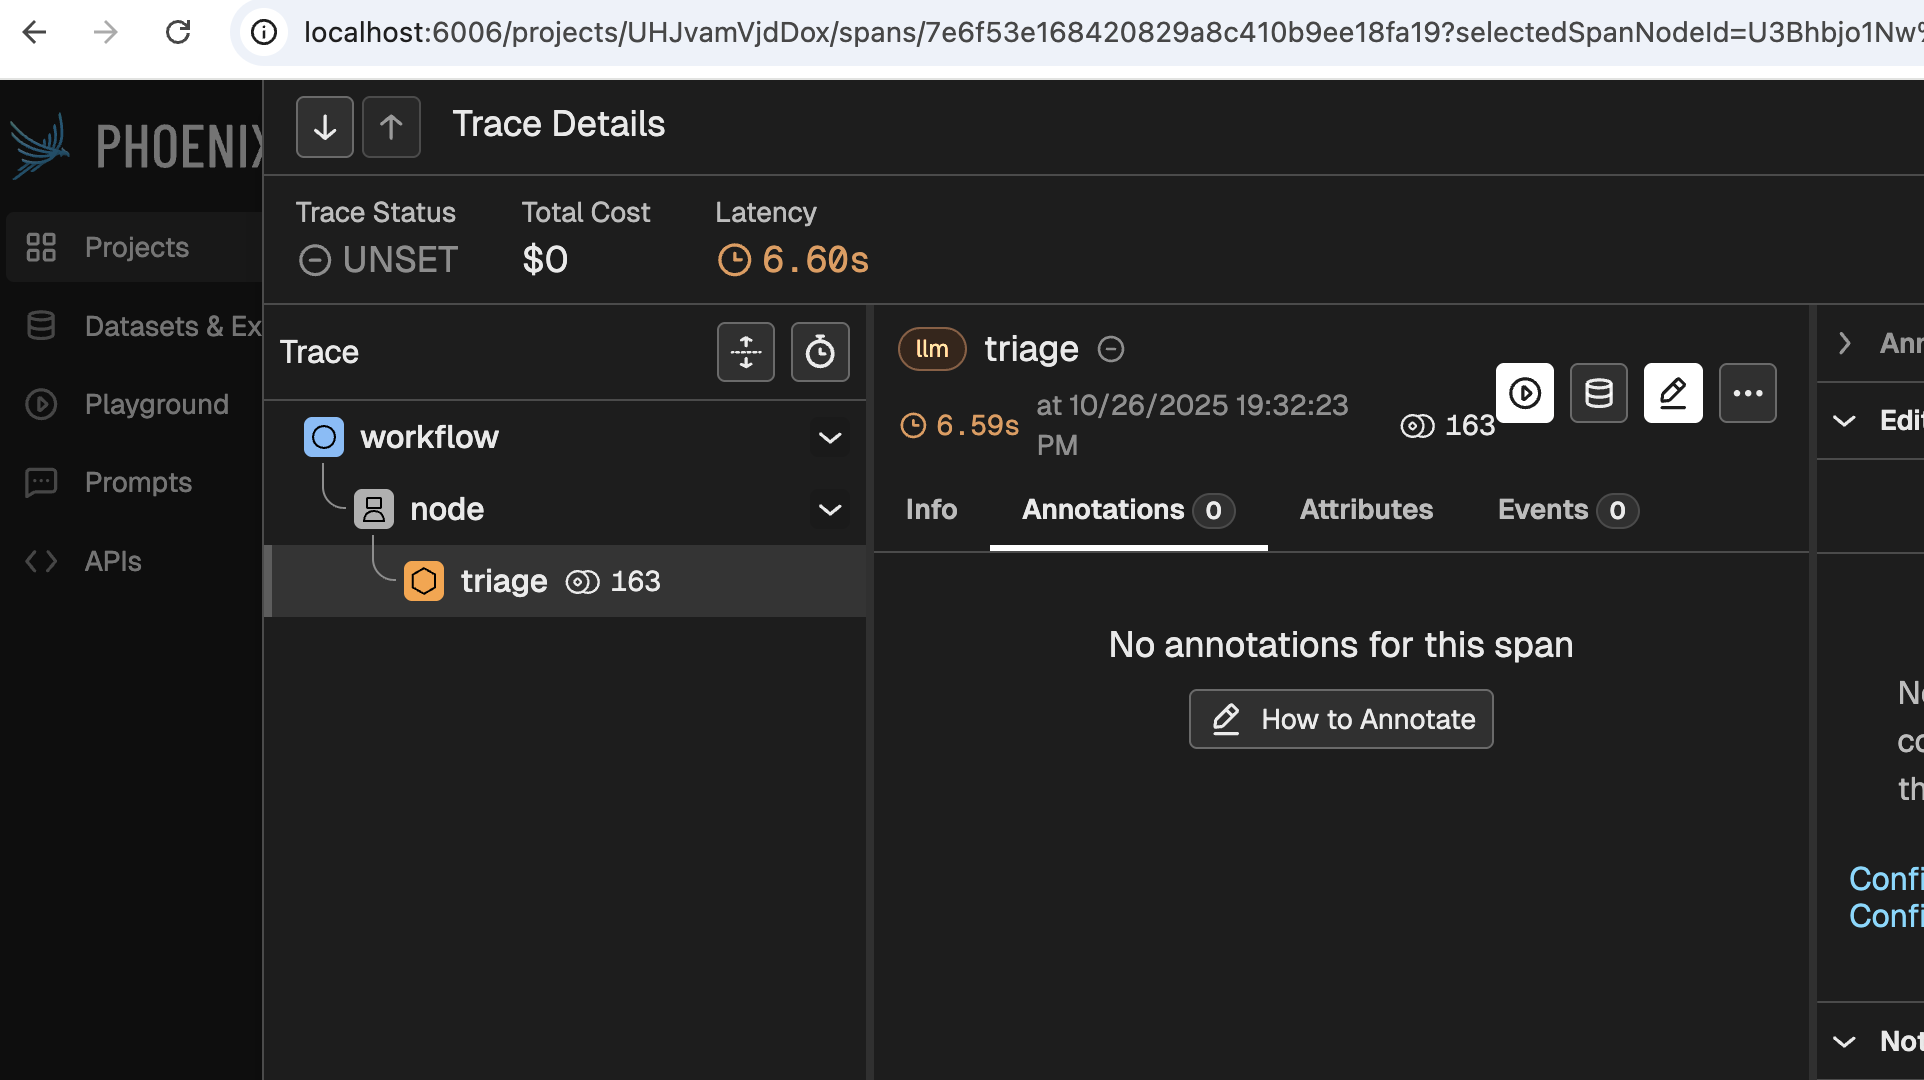
Even before clicking any buttons, this screen reveals a bit of its power. This simple image tells you is that:
- A workflow received the request, and handed it over to a node
- The node 'Triaged' the request.
- 163 tokens were used
- It took 6.6 seconds to process the request
Digging deeper would provide you with much more and valuable information, such as:
- What model was used for each stage
- What was the system prompt used
- Which agent made the call (useful for when you have multiple agents deployed)
- Which user and session does the message correspond to
- Which node processed each thing
- How much of the 6.6 seconds were spent on each step of the process
- Why did the model stop anseering (did it finish? did it reach a limit? was the response flagged as offensive?)
- etc.
🚀 Now we can safely scale Dory
With Observability in place, we can scale Dory without having to guess what it is doing. We can inspect its behaviour, improve it, and ultimately deploy it so our users can interact with it. Let's start this scaling in the next section.
Offline Evaluations
As you might have read in the Evaluations explanation, evaluations are fundamental for developing trustworthy and reliable AI Agents. Forma encourages people to run evaluations often. This tutorial aims to explain the workflow that Forma has envisioned for Evaluations.
In simple terms, an evaluation is a straightforward concept:
- You have a sample question
- You ask that question to your agent
- You then use some metric or rubric to decide whether the answer is good enough or not, and why (this will sometimes require having a sample output)
Forma can help us with these three steps.
Note: Offline evaluations refer to the evaluations run before deploying an AI Agent. They are different from online or continuous evaluation in that they can use pre-established datasets to compare actual vs expected answers. Continuous evaluation is still in development.
1. Use Personas to generate sample questions
For our current goal, Persona is no more than a roleplaying LLM. We tell an LLM "Pretend to be...", and they will send messages as if this was the case. We can leverage this for generating sample data.
AI Agents can be surprisingly good testers of other AI Agents as many of their flaws—like hallucinations and potential offensiveness—are not an issue when generating data. After all, users are allowed to be way more offensive and clueless than an AI Agent (because if the user does not understand quickly what the App is about, we blame the designer, not the user).
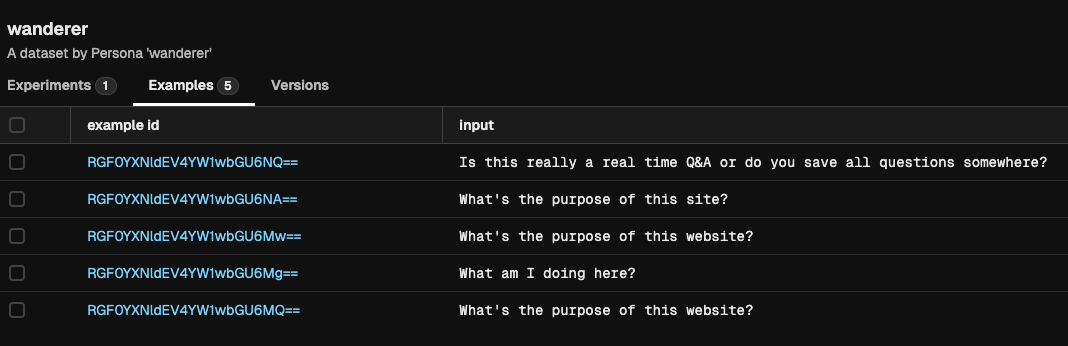
So, let's explore our first Persona. Open the file ./evals/personas/wanderer.yaml
llm:
  provider: ollama
prompt: You are a person who just landed on a
  website, and this website is just a chatbot. It is an
  empty canvas with a textbar saying "ask me anything"
  and a send button. When you get any message, just
  respond with what you would ask.
As you can tell, we are asking an LLM (ran by Ollama, in this case) to pretend to be a human who just happens to have landed in front of a Chatbot. What would your first reaction be?
So, we can generate some sample data by running:
forma tester -f wanderer.yaml -n 5
You will notice that the wanderer.json file contains a list of objects which only have an input field. Each of these examples can also contain an expected_output field, which may be used for contrasting them with the responses from your agent.
2. Upload the dataset to Arize Phoenix
You are probably familiar by now with the fact that Forma depends on other services to operate properly. The same service we used in the previous tutorial—called Arize Phoenix—helps us manage our datasets and also visualise results in order to know whether our changes have improved the agent or not.
So, let's get that service running (if you haven't already)
# You need to have docker-compose installed
docker-compose -f ./dev/dev-services.yaml up
And then upload the dataset we just created to it.
forma dataset-upload -f ./evals/data/wanderer.json
If you now go to the Phoenix Service (in http://localhost:6006/), you should see your dataset:
3. Test your agent with that dataset
Before using our wanderer dataset for running evaluations, we need to define this evaluation. We can define evaluations in different sub-components of the agent of the agent in order to perform more focused assessments.
In this case, we will evaluate the agent itself. This comes out of the box when you run forma init.
# Define evaluations down here
evals:
  - dataset: wanderer
    metrics:
      - template: $../evals/metrics/politeness.md
        llm:
          provider: ollama
You can go and check the politeness.md file, and you will notice that it uses the same templating system we were using earlier (see below to learn about the valid fields for evaluation templates).
With this in place, we can now run:
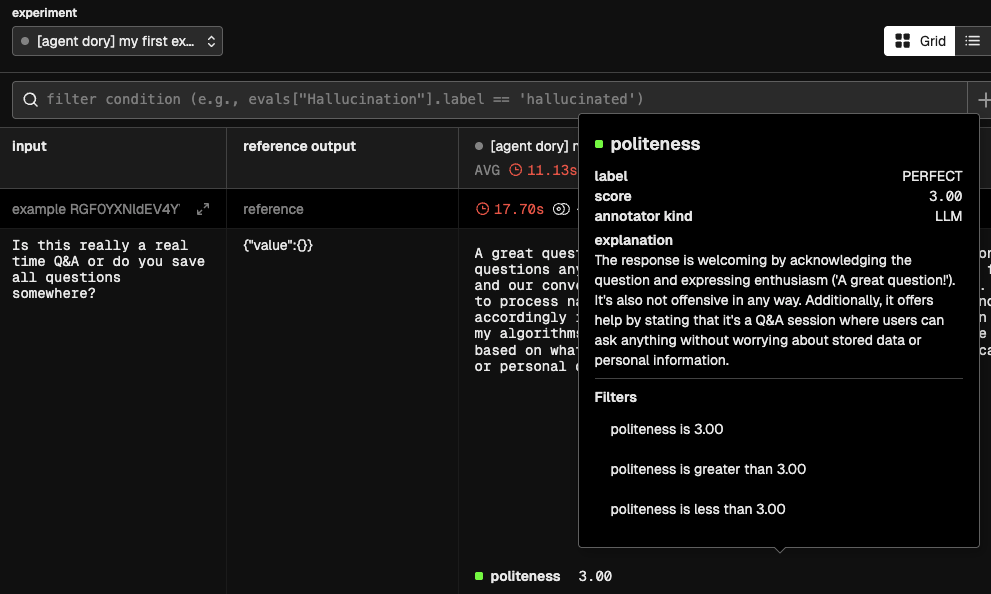
forma eval -e "my first experiment"
If you now go to the Phoenix Service (in http://localhost:6006/), you should see the results of the evaluation, including the metrics:
❓What is happening under the hood?
- The first step is to ask your Agent, Node or Workflow that will be evaluated to produce an answer. This is called the
actual_output. - Having generated the
actual_output, the metric template will be rendered. This template can contain only three fields:actual_output- Which will be replaced with the answer of the agent, node or other.input- Which will be replaced by the input, extracted from the dataset.expected_output- An optional value, that would also be extracted from the example.
- This new rendered template will be sent to an LLM of your choice, which will be asked to generate:
label- A single-word verbal equivalent of the score (e.g., 'Good', 'Bad', 'Hallucination'). Base this value on the instructions providedscore- The numerical value reflecting the quality of the evaluation, assigned as per the instructionsexplanation- A verbal explanation for the score and labels given
Workflows
As it was explained earlier, workflows are a mechanism to break down large tasks into smaller ones. The value of this is that our system instructions will be shorter and more focused, meaning that LLMs will behave in a more predictable manner. Let's revisit the original example:
Example
We can break down this:
Take this academic article and produce a blog post for 5th-graders,
in Spanish.

The content of the blog post should include a brief
introduction/motivation, a brief explanation of the methodology,
and an emphasis in the results and implications.

Your target audience is 5th graders, so do not use acronyms or jargon.
Use examples to make it more relatable.
Into these more focused steps
Create a list containing the (1) motivation; (2) methodology; (3) results and implications from the following paperWrite a blog post for 5th graders based on the following summary points. Explain the motivation, outline the methodology and emphasise the results and implications. Use examples to make it more relatable.Translate this blog post into Spanish. Keep the tone and length of the post.
I guess the motivation is clear enough. Let's get started.
1. Let's create a workflow
A workflow is a series of nodes that might or might not depend on each other. The way to express dependency is through Templates. This means that the system prompt of one node can reference another node (using its ID), indicating two things that the output of the referenced node should be injected into the system prompt if this node.
It will become clearer with an example.
Step 1 - Summarize (or make up) an article
For the sake of an example, instead of asking an LLM to summarize an article, let's ask it to invent one. Create a file called src/prompts/summarizer.md, which will contain the instructions for making up a study summary.
You are an expert con artist. Your job is to take any topic the
user gives you, and pretend that you performed a study about that
topic. You should respond by stating:

1. A title for the published reports
2. The motivation for the study
3. The methodology
4. And the results and implications

You should respond with just that information, without adding
ANY comments such as "here is the study".

Be brief.
Now we need to update Dory so that it uses this prompt.
id: dory
persist_sessions: true
start:
  nodes:
    - id: study-summary # We need to assign an ID
      llm:
        provider: ollama
      # You can delete the original "agent_prompt.md" file, if you want
      system_prompt: $/prompts/summarizer.md
So far, nothing much has changed. You have the same Dory but with different instructions. You can talk to Dory and it will do as we instructed.
📌 Note: We need to assign an ID, which we will use to reference the output of this node in subsequent steps.
Step 2 - Write a blog
Create a file called src/prompts/blogger.md, which will contain the instructions for the new node, in charge of writing blog posts.
Write a blog post for 5th graders based on the study summarized below.

Explain the motivation, outline the methodology and emphasise the results
and implications. Use examples to make it more relatable.

Keep it brief, aim for 2 paragraphs.


# Study

{{study-summary}}
📌 Note: Forma will replace the
{{study-summary}}field by the output of the node whose id isstudy-summary.
Now we need to update Dory so that it uses this prompt.
id: dory
persist_sessions: true
start:
  # Because we have multiple nodes, we need to
  # specify which one is the output. Multiple values
  # are also alloed
  output: blog-post # <-- Update this
  nodes:
    - id: study-summary
      llm:
        provider: ollama
      system_prompt: $/prompts/summarizer.md

    # Add the new step
    - id: blog-post
      llm:
        provider: ollama
      system_prompt: $/prompts/blogger.md
Feel free to chat to dory, and it should be writing blog posts
Step 3 - Translate
Create a file called src/prompts/translator.md, which will contain the instructions for the translation step.
Translate the following blog post into Spanish. Keep the tone and length of the post.

# Blog post

{{blog-post}}
Again, we need to update Dory so that it uses this prompt.
id: dory
persist_sessions: true
start:
  output: translation
  nodes:
    - id: study-summary # Update the output
      llm:
        provider: ollama
      system_prompt: $/prompts/summarizer.md

    - id: blog-post
      llm:
        provider: ollama
      system_prompt: $/prompts/blogger.md

    # Add the new step
    - id: translation
      llm:
        provider: ollama
      system_prompt: $/prompts/translator.md
2. Lets try it
Let's start our development services and talk to Dory
- On one terminal window or tab, run
docker-compose -f ./dev/dev-services.yaml up - On a different terminal window or tab, start the chat by running
forma chat
Then, propose a research topic:
The effect of Ant overpopulation over people's sausage consumption
The results will vary, but in my case, I got the following (predictably stupid) result:
La saga de los chorizos: cómo un problema picudo cambió las costumbres del asado
Imagina que estás realizando un asado en el jardín con amigos y familiares. Los chorizos salpiconados en la parrilla hueven increíblemente bien, pero espera – ¿crees que esos deliciosos links pueden estar influenciados por los invitados no deseados que se acampan a tus pies? Un estudio fascinante sugiere que sí, es posible! Los investigadores descubrieron que cuando las poblaciones de hormigas explotan en áreas suburbanas, cambian los hábitos alimenticios de las personas. Pero no te preocupes, ¡no es porque las hormigas se estén robando nuestros refrigerios (aunque parecen estar interesadas en los dulces)!
Según el estudio, las comunidades con infestaciones de hormigas más intensas dejaban de comer menos chorizos y más vegetales. De hecho, los hogares con cargas de hormigas vieron caer un 27% en la consumo de chorizos. Esto puede parecer un poco raro, pero piensa en ello así: tener muchas hormigas alrededor podría hacer que las personas se sientan más conscientes del medio ambiente y les estimule a cocinar comidas más saludables. ¿Quién sabe? Tal vez esas hormigas molestarte estén inspirando a nuestros padres (o nosotros!) para tomar mejor decisiones sobre la comida! ¡Eso es lo que llamo un giro emocionante en las costumbres del asado de siempre!
3. Check what happened
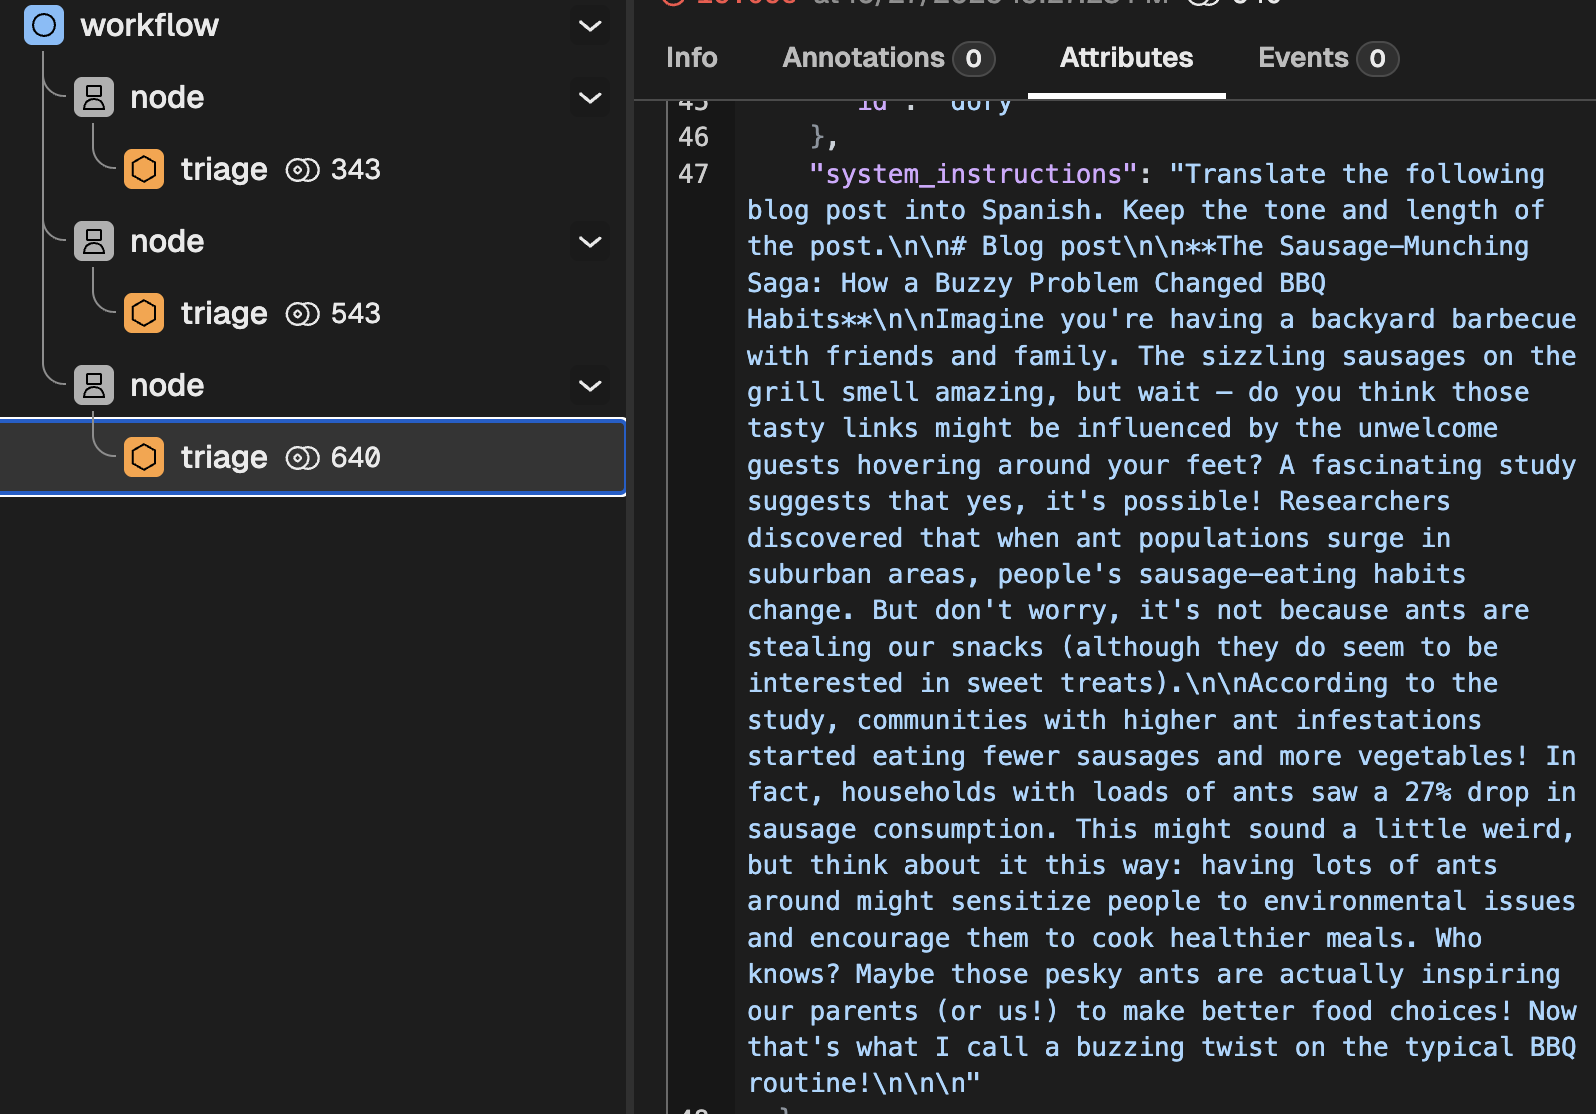
Go to http://localhost:6006/ and check the trace named workflow.
You should see something like this
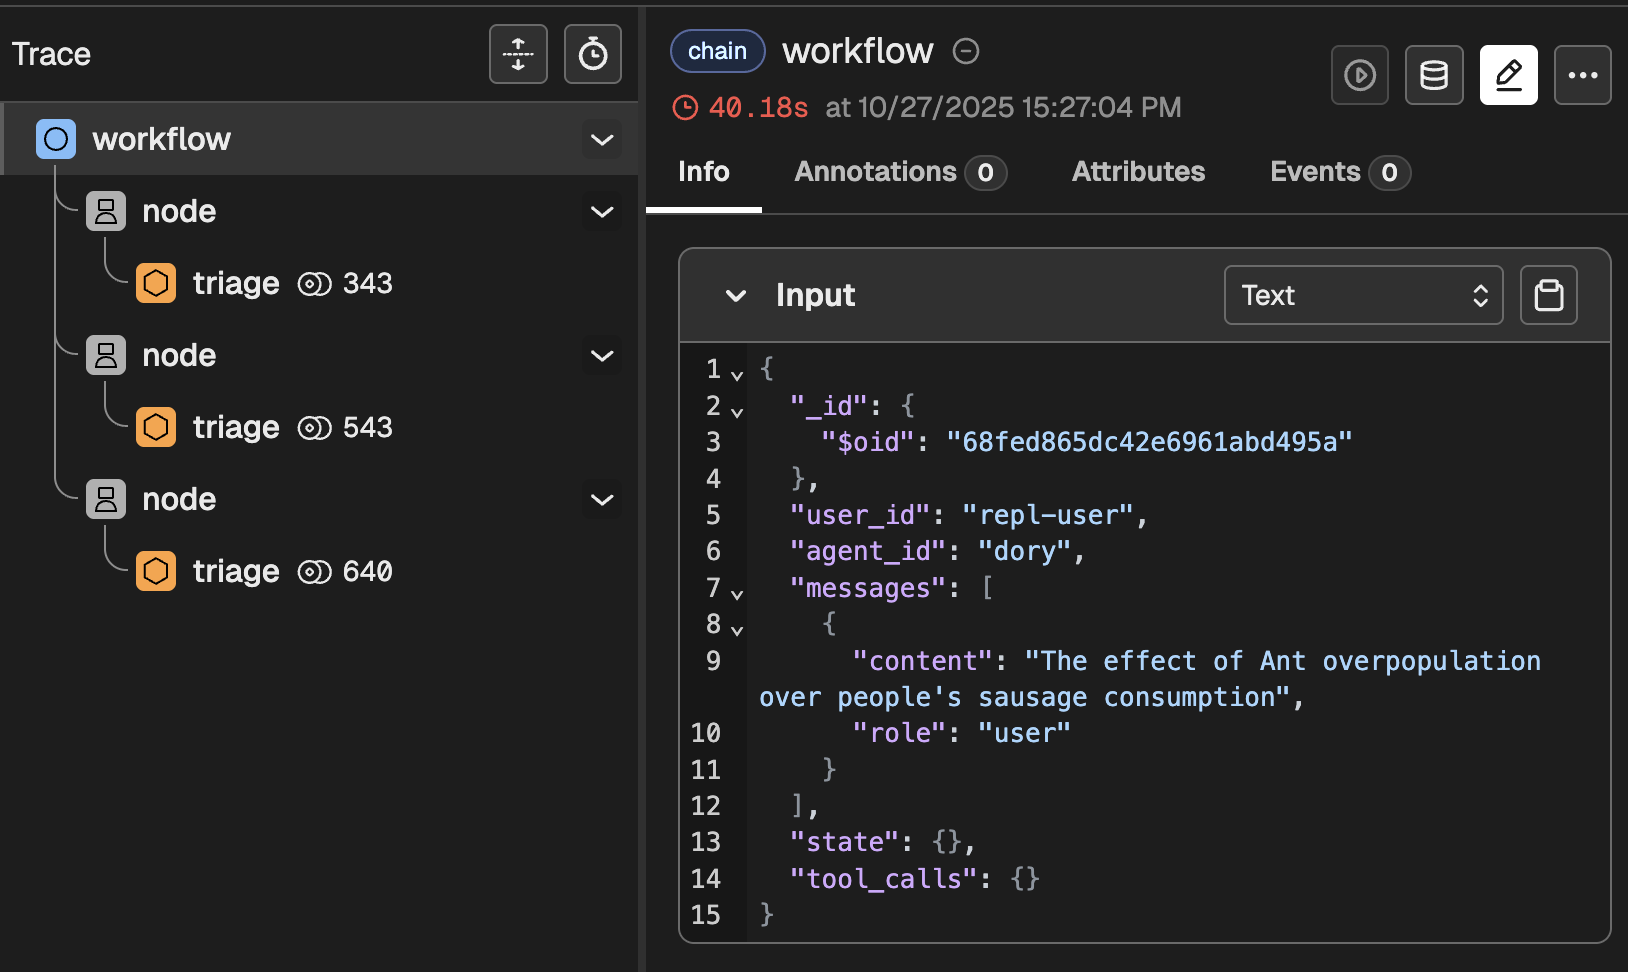
This clearly indicates that, as expected, three nodes ran in series. If you dig a bit deeper, you will find things like:
- The intermediate results produced by each node
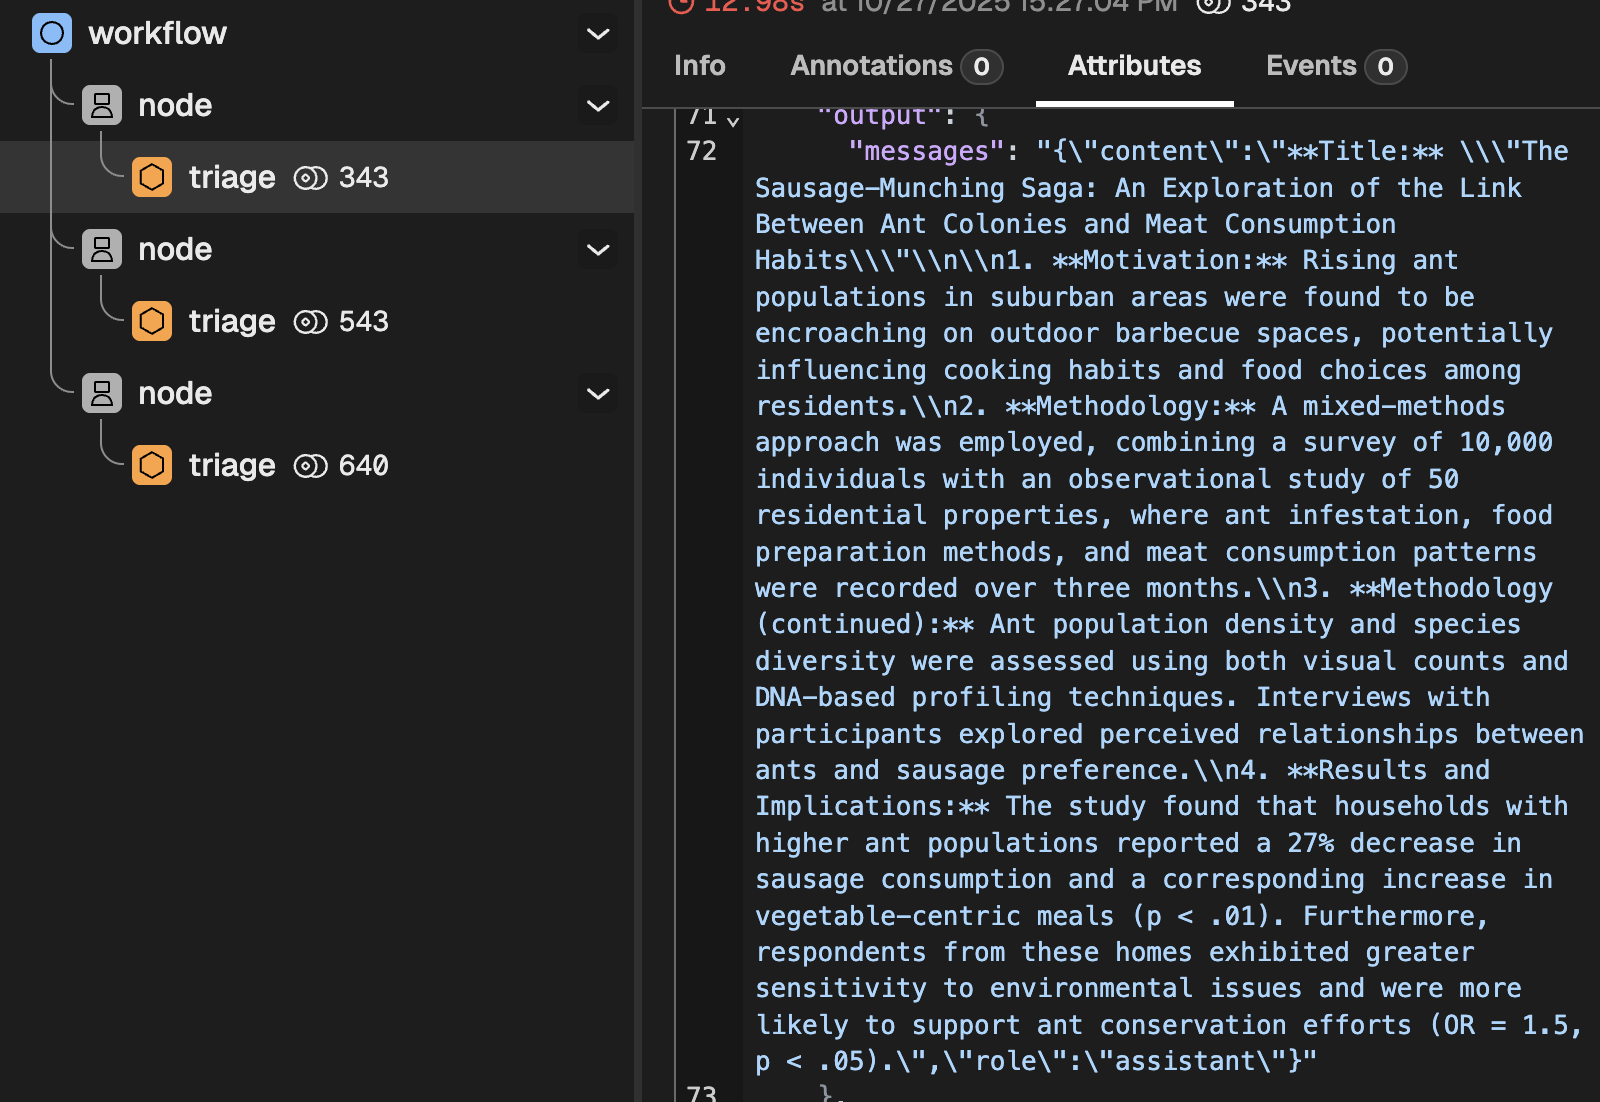
- The rendered system instructions
📌 Up next: templates
This tutorial introduced templates. Before we jump into Tools, we need to dig a bit deeper into that. Go to the next section to learn all about them.
Templates
Templates work by replacing a Template Field with the value of a variable with a certain Field name. And it is very simple:
If you have a variable some-variable=2, and a template saying I have {{some-variable}} apples, rendering the template will give you I have 2 apples. That is all, simple and predictable.
There are two main situations where templates become very useful:
- Using dynamically generated content (e.g., the response of one agent) as part of the input to another Agent or LLM.
- Defining reusable blocks of instructions to avoid writing the same thing multiple times
Forma only allows for the first use case, and does not support reusable blocks of instructions (more on this later).
Templates for dynamically generated content
Templates can include fields for dynamically generated content. For example, you can have a node called descriptor that produces a short product description; and then a node pr-expert in charge of adapting it so that it matches the tone and style of your company.
Imagine your descriptor is given the following isntructions.
Users will send you a picture. Your job is to describe the
product in such picture.
And then your pr-expert will be given the following instructions:
You are a PR expert, in charge of improving product descriptions
so that they match the following guidelines:

1. No emojis
2. Always describe in a positive tone

We need you to improve the following description:

{{descriptor}}
Naming nodes and fields
Template fields are identified by variable names. While not very limiting, these names need to follow a few simple rules:
- Must start with a letter (a–z or A–Z) or an underscore (_).
- Can contain letters, digits, underscores (_), and dashes (-).
- Cannot start with a digit.
- Cannot contain spaces, dots, or special symbols (like $, %, /, .).
Here are some examples:
| Variable Name | Valid | Reason |
|---|---|---|
world | ✅ | Simple lowercase name |
_user | ✅ | Starts with underscore |
big-world | ✅ | Dashes are allowed |
user_123 | ✅ | Numbers allowed (not at start) |
HelloWorld | ✅ | Uppercase letters allowed |
1world | ❌ | Cannot start with a digit |
user name | ❌ | Spaces not allowed |
user.name | ❌ | Dots not allowed |
user/name | ❌ | Slashes not allowed |
$user | ❌ | $ not allowed |
Describing fields
Sometimes it is very useful to communicate to people or LLMs what the different fields are supposed to be. For instance, when executing a Workflow as a tool, this Workflow is given an input_prompt. This is a template that will be rendered and used as the first message received by said workflow, and an LLM will need to dynamically generate all the variables needed to fully render this template. Giving this LLM some information about what the fields are makes them behave much more reliably.
Fields can be fully described within a template using the following syntax:
{{name:optional-type "optional-description"}}
Where:
nameis the mandatory field name, as described above.typetells us what kind of value is expected (e.g., an int? float? string?). If not given, it is assumed to be a string.descriptionis just some free text that will tell the LLM or the user what this is meant to be
The following are the valid types:
| Type | Description | Examples |
|---|---|---|
string | Any text text | "car", "bananas with syrup" |
number | Any number | 1, 31, 99.2123 |
int or integer | An integer number | 2, 212 |
bool or boolean | True or false | true, false |
The following are examples of valid and invalid fields
| Template Expression | Valid | Reason | Type |
|---|---|---|---|
{{ world }} | ✅ | Basic variable, with no type. Defaults to string. | string |
{{ name:string }} | ✅ | Includes a type | string |
{{ age : int }} | ✅ | includes valid type | int |
{{ name:string "Full name" }} | ✅ | Includes optional description | string |
{{ is_big:bool "Is larger than 3 elephants?" }} | ✅ | Underscore prefix and description | boolean |
{{ 1world }} | ❌ | Invalid name | -- |
{{ user:"string" }} | ❌ | Type should not be quoted | -- |
{{ world: string "Mismatched quotes }} | ❌ | Missing closing quote in description | -- |
{{ age : ints }} | ❌ | Invalid type | -- |
❌ Why not reuse blocks of instructions
Some frameworks have a very powerful prompt templating system, which allows users to reuse pieces of prompts in several places. Forma does not really do that, on purpose. The reason is that this makes it harder to audit AI Agents. Take the following code as an example:
import llm
from prompts import tone_and_style, safety

prompt = f"""
You are a customer service agent. Your job is to help customers
achieve their goal.

{tone_and_style}
{safety}
"""

llm.chat(prompt, "hello!")
This syntax is appealing. It looks neat and modular. And yet, ask yourself:
- What will be the exact prompt that the LLM will receive?
- Do you know if the
tone_and_styleand thesafetyblocks have a header? - Are they both written in Markdown?
- Do they have blank lines at the end?
- Do they start with a "You are a..." section?
You can go and check these files, of course, but that introduces friction and the risk of having incoherent overall instructions.
In summary, Forma avoids this because:
- Prompts are not modular code — they are natural language instructions that need to make sense as a whole.
- The final rendered prompt must always be auditable, reproducible, and human-readable.
- Reusable “blocks” create hidden dependencies that make debugging, auditing, and comparing behavior much harder.
Introduction to Tools
Tools are the instruments that allow an AI Agent to do things, rather than just read and write text. By giving an Agent access to tools, you effectively transform it into a user interface. You can now use natural language to send emails, check the time, read a database and summarise the results, and much more. Depending on how you design your agent, you might want to give it permissions to do things without you asking (e.g., as a reaction to specific pictures being uploaded).
Before jumping into a hands-on tutorial, you need to remember the following concepts:
- A tool is just a normal programming function that receives certain arguments, and returns a value.
- LLMs cannot call tools, they can only decide which function should be called, and what the arguments should be. This means that we can add additional safeguards before calling a tool (e.g., role-based permissions)
- The decision to call a tool is based on both its name and description. We need to give LLMs this information so that they decide when and if a tool should be used.
- LLMs do not know what happens within the tools, and they do not need to. If a model chooses to use the
get_product_descriptiontool, that function could talk to another agent, fetch information from a database, or even return some mock/fake data. The LLM only needs to know what the tool achieves, not how. - Calling tools is optional, meaning that there is no guarantee that a specific tool will be ran (this is the opposite of the case of Worlfkows, where all nodes are guaranteed to run)
Tools in Forma
By design, Forma does not let you define arbitrary functions directly as tools. Instead, it exposes built-in connectors that act as bridges to your actual logic. For instance, you can use an open-api-tool to make HTTP requests to any endpoint. This is perfect for connecting to your own APIs, cloud functions, or serverles actions.
As mentioned earlier, an LLM needs three piecs of information to decide when and how to use a tool:
name- The name of the tooldescription- A description of the tooltool- The tool itself, which will require:type- the Type of tool (there is a finite number of tool types)- ... Other arguments specific to the tool.
Within the tool itself, Forma always requires type, which lets it know which specific tool you are defining.
Tutorial time - Let's define our first tool
So far, our version of Dory (from the workflows tutorial) can only do one thing: It receives a research topic, and produces a blog post in Spanish. But we know Dory can do more! So let's turn this functionality into a tool and give Dory the choice to use it or now.
We use a workflow tool for this. A workflow tool executes a workflow just like before, except that it does not receive the conversation context. Its output depends exclusively on the arguments passed to it.
But, if it does not receive the users' messages, what does the workflow tool respond to? Well, it receives a single message with whatever you define in the input_prompt field. This will become clearer once you follow the tutorial and then check the traces and logs.
1. Place the main workflow into its own file
While you could just extend our agent.yaml file, it will easily become hard to read. Let's avoid this by creating a file called ./src/tools/generate_blog_post.yaml. In this file we will pass the information we mentioned earlier: name and description of the tool, and the tool itself.
# ./src/tools/generate_blog_post.yaml
name: write-blog-post
description: writes great blog posts about research topics that the user wants, in Spanish
tool:
   # Specify the tool and the arguments
  type: workflow
  input_prompt: write a blog post about '{{research_topic:string "the research topic chosen by the user"}}.'
  ## From here and on, this is the exact same workflow we had before
  output: translation
  nodes:
    - id: study-summary
      llm:
        provider: ollama
      system_prompt: $/prompts/summarizer.md

    - id: blog-post
      llm:
        provider: ollama
      system_prompt: $/prompts/blogger.md

    - id: translation
      llm:
        provider: ollama
      system_prompt: $/prompts/translator.md
As you can see, this file contains almost the exact same workflow we had before, with the addition of two fields:
type- This indicates to Forma what kind of tool you are defining. The LLMs are not aware of this field and do not use it.input_prompt- This specifies the message that this workflow will receive. It uses the Template syntax explained earlier.
💡 Example: In this case, if the LLM decides to call this tool using the research topic "gravity in the star wars universe", the message that this workflow will receive (and respond to) will be "write a blog post about 'gravity in the star wars universe'."
2. Register the tool with Dory
We will go back to our simplest Dory (although, with memory), and we will add a tool to its node.
id: dory
persist_sessions: true
start:
  nodes:
    - llm:
        provider: ollama
      system_prompt: You are a helpful assistant
      tools: # <-- Tools to the Node (not workflow, agent, or llm)
        - $/tools/generate_blog_post.yaml # <- Point to our newly created file
With this, Dory no longer has to produce a blog post every time. It can now choose to use this tool when appropriate.
3. Run it and check the traces
Chat to Dory! First greet it, then ask for a research blog post. You should notice two completely different behaviors (as reflected in the image below, showing the traces).
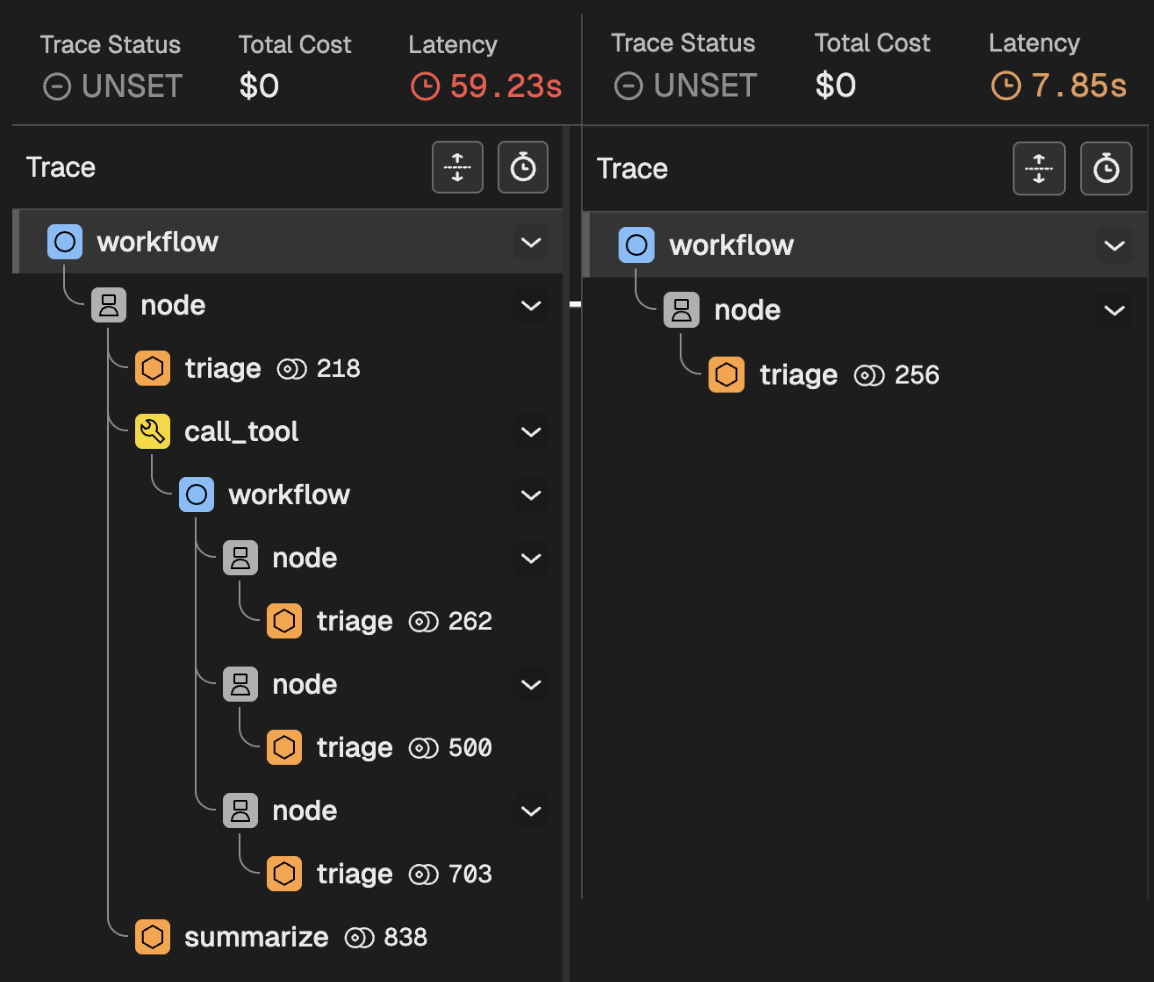
When you greet Dory
When you greet Dory:
- Your message enters the main workflow
- The message reaches the first and only node
- Nodes are predictable: They first Triage calling an LLM, who whether whether to call a tool.
- The LLM decided not to call a tool, and just respond quickly.
When you ask for a research blog post
When you ask for a blog post:
- Your message enters the main workflow
- The message reaches the first and only node
- The node Triages making a request to the LLM.
- The LLM decides to call the Workflow tool, which means:
- Your message enters the workflow of the tool
- The three internal nodes are executed
- The output is returned to Dory
- Dory takes the result of the Workflow tool, and writes a response to you
Conclusion
What you are seeing here is a key element of sophisticated AI Agents in Forma. While woorkflows let you break down big tasks into several smaller and more focused ones, tools let AI Agents decide what to do. On top of letting agents interact with external systems, tools are also routers that Agents can use to process requests in completely different ways depending on the input and its instruction.
Available tools
Check the list of tools in the Reference Documentation.
Deep dive into tools
The following contents assume you have read the Getting Started section. If not, please do start there.
Role Based Access
Role-based access is a feature that allows you to let some users do some things that other users cannot do. This is already very common on web applications, where developers assign Roles to users for cost, security or other concerns. For instance, you can have a role called free-tier-user which grants permissions to a subset of features. Similarly, an admin role might let users read/write data from a datbase that is inaccessible by other users. Forma allows you to implement Role-based-access for the tools in your agent.
Note: as mentioned in the architecture section, Forma will not authenticate your users. A different component within your application should make sure the permissions and user ID given to forma are real.
How it is implemented
Forma will handle the Role-based acess in the following way:
- You provide the roles of the user in the header of the request, follows:
curl -H 'X-User-Roles: paid-user,admin' .... (If no roles are provided, the user is assumed to have NO roles and thus they won't have access to any tool that is restricted.) - Forma parses those, and—at every triage-stage of each node, at run time—will select the tools available for users with the specified roles.
- A request is made to the LLM including only this subset of tools.
- The path follows as usual
This approach intends to eliminate the chances of an LLM calling a tool that should not be allowed to the user. An alternative could have been, for example, to add an instruction saying something like "this user is in the Free tier, they do not have write access", but this is not reliable enough for a security-sensitive application.
Another consequence of this is that, if a user intents to call a function they have no access to (e.g., a free-user asking for a paid feature), there will be no error. Forma will simply eliminate the restricted tools when asking the LLM to choose an action, and the LLM will not even be aware that such a tool exists.
Limiting access to tools
Restricting the use of a tool to specific roles is as simple as passing the just_for field to it. Let's remember the blog-writer agent we developed earlier.
name: write-blog-post
description: writes great blog posts about research topics that the user wants, in Spanish
just_for:           # Add this!
   - blog-writer   # And this!
   - admin          # And this!
tool:
  # ... the rest of your tool
The above means that a user with EITHER blog-writer ORadmin roles will be able to call this tool. Other users will not.
Indicating the user's roles in production
To indicate this you would make a request as follows:
curl -X POST -i http://localhost:8080/v1/chat \
  -H "Authorization: Bearer key-not-for-production" \
  -H "X-User-ID: user-id" \
  -H "X-Session-ID: session-id" \
  -H "X-User-Roles: admin, another-role" \
  -H "Content-Type: application/json" \
  -d '{"content":"write me a blog post, please!"}'
Note: again, Forma will not validate neither the user ID nor the roles. You should have a separate service do this before calling Forma.
Impersonating roles during development
When running forma serve, you are emulating a production server and thus you should pass the roles using the X-User-Roles header.
When using forma chat, on the contrary, you essentially "start a session as a user with roles". You do this by passing the flag --roles role-1,role-2.
More on Evals
The intro to evaluations covered the basics of evaluations in Forma. To summarise, it consists of:
- Create a dataset (the
forma testercommand can help create it) - Upload the dataset to Phoenix (for now, the only supported eval framework) using the
forma dataset-uploadcommand - Run evaluations using the
forma evalcommand.
There is more to evaluations than that, however. This section provides more details on Evaluations, including creation and maintenance of datasets.
Arize Phoenix
Arize Phoenix is an open-source llm tracing and evaluation project. Forma does not make use of all of its features, but it heavily relies on it nonetheless. Specifically, Phoenix will:
- Store datasets
- Allow you to edit and extend datasets
- Visualize the results of evaluations
- Store different experiments
📌 Note that, in the future, the plan is to recommend developers to share deployed version of Phoenix so that everyone in the team has access to the latest datasets; and that they are used for evaluation purposes in Devops workflows. For now, we use it locally.
Datasets
A dataset is no more than a set of prompts that will be used to test and assess the quality of an AI Agent.
Datasets have a name, a description, and the data with which to test. These can be created manually, or with the help of the forma tester command. This is the short user manual:
Asks the 'personas' (aka, virtual testers) to create a dataset of questions

Usage: forma tester [OPTIONS] --file <FILE>

Options:
  -p, --path <PATH>                The path where the 'personas' descriptions are kept [default: ./evals/personas]
  -f, --file <FILE>                The name of the 'persona' file within the given path
  -o, --output-path <OUTPUT_PATH>  The relative path of the output dataset file [default: ./evals/data]
  -n, --n <N>                      The number of questions to try [default: 5]
  -h, --help                       Print help
For instance, let's examine the dataset we created in the intro to evaluations, using the command
forma tester -f wanderer.yaml -n 5
This generates 5 datapoints using the wanderer persona. The file is in the default location (./evals/personas) and the output file will go in the default destination (./evals/data). The file looks like this:
{
  "name": "wanderer",
  "description": "A dataset by Persona 'wanderer'",
  "data": [
    {
      "input": "What is the purpose of this conversation?\n"
    },
    {
      "input": "Who created this site?\n"
    },
    {
      "input": "Is this AI being monitored or is it generating responses independently of human oversight?\n"
    },
    {
      "input": "What's the purpose of this site? Is it some kind of game or a real person behind this?\n"
    },
    {
      "input": "Who created this website?\n"
    }
  ]
}
This dataset can be uploaded to Phoenix by using the command forma dataset-upload. For instance:
forma dataset-upload -f ./evals/data/wanderer.json
With this dataset in place, you can now run evaluations and the dataset can be shared with other people.
Evaluating different parts of an AI Agent
As explained earlier, Forma agents are made up of 4 basic components:
- LLMs
- Nodes
- Workflows
- The Agent itself
Sophisticated agents can have several workflows, nodes, and call LLMs multiple times with different instructions and contexts. While Forma allows you to evaluate the agent as a whole (by simply adding an evals section in the agent.yaml file), it also allows for evaluating each component separately.
Identifying evaluatable components
In order to see all the components within the agent that can be evaluated, you should use the command
# Use the -f argument if your agent is not in the expected default location
forma eval --list
It should print a list with every "evaluatable" element, and the number of evaluations and metrics in each. Here is an example:
Agent
  - dory [1 evals | 1 metrics]
Workflows:
  - wbd4ddee-169f-4e42-9c1a-668b95827eb0 [0 evals | 0 metrics]
  - w8bf8185-2426-4991-8ab4-1174180d0d8e [0 evals | 0 metrics]
Nodes:
  - root [0 evals | 0 metrics]
  - study-summary [0 evals | 0 metrics]
  - translation [0 evals | 0 metrics]
  - blog-post [0 evals | 0 metrics]
LLMs:
  - study-summary.llm [0 evals | 0 metrics]
  - blog-post.llm [0 evals | 0 metrics]
  - root.triage-llm [1 evals | 1 metrics]
  - translation.llm [0 evals | 0 metrics]
  - root.summarize_llm [0 evals | 0 metrics]
📌 Note that not all elements have evaluations... this will be important later
📌 Also note that the workflows have a very horrible ID. This happens because, when Forma sees an element without an ID, it assigns one for it. Always assing IDs to any nodes you want to evaluate, as they change every time you load the agent.
Selecting what to evaluate
Running ALL evaluations can be long and tedious. While developing, you are most likley to know what you need to fix and iterate on that. This is why Forma allows you to run evaluations at a per-element basis. For instance:
📌 Note that the following examples use the
--dry-runor-dargument. This is meant to help you check what will be evaluated before you evaluate anything.
# Evaluate just the agent as a whole
forma eval --dry-run --agent
forma eval -d -a # <-- this also works

## Evaluate Workflow with ID = 'my-workflow'
forma eval --dry-run --workflow my-workflow
forma eval -d -w my-workflow # <-- this also works

## Evaluate node with ID = 'blog-post'
forma eval --dry-run --node blog-post
forma eval -d -n blog-post # <-- this also works

## Evaluate the triage LLM of the node with ID = 'root'
forma eval --dry-run --llm root.triage-llm
forma eval -d -l root.triage-llm # <-- this also works
📌 Note that when you define LLMs, they do not have IDs. They are part of a node, and their name will be
<node-id>.llmif the node does not have tools; or<node-id>.triage-llmand<node-id>.summarize-llmit it has tools (because it will often follow the Triage/Summarize behaviour).
You can also compound multiple filters by doing something like:
# Evaluate the agent as a whole AND ALSO workflows called my-workflow and my-other-workflow
forma eval -d -a -w my-workflow -w my-other-workflow
📌 Also note that using the filters to target any element that does not have evaluations WILL THROW AN ERROR
Evaluating
Now, for evaluating you just need to use the same command as before, but without the --dry-run parameter, and providing a value to the --experiment_name or -e parameter. The experiment name will help organise the evaluation results in a way that you can later compare the effect of your changes against what you previously ran.
# Note that we removed the -d
forma eval -a -w my-workflow -w my-other-workflow -e my-first-eval
After the evaluation is done, you should be able to see the results in the Phoenix UI.
Forma Agents' API Key
At present, Forma agents do not authenticate users. It is the calling service who should do that, get the ID, and then pass it along with the session id. However, Forma agents can require an API Key of your choice. You can opt out.
The steps to set an API key are the following:
1. Configure your Agent.
By default, agents will require an API Key. If you want to opt out, you need to enable the flag client.no_api_key: true
id: dory
client:
    no_api_key: true # <-- THIS
start:
  nodes:
    - llm:
        provider: ollama
      system_prompt: $/prompts/agent_prompt.md
2. Assign an API Key
If enabled, Forma will be expecting an environment variable called FORMA_AGENT_KEY to be available. This can be set in your .env file during development, and however you prefer in production. For example:
# Example of an API Key in an .env
FORMA_AGENT_KEY=key-not-for-production
3. Make requests
When making requests, make sure you add your API key using the API Key. For instance:
curl -X POST -i http://localhost:8080/v1/chat \
  -H "Authorization: Bearer key-not-for-production" \
  -H "X-User-ID: user-id" \
  -H "X-Session-ID: session-id" \
  -H "Content-Type: application/json" \
  -d '{"content":"hey"}'
Authenticating to LLM Providers
This is a work in progress as, more than authenticating to LLMs themselves, the approach is to authenticate to their provider.
API Keys
Some providers require API Keys. When this is the case, your API key should be available as an environment variable for Forma to look up. The name of the variable is specified on their own docs.
Other platforms
I am currently working on authenticating for Google... work in progress.
Observability and Monitoring
Observability is built into every Forma container image.
By default, agents ship with OpenTelemetry instrumentation, extended with OpenInference standards.
This means:
- You can send traces, logs, and metrics to any OTEL-compatible backend (Grafana, Tempo, Datadog, etc.).
- You can analyze AI-specific traces with Phoenix Arize.
- You can integrate Forma agents into your existing observability stack with no additional coding.
What you will collect
- Traces – Each request and workflow execution is traced, including LLM calls and tool invocations.
- Metrics – Counters and histograms for request counts, latencies, and error rates.
- Logs – Structured logs at configurable levels (
trace,debug,info).
We intentionally do not log our dependencies (like LLM provider SDKs). Instead, we propagate their errors and report them in a clean, standardized way. That way, your logs reflect your agent’s behavior, not library internals.
Configuration
You can configure observability via environment variables when running your container.
OTEL Collector
Point your agent to an OpenTelemetry Collector (local or remote):
# gRPC endpoint (default)
export OTEL_EXPORTER_OTLP_ENDPOINT="http://localhost:4317"

# Optional: separate metrics endpoint
export OTEL_EXPORTER_OTLP_METRICS_ENDPOINT="http://localhost:4317/v1/metrics"
Log Levels
Control the verbosity of Forma logs with FORMA_LOGS variables:
export FORMA_LOGS=info # or debug | trace | warn | error | info (default)
trace– Most detailed, includes every span and step.debug– Useful for development; shows workflow decisions and tool calls.info– Production-friendly; high-level events and errors only.warn- logs warnings and errorserror- logs only errors
Quick Start with Phoenix
If you want to analyze AI-specific traces:
- Run a local Phoenix Arize instance (Dockerized).
- Point OTEL_EXPORTER_OTLP_ENDPOINT to it.
- Interact with your agent and watch traces appear in Phoenix.
AI Agents
Client application examples
I believe that examples should not just be templates and copy/paste solutions. They should also explain how things are done.
So, all the resulting code in these examples can be found in this repo, but still, you can find exlanation of how they are meant to be setup.
Front-end examples
| Use Case | Streaming? | Protocol | Session |
|---|---|---|---|
| NextJS Chatbot | Yes (SSE) | AI-SDK v5 | Client |
| NextJS Chatbot + DB | Yes (SSE) | AI-SDK v5 | Database |
Develop a front end using NextJS
This page is the first of two parts which explain how to develop a basic chatbot ui that will interact with a Forma agent, communicating via Streaming/SSE using the Vercel AiSDK v5.
Note: this part DOES NOT END with a functional chatbot. You need to complete part 2 for that.
We will use the following tech stack:
- NextJS as the framework
- Tailwindcss for styling
- shadcn for making the components functional and pretty effortlesly
- Vercel AiSDK v5 for processing the streamed responses
Setting up your Forma AI Agent so respect this communication protocol
In order for our Forma agent to be compatible with this chatbot, we need to setup the runtime to use the client to ai-sdk-v5
# runtime.yaml

persist_sessions: false # <-- Keep this for now
client: ai-sdk-v5 # <-- FOR AI_SDK COMPATIBILITY
Also, remember to setup an API Key. Add this to the .env file in your Forma directory:
# .env, within the Forma agent directory
FORMA_AGENT_KEY=fake-key-which-should-be-longer-in-production
Setting up our tech stach
THe first thing to do is to start a NextJS project. You do this by running the following command in your terminal
APP_NAME=nextjs-aisdk-5
npx create-next-app@latest --app --ts --tailwind --app --turbopack --yes $APP_NAME
cd $APP_NAME
That command created a new NextJS app, with TailwindCSS already in place. Now you can run
npm run dev
And go to http://localhost:3000 on your browser. You should see something like this:
All right, so this does not like a chatbot... but we will get there.
Turn this into a chat
Add support for the communication protocols
A chat needs messages, among other things. Let's install some libraries that will help us send and store messages
npm install ai '@ai-sdk/react'
Cleanup the template
Remove all the stuff in the public folder within your project. You can do it using your mouse, or—if you use Mac or Linux—you can do this:
# If it asks you if you are sure... yeah, this should be safe.
rm ./public/*
Add some useful UI components
This is a very simple template, and we might not need a whole library. However, as things scale, a library like shadcn becomes very valuable. I guess their aesthetic appeal is always debatable. Regardless, my view is that they have built-in functionalities that are quite pleasing for users (e.g., close a dialog by pressing the 'Esc' key) and their style can be fully modified.
# It will ask you whether you want to install some dependencies, and
# if you want to create a `components.json` file. Say Yes to both.
npx shadcn@latest add button
Replace the landing page
There is a file in your project called page.tsx (located at your-project-name/app/page.tsx). Replace everything in it by copying and pasting the code below.
This code contains no Forma-specific code, and it is almost entirely just React/NextJS. We will comment some specific bits of this code in the next section.
// ./app/page.tsx
"use client"

import { Button } from "@/components/ui/button";
import { ArrowUpIcon, Sparkles } from "lucide-react"
import { useChat } from "@ai-sdk/react";
import { type UIMessage } from "@ai-sdk/react";
import { UIDataTypes, UITools, type UIMessagePart } from 'ai'
import { useCallback, useRef, useState } from "react";


type MessagePart = UIMessagePart<UIDataTypes, UITools>

type ChatRequestOptions = {
  headers?: Record<string, string> | Headers
  body?: object,
  data?: object
}

function Part({ part }: { part: MessagePart }) {
  switch (part.type) {
    case "text":
      return <p>{part.text}</p>
    default:
      console.log(`unsupported message part of type '${part.type}': ${JSON.stringify(part)}`)
      return null
  }
}


function SubmitForm({ sendMessage }: {
  sendMessage: (message: { text: string }, options?: ChatRequestOptions) => Promise<void>
}) {
  const [input, setInput] = useState<string>("")
  const textAreaRef = useRef<HTMLTextAreaElement>(null)
  const submit = useCallback(async (text: string) => {
    let area = textAreaRef.current
    if (area) {
      area.value = ""
    }
    sendMessage({ text })
  }, [])

  const onKey = useCallback((e: any) => {
    let newv = e.target.value.trim()
    setInput(newv)
    if (e.key === 'Enter') {
      submit(newv)
    }
  }, [setInput])

  return <div className='h-fit'>
    <div className='flex items-center p-2 rounded-2xl border m-1'>
      <textarea ref={textAreaRef} onKeyUp={onKey} className='flex-grow outline-none focus:outline-none resize-none' placeholder="Ask me anything!" />
      <Button size="icon" aria-label="Submit" onClick={() => {
        submit(input)
      }} >
        <ArrowUpIcon />
      </Button>
    </div>
  </div>
}

function Chatlog({ messages }: {
  messages: UIMessage[]
}) {
  return <div className="h-full flex-grow flex flex-col p-2 overflow-y-scroll">
    {messages.map((m) => {
      const parts = m.parts.map((p, i) => {
        return <Part key={i} part={p} />
      })
      switch (m.role) {
        case "assistant":
          return <div key={m.id} className='w-full flex'>
            <span><Sparkles /></span>
            <div className='bg-transparent text-foreground py-1 px-3 max-w-[70%] w-fit'>{parts}</div>
            <span className='flex-grow'></span>
          </div>

        case "user":
          return <div key={m.id} className='w-full flex'>
            <span className='flex-grow'></span>
            <div className='bg-primary text-primary-foreground rounded-md py-1 px-3 max-w-[70%] w-fit'>{parts}</div>
          </div>
        case "system":
          return null
        default:
          return <code>unsupported role {m.role}: {JSON.stringify(m)}</code>
      }
    })}
  </div>
}

export default function Home() {

  const {
    messages,
    sendMessage,
  } = useChat<UIMessage>({
    onError: (e) => {
      console.warn(e)
    }
  });

  return (
    <main className='flex flex-col h-screen w-full max-w-3xl mx-auto overflow-hidden'>
      <Chatlog messages={messages} />
      <SubmitForm sendMessage={sendMessage} />
    </main>
  );
}
Let's discuss this code a little bit
You might noticed that 93% if this code is just Typescript and NextJS/React. In fact there is 0% Forma-specific code, and just about 7% (8 lines) of AiSdk v5 code.
The code worth paying attention to is the following:
// This little piece of magic gives us two things
const {
  messages, // <-- (1) A list of messages to render
  sendMessage, // <-- (2) A function to send new messages
} = useChat<UIMessage>({
  onError: (e) => {
    console.warn(e) // <-- A bit of error handling here
  }
});
So, with those pieces in place, I can now just render the messages in any way I like, and I can call the sendMessage function to send messages.
Some things to know:
- By default,
sendMessagesends the messages to theapi/chatendpoint. We will keep this default. - The list of
messages is updated automatically as events are streamed from the back end.
Setup the Back End
As mentioned earlier, sendMessage sends messages to api/chat, so we need to develop that. The path of every message will be the following:
- You send a message from your browser (i.e., the Front end)
- The message is received by the
api/chatendpoint (i.e., the Back End). It will add Authentication, and forward it to the Forma agent - The Forma agent processes the request, responding to the Back End
- The Back-End pipes the messages to the Front-End.
We use this method because Forma agents are not meant to handle security (beyond an API Key). By calling forma agents from your back-end, you can:
- Validate the users identity and permissions
- Keep the Forma Agent API Key secure
- Make the call to Forma agents a part of a longer process (e.g., updating a file in a bucket)
YOU ARE RESPONSIBLE FOR SECURING YOUR AGENT AND ADDING AUTHENTICATION
So, add the code below to app/api/chat/route.ts. This path is the one the useChat function defines by default.
// app/api/chat/route.ts

import { NextRequest, NextResponse } from "next/server";

export async function POST(request: NextRequest) {
    const body = await request.json() // Parse the front-end request
    try {
        // Send request to Forma Agent
        const r = await fetch(`${process.env.FORMA_AGENT_URL!}/v1/chat`, {
            method: 'POST',
            headers: {
                "Content-Type": "application/json",
                "Authorization": `Bearer ${process.env.FORMA_AGENT_KEY!}`
             },
            body: JSON.stringify(body),
            cache: 'no-store',
        });

        if (!r.ok) {
          // check if this was successful
          let error = await r.text()
          console.error(error)
          return new NextResponse(JSON.stringify({
              status: r.status,
              error
          }), { status: r.status });
        }

        // Pipe Forma's stream directly to client,
        // adding the headers expected by the front-end
        const sseHeaders = {
            "x-vercel-ai-ui-message-stream": "v1",
            "Transfer-Encoding": "chunked",
            'Cache-Control': 'no-cache, no-transform',
            'Connection': 'keep-alive',
            'Content-Type': 'text/event-stream',
            "X-Accel-Buffering": "no"
        };

        return new NextResponse(r.body, {
            status: 200,
            headers: sseHeaders,
        });

    } catch (error) {
        console.error('Error proxying SSE stream:', error);
        return new NextResponse("Failed to connect to the streaming service.", { status: 500 });
    }
}
You also need to add the Environment variables we are referencing. Put them in your .env file:
# .env file of your Client

#  WHERE the agent is
FORMA_AGENT_URL=http://localhost:8080

# API Key. Should match the one you set on your Forma .env file
FORMA_AGENT_KEY=fake-key-which-should-be-longer-in-production
Run it
Now, open two terminal windows, and run the following:
# Run the Web App you just made
npm run dev
Talking to the Forma agent will fail, as—by default—Vercel sends all the messages in the conversation to the agent. Forma does not support that as of today. To to the next section to continue.
Vercel AI-SDK v5 - With session persistence
Note: This guide is the continuation of the other Vercel AI-SDK v5 tutorial.
We already mentioned that the other other Vercel AI-SDK v5 tutorial:
- Keeps the history of messages on the browser, not in the backend
- Sends the whole chat history to the server on every interaction
While those to elements can make an AI agent cheaper (because you do not need to manage an Sessions database), they also imply that (respectively):
- Sessions are relatively ephemeral, and will disappear when the user refreshes the page or deletes their cookies, depending on how memory is implemented.
- Every new message sends much more information, meaning that you are consuming more data; but also, that if someone intercepts this communication, they not only get a loose message (e.g., "Sure, that sounds good!") but the whole conversation surrounding that specific message (e.g., they would know "what" sounds good).
The solution is to keep the memory on the back-end. That way, when you send a message, the Forma Agent will first retrieve the context of the conversation (i.e., the previous messages) and then send them to the LLM. Then, before returning the answer to you, it will update the sessions database by adding the response.
Let's do this.
Setting up your Forma AI Agent so respect this communication protocol
In order for our Forma agent to be compatible with this chatbot, we need to tell the runtime to persist sessions
# runtime.yaml
persist_sessions: true # <-- MAYBE CHANGED
client: ai-sdk-v5 # <-- NOT CHANGED
Also, remember to setup an API Key. Add this to the .env file in your Forma directory:
# .env, within the Forma agent directory
FORMA_AGENT_KEY=fake-key-which-should-be-longer-in-production

# We will need the Sessions Database container running locally as well.
SESSIONS_DB_URL=mongodb://root:example@localhost:27017/?directConnection=true
There are two main things we need to do now:
- Making sure we let the Forma agent know that a new session will start
- Make sure that new chat messages contain information about who the user is, and which session this message belongs to.
Initializing sessions
Authenticating the user
When a website opens, you need to authenticate the user. We will not do this here, but we can emulate something like that.
The first thing is to give the Chat some place to store the user information; in other words, to keep the user ID in the state.
// Add this within the Home() component in app/page.tsx.

// You will need to import `useState`
const [userId, setUserId] = useState<string | undefined>(undefined)
Then, make sure the user is initialized properly when the page loads.
// Add this within the Home() component in app/page.tsx.

// import useEffect
useEffect(() => {
  // You need to handle this with
  // your own authentication service
  setUserId('my-user-which-i-will-authenticate')
}, [])
Create a new session when the user logs in
Once a user logs in, we need to create a new session for them. We do this by reaching the v1/init endpoint. The way to do this on the front-end is the following.
First, give the Chatbot some place to put the session id (i.e., state):
const [sessionId, setSessionId] = useState<string | undefined>(undefined)
Then, ask the Forma Agent to initialize and give you a new session-id when the user logs in:
// This function creates a new session, and gets the session/
const getSessionId = useCallback(async () => {
    // Let's not create a session if we have no user or session IDs
    if (!userId) {
      return
    }

    // Send this information to the back-end to create the session
    let r = await fetch(`/api/init`, {
      headers: {
        // Give this information to the back end
        "x-user-id": userId
      }
    })
    let res = await r.json()
    if (!r.ok) {
      console.warn(res)
    } else {
      setSessionId(res.session_id)
    }
}, [userId, setSessionId])

// This will runn every time the userId changes
useEffect(() => {
    getSessionId()
}, [userId])
And then we need to implement the back-end of our own client, where we will also pass the authentication information:
// This file is app/api/init/route.ts

import { NextRequest, NextResponse } from "next/server";

export async function GET(request: NextRequest) {
    let userId = request.headers.get("x-user-id")
    if (!userId) {
        return new NextResponse(JSON.stringify({
            error: "we cannot create a session for an unknown user",
            status: 400
        }), { status: 400 });
    }

    const headers = new Headers();
    // add authentication

    headers.set("Authorization", `Bearer ${process.env.FORMA_AGENT_KEY!}`);
    // Add the user id, which will own the newly created session
    headers.set("X-User-Id", userId);

    try {
        let r = await fetch(`${process.env.FORMA_AGENT_URL!}/v1/init`,
            { headers },
        )
        if (!r.ok) {
            let error = await r.text()
            console.error(error)
            return new NextResponse(JSON.stringify({
                status: r.status,
                error: error
            }), { status: r.status });
        }
        return new NextResponse(r.body);
    } catch (error) {
        console.error(error)
        return new NextResponse(JSON.stringify({
            error: "Failed to get sessionId from Forma agent",
            status: 500
        }), { status: 500 });
    }
}
Add userId and sessionId to the message sent to Forma
First, we should add this information on the front-end (i.e., Browser). We do this by updating the SubmitForm component, which is the one in charge of that. Turn it into this:
// Update this component, within app/page.tsx
function SubmitForm({ sendMessage, userId, sessionId }: {
  sendMessage: (message: { text: string }, options?: ChatRequestOptions) => Promise<void>,
  userId?: string, // <- Add this as an argument
  sessionId?: string // <- Add this as an argument
}) {
  const [input, setInput] = useState<string>("")
  const textAreaRef = useRef<HTMLTextAreaElement>(null)
  const submit = useCallback(async (text: string) => {
    let area = textAreaRef.current
    if (area) {
      area.value = ""
    }
    sendMessage({ text }, {
      headers: {
        "x-user-id": userId || "", // <- We pass userId in the header
        "x-session-id": sessionId || "" // <- Also, sessionId in the header
      }
    })
  }, [sendMessage, userId, sessionId])

  const onKey = useCallback((e: any) => {
    let newv = e.target.value.trim()
    setInput(newv)
    if (e.key === 'Enter') {
      submit(newv)
    }
  }, [setInput, submit]) // <- We also updated this. Search for docs on React's useCallback

  return <div className='h-fit'>
    <div className='flex items-center p-2 rounded-2xl border m-1'>
      <textarea ref={textAreaRef} onKeyUp={onKey} className='flex-grow outline-none focus:outline-none resize-none' placeholder="Ask me anything!" />
      <Button size="icon" aria-label="Submit" onClick={() => {
        submit(input)
      }} >
        <ArrowUpIcon />
      </Button>
    </div>
  </div>
}
We added new arguments to SubmitForm, so we need to adjust this section:
return (
  <main className='flex flex-col h-screen w-full max-w-3xl mx-auto overflow-hidden'>
    <Chatlog messages={messages} />
    <SubmitForm
      sendMessage={sendMessage}
      userId={userId} // <- pass user id
      sessionId={sessionId} // <- pass session id
    />
  </main>
);
Then you need to read this information on the back-end. You can do this by adding the following at the top of the POST function:
// Add this within `app/api/chat/route.ts, at the top of the `POST` function
let userId = request.headers.get("x-user-id")
let sessionId = request.headers.get("x-session-id")
if (!userId || !sessionId) {
    // Make sure headers are passed.
    return new NextResponse(JSON.stringify({
        error: "sending message without user or session id is not allowed",
        status: 400
    }), { status: 400 });
}
And then forwarding this information to the Forma agent
// Update this part of `app/api/chat/route.ts, within the `POST` function
const r = await fetch(`${process.env.FORMA_AGENT_URL!}/v1/chat`, {
    method: 'POST',
    headers: {
        "Content-Type": "application/json",
        "Authorization": `Bearer ${process.env.FORMA_AGENT_KEY!}`
        "X-User-Id": userId, // <-- Add this
        "X-Session-Id": sessionId // <-- And this
    },
    body: JSON.stringify(body),
    cache: 'no-store',
});
Send just the last message.
In order to only send the last message, we need to configure the useChat hook we used previously. It should now look like this:
// file: `app/page.tsx`
// Update the call to `useChat` to this:
const {
  messages,
  sendMessage,
} = useChat<UIMessage>({
  // Import DefaultChatTransport from 'ai'
  transport: new DefaultChatTransport({
    prepareSendMessagesRequest: ({ messages }) => {
      return {
        body: messages.at(-1)!, // <-- Send only the last message
      }
    }
  }),
  onError: (e) => {
    console.warn(e)
  }
});
Run it all together
You should be able to run all of it by running these three elements in different terminal tabs:
# Go to wherever your forma agent is
cd <forma/path>
# Run the
docker-compose -f dev/sessions-db.yaml up
# Go to wherever your forma agent is
cd <forma/path>
# The Forma CLI
forma serve
# Run the Web App you just made
npm run dev
Agent
Defines the entry points, evaluations and other settings for the Forma agent.
Full Specification
id: string
start: Workflow
evals:
	- Eval
	- ...
id
The ID. If absent, one will be provided.
start
The Workflow that serves as a starting point of this Agent.
evals
The evaluations that will be used to test the Agent as a whole.
Eval
An evaluation is not a complex thing:
- You have a sample question
- You ask that question to your agent
- You then you use some metric or rubric to decide whether the answer is good enough or not, and why.
Explanations of (1) and (3) are provided below
Full Specification
dataset: string
metrics:
	- Metric
	- ...
dataset
The set of questions that will be asked to the agent, node or workflow in order to evaluate their performance
metrics
The set of metrics to evaluate the answers with. If none is given, the Agent, Workflow or Node will still be evaluated, but tis answers will not be judged.
Metric templates can contain three fields:
actual_output- Which will be replaced with the answer of the agent, node or other.input- Which will be replaced by the input, extracted from the dataset.expected_output- An optional value, that would also be extracted from the example.
They will produce the following outputs:
label- A single-word verbal equivalent of the score (e.g., 'Good', 'Bad', 'Hallucination'). Base this value on the instructions providedscore- The numerical value reflecting the quality of the evaluation, assigned as per the instructionsexplanation- A verbal explanation for the score and labels given
For example:
Your job is to judge whether this sentence:
{{actual_output}}
(1) a good answer th the following question:
{{input}}
and (2), whether contradicts this reference answer:
{{expected_output}}
Give it a score between 0 and 2 (one point for each criteria), explain your reasoning behind the score, and indicate whether it is Horrible (0 points), Bad (1 point) or Good (2 points)
FormaRuntime
Used to determine what kind of client will be communicating with this agent.
It can be used to switch from Streaming (SSE) or normal REST, and changing the input/output schema.
Note that this setting does not hot reload, meaning that; during development, you will need to stop and restart Forma for changes to be effective.
Supported Variants
🎯 Variants are identified by using the
clientfield. For instanceclient: name-of-variant
sync
Basic service-to-service communication, with no streaming.
Client sends an Open AI Message, and receives another back.
This is meant to work mostly for machine-to-machine communication, where the client is a server, that needs to submit tasks or questions to a Forma Agent.
sse
Basic service-to-service communication, with streaming of states (not tokens).
Client sends an Open AI Message, and receives updates with respect
to tool calls and other state changes.
This is meant to work mostly for machine-to-machine communication, where the client is a server, that needs to submit tasks or questions to a Forma Agent.
ai-sdk-v5
Streamed responses using Vercel's 'AI-SDK v5' Server Side Events (SSE). Client sends a single message (the last user message) and the Forma agent will take care of retrieving the full conversation from the sessions database, if session persistence is enabled.
Note: This is NOT the normal behaviour. The default behaviour of the Vercel AI SDK v 5 is to send the whole conversation on every interaction. Forma does not favour this behaviour.
whatsapp
Use your Forma Agent as a Webhook for a Whatsapp Cloud API.
THIS HAS NOT BEEN TESTED YET PROPERLY.
This runtime always persist sessions.
Note that connecting to real webhooks while developing your agent will require Ngrok or a similar product. However—because the runtime does not change the behaviour of your agent—you can test your agent using any other kind of client service
Authentication
Set the following environment variables.
WHATSAPP_HOST_NUMBER_ID=123123123
WHATSAPP_KEY=whatsapp-long-token # For authenticating with the Whatsapp API
WHATSAPP_VERIFY_TOKEN=12321 # for verifying webhooks
How Whatsapp messages are translated into LLM Messages
telegram
Use your Forma Agent as a Telegram Bot webhook.
This runtime always persists sessions. Each Telegram chat maps to one session; the chat ID is used as the user identifier.
Register the webhook with Telegram once your server is reachable:
https://api.telegram.org/bot{TOKEN}/setWebhook?url=https://your-host/v1/chat
Human in the loop
Human in the loop is surfaced as a message with two inline
buttons: Accept or Reject. These can be set up through the
accept_button_text and reject_button_text configuration
options.
Authentication
Set the following environment variables.
TELEGRAM_BOT_TOKEN=your-telegram-bot-token # the token obtained from @BotFather.
OpenAISyncAdapter
Offers a single endpoint, with a Chat Completion, returning a fully resolved OpenAI message
Full Specification
persist_sessions: boolean
no_api_key: boolean
max_history_messages: int
persist_sessions
If true, the Agent will keep the state and the history of the conversation in a MongoDB-compatible database.
no_api_key
Option to NOT require an API Key. If false, requests should include an
Authorization: Bearer $KEY header, which will be compared to the
environment variable FORMA_AGENT_KEY in the server.
max_history_messages
The maximum number of messages to retrieve from the sessions database in each user interaction. The purpose is to prevent (1) the system prompt from being diluted by a large number of messages, and (2) reduce the token usage.
OpenAISSEAdapter
Offers a single endpoint, with a Chat Completion, returning a set of SSE
Full Specification
persist_sessions: boolean
no_api_key: boolean
max_history_messages: int
persist_sessions
If true, the Agent will keep the state and the history of the conversation in a MongoDB-compatible database.
no_api_key
Option to NOT require an API Key. If false, requests should include an
Authorization: Bearer $KEY header, which will be compared to the
environment variable FORMA_AGENT_KEY in the server.
max_history_messages
The maximum number of messages to retrieve from the sessions database in each user interaction. The purpose is to prevent (1) the system prompt from being diluted by a large number of messages, and (2) reduce the token usage.
AiSdkV5Adapter
Offers a single endpoint, with an SSE Completion
Full Specification
persist_sessions: boolean
no_api_key: boolean
max_history_messages: int
persist_sessions
If true, the Agent will keep the state and the history of the conversation in a MongoDB-compatible database.
no_api_key
Option to NOT require an API Key. If false, requests should include an
Authorization: Bearer $KEY header, which will be compared to the
environment variable FORMA_AGENT_KEY in the server.
max_history_messages
The maximum number of messages to retrieve from the sessions database in each user interaction. The purpose is to prevent (1) the system prompt from being diluted by a large number of messages, and (2) reduce the token usage.
WhatsappAdapter
Adapter for the WhatsApp API. THIS IS VERY EXPERIMENTAL
Full Specification
host_phone_number: string
whatsapp_api_key: string
max_history_messages: int
host_phone_number
The phone number associated with the account
whatsapp_api_key
The API key to authenticate
max_history_messages
The maximum number of messages to retrieve from the sessions database in each user interaction. The purpose is to prevent (1) the system prompt from being diluted by a large number of messages, and (2) reduce the token usage.
TelegramAdapter
Adapter for the Telegram Bot API.
Registers a single webhook endpoint that receives [TelegramUpdate]s and
replies through the Telegram Bot API.
Set the webhook URL on your bot with:
https://api.telegram.org/bot{TOKEN}/setWebhook?url=https://your-host/v1/chat
Required environment variables
TELEGRAM_BOT_TOKEN— the token provided by @BotFather.
Full Specification
max_history_messages: int
bot_token: string
accept_button_text: string
reject_button_text: string
confirm_tool_call_question: string
max_history_messages
Maximum number of past messages included in each context window.
bot_token
Populated from the TELEGRAM_BOT_TOKEN env var during init.
accept_button_text
Text to come up in the accept tool call button. Defaults to \"Yes\".
reject_button_text
Text to come up in the reject tool call button. Defaults to \"No\".
confirm_tool_call_question
Text to come up in the confirm tool call button. Defaults to \"Approve this action?\".
GenaiClient
Defines the LLM Provider, the model and the settings utilise to generate responses
Supported Variants
🎯 Variants are identified by using the
providerfield. For instanceprovider: name-of-variant
ollama
A client for Ollama inference.
Ideal for running local processes in an easy manner during development
openai-v1
A client for OpenAI's v1 API
groq
Client for Groq
vertex-ai
Client for Google's Vertex AI platform
Ollama
A client for Ollama running in OpenaAI-compatible mode (which happens by default)
It attempts to adhere as strictly as possible (even if some features are not supported by Forma).
🔑 Authentication: Does not support authentication yets
Note: the documentation below has been copied nearly verbatim from OpenAI's one, as reference
Full Specification
endpoint: string
model: string
stream: boolean # optional
tools:
	- OpenAITool
	- ... # optional
format: JsonSchema # optional
num_keep: int # optional
seed: int # optional
num_predict: int # optional
top_k: int # optional
response_format: OpenAIResponseFormat # optional
top_p: number # optional
min_p: number # optional
typical_p: number # optional
repeat_last_n: int # optional
temperature: number # optional
repeat_penalty: number # optional
presence_penalty: number # optional
frequency_penalty: number # optional
stop:
	- string
	- ... # optional
endpoint
The endpooint to utilize. Defaults to http://127.0.0.1:11434
model
The model to utilize. Defaults to llama3.1:8b
stream (optional)
If set to true, the model response data will be streamed to the client as it is generated using server-sent events. See the Streaming section below for more information, along with the streaming responses guide for more information on how to handle the streaming events.
tools (optional)
A list of tools the model may select as appropriate to call.
format (optional)
An object specifying the format that the model must output.
num_keep (optional)
seed (optional)
num_predict (optional)
top_k (optional)
response_format (optional)
An object specifying the format that the model must output.
Setting to { \"type\": \"json_schema\", \"json_schema\": {...} }
enables Structured Outputs which ensures the model will match your
supplied JSON schema.
Setting to { \"type\": \"json_object\" } enables the older JSON mode,
which ensures the message the model generates is valid JSON.
Using json_schema is preferred for models that support it.
top_p (optional)
An alternative to sampling with temperature, called nucleus sampling, where the model considers the results of the tokens with top_p probability mass. So 0.1 means only the tokens comprising the top 10% probability mass are considered.
We generally recommend altering this or temperature but not both.s
min_p (optional)
typical_p (optional)
repeat_last_n (optional)
temperature (optional)
repeat_penalty (optional)
presence_penalty (optional)
frequency_penalty (optional)
stop (optional)
OpenaiV1
A client for OpenAI's v1 api
It attempts to adhere as strictly as possible (even if some features are not supported by Forma).
🔑 Authentication: uses the
OPENAI_API_KEYAPI Key
Note: the documentation below has been copied nearly verbatim from OpenAI's one, as reference
Full Specification
endpoint: string
model: string
audio: OpenAIAudioSettings # optional
frequency_penalty: number # optional
logprobs: boolean # optional
max_completion_tokens: int # optional
metadata: serde_json # optional
modalities:
	- OpenAIModality
	- ... # optional
n: int # optional
parallel_tool_calls: boolean # optional
presence_penalty: number # optional
prompt_cache_key: string # optional
reasoning_effort: OpenAIReasoningEffort # optional
response_format: OpenAIResponseFormat # optional
safety_identifier: string # optional
service_tier: OpenAIServiceTier # optional
store: boolean # optional
stream: boolean # optional
stream_options: OpenAIStreamOption # optional
temperature: number # optional
text: OpenAITextField # optional
tool_choice: OpenAIToolChoiceMode # optional
tools:
	- OpenAITool
	- ... # optional
top_logprobs: int # optional
top_p: number # optional
endpoint
The endpoint to reach for the API. Defaults to https://api.openai.com
model
The model to use. Defaults to gpt-3.5-turbo
audio (optional)
Required when audio output is
requested with modalities: [\"audio\"].
frequency_penalty (optional)
Number between -2.0 and 2.0. Positive values penalize new tokens based on their existing frequency in the text so far, decreasing the model's likelihood to repeat the same line verbatim.
logprobs (optional)
Whether to return log probabilities of the output tokens or not. If true, returns the log probabilities of each output token returned in the content of message.
max_completion_tokens (optional)
An upper bound for the number of tokens that can be generated for a completion, including visible output tokens and reasoning tokens.
metadata (optional)
Set of 16 key-value pairs that can be attached to an object. This can be useful for storing additional information about the object in a structured format, and querying for objects via API or the dashboard.
Keys are strings with a maximum length of 64 characters. Values are strings with a maximum length of 512 characters.
modalities (optional)
Output types that you would like the model to generate. Most models are capable of generating text, which is the default
n (optional)
How many chat completion choices to generate for each input message.
Note that you will be charged based on the number of generated tokens
across all of the choices. Keep n as 1 to minimize costs.
parallel_tool_calls (optional)
Whether to enable parallel function calling during tool use
presence_penalty (optional)
Number between -2.0 and 2.0. Positive values penalize new tokens based on whether they appear in the text so far, increasing the model's likelihood to talk about new topics.
prompt_cache_key (optional)
Used by OpenAI to cache responses for similar requests to optimize your cache hit rates. Replaces the user field. Learn more.
reasoning_effort (optional)
Constrains effort on reasoning for reasoning models. Currently supported values are minimal, low, medium, and high. Reducing reasoning effort can result in faster responses and fewer tokens used on reasoning in a response.
response_format (optional)
An object specifying the format that the model must output.
Setting to { \"type\": \"json_schema\", \"json_schema\": {...} }
enables Structured Outputs which ensures the model will match your
supplied JSON schema.
Setting to { \"type\": \"json_object\" } enables the older JSON mode,
which ensures the message the model generates is valid JSON.
Using json_schema is preferred for models that support it.
safety_identifier (optional)
A stable identifier used to help detect users of your application that may be violating OpenAI's usage policies. The IDs should be a string that uniquely identifies each user. We recommend hashing their username or email address, in order to avoid sending us any identifying information.
service_tier (optional)
When the service_tier parameter is set, the response body will
include the service_tier value based on the processing mode actually
used to serve the request. This response value may be different from
the value set in the parameter.
store (optional)
Whether or not to store the output of this chat completion request for use in our model distillation or evals products.
Supports text and image inputs. Note: image inputs over 10MB will be dropped.
stream (optional)
If set to true, the model response data will be streamed to the client as it is generated using server-sent events. See the Streaming section below for more information, along with the streaming responses guide for more information on how to handle the streaming events.
stream_options (optional)
temperature (optional)
What sampling temperature to use, between 0 and 2. Higher values like 0.8 will make the output more random, while lower values like 0.2 will make it more focused and deterministic. We generally recommend altering this or top_p but not both.
text (optional)
Constrains the verbosity of the model's response. Lower values
will result in more concise responses, while higher values will
result in more verbose responses. Currently supported values are
low, medium, and high.
tool_choice (optional)
Controls which (if any) tool is called by the model. none means
the model will not call any tool and instead generates a message.
auto means the model can pick between generating a message or calling
one or more tools. required means the model must call one or more tools.
tools (optional)
A list of tools the model may call.
top_logprobs (optional)
An integer between 0 and 20 specifying the number of most likely tokens to return at each token position, each with an associated log probability. logprobs must be set to true if this parameter is used.
top_p (optional)
An alternative to sampling with temperature, called nucleus sampling, where the model considers the results of the tokens with top_p probability mass. So 0.1 means only the tokens comprising the top 10% probability mass are considered.
We generally recommend altering this or temperature but not both.
Groq
A client for Groq running in OpenaAI-compatible mode (which happens by default)
It attempts to adhere as strictly as possible (even if some features are not supported by Forma).
🔑 Authentication: uses the
GROQ_API_KEYAPI Key
Note: the documentation below has been copied nearly verbatim from OpenAI's one, as reference
Full Specification
endpoint: string
model: string
stream: boolean # optional
tools:
	- OpenAITool
	- ... # optional
format: JsonSchema # optional
num_keep: int # optional
seed: int # optional
num_predict: int # optional
top_k: int # optional
response_format: OpenAIResponseFormat # optional
top_p: number # optional
min_p: number # optional
typical_p: number # optional
repeat_last_n: int # optional
temperature: number # optional
repeat_penalty: number # optional
presence_penalty: number # optional
frequency_penalty: number # optional
stop:
	- string
	- ... # optional
endpoint
The endpooint to utilize. Defaults to http://127.0.0.1:11434
model
The model to utilize. Defaults to llama3.1:8b
stream (optional)
If set to true, the model response data will be streamed to the client as it is generated using server-sent events. See the Streaming section below for more information, along with the streaming responses guide for more information on how to handle the streaming events.
tools (optional)
A list of tools the model may select as appropriate to call.
format (optional)
An object specifying the format that the model must output.
num_keep (optional)
seed (optional)
num_predict (optional)
top_k (optional)
response_format (optional)
An object specifying the format that the model must output.
Setting to { \"type\": \"json_schema\", \"json_schema\": {...} }
enables Structured Outputs which ensures the model will match your
supplied JSON schema.
Setting to { \"type\": \"json_object\" } enables the older JSON mode,
which ensures the message the model generates is valid JSON.
Using json_schema is preferred for models that support it.
top_p (optional)
An alternative to sampling with temperature, called nucleus sampling, where the model considers the results of the tokens with top_p probability mass. So 0.1 means only the tokens comprising the top 10% probability mass are considered.
We generally recommend altering this or temperature but not both.s
min_p (optional)
typical_p (optional)
repeat_last_n (optional)
temperature (optional)
repeat_penalty (optional)
presence_penalty (optional)
frequency_penalty (optional)
stop (optional)
VertexAI
A client for calling Google Cloud's Vertex AI models.
🔑 Authentication: We use the Google Library, so whe edhere to the recommended Google Cloud Platform authentication method. To run locally, you should run
gcloud auth application-default loginto acquire credentials, and set theGOOGLE_CLOUD_PROJECT_IDenvironment variable. These two requirements will be automatically set in your deployed machines.
Note: the documentation below has been copied nearly verbatim from Google Cloud's documentation.
Full Specification
model: string
location: string
cached_content: string # optional
tools:
	- Tool
	- ...
tool_choice: Mode # optional
temperature: number # optional
top_p: number # optional
top_k: number # optional
candidate_count: i32 # optional
max_output_tokens: i32 # optional
stop_sequences:
	- string
	- ...
response_logprobs: boolean # optional
logprobs: i32 # optional
presence_penalty: number # optional
frequency_penalty: number # optional
seed: i32 # optional
response_mime_type: string
response_format: JsonSchema # optional
include_thoughts: boolean # optional
thinking_budget: i32 # optional
image_aspect_ratio: string # optional
model
The model to use. Check Google Cloud's availability of models in different regions
location
The location of the endpoint to use (e.g., 'global', 'us-central1')
cached_content (optional)
The name of the cached content used as context to serve the prediction. Note: only used in explicit caching, where users can have control over caching (e.g. what content to cache) and enjoy guaranteed cost savings.
It is assume to be cached in the same project and location as the Vertex AI client
tools
A Tool is a piece of code that enables the system to interact with
external systems to perform an action, or set of actions, outside of
knowledge and scope of the model.
tool_choice (optional)
Which tools to call, if any. Options are:
auto: Default model behavior, model decides to predict either function calls or natural language response.any: Model is constrained to always predicting function calls only. If "allowed_function_names" are set, the predicted function calls will be limited to any one of "allowed_function_names", else the predicted function calls will be any one of the provided "function_declarations".none: Model will not predict any function calls. Model behavior is same as when not passing any function declarations.
temperature (optional)
Controls the randomness of predictions.
top_p (optional)
If specified, nucleus sampling will be used.
top_k (optional)
If specified, top-k sampling will be used.
candidate_count (optional)
Number of candidates to generate.
max_output_tokens (optional)
The maximum number of output tokens to generate per message.
stop_sequences
Stop sequences.
response_logprobs (optional)
If true, export the logprobs results in response.
logprobs (optional)
Logit probabilities.
presence_penalty (optional)
Positive penalties.
frequency_penalty (optional)
Frequency penalties.
seed (optional)
Seed.
response_mime_type
Output response mimetype of the generated candidate text. Supported mimetype:
text/plain: (default) Text output.application/json: JSON response in the candidates. The model needs to be prompted to output the appropriate response type, otherwise the behavior is undefined. This is a preview feature.
response_format (optional)
The Schema object allows the definition of input and output
data types. These types can be objects, but also primitives and arrays.
Represents a select subset of an OpenAPI 3.0 schema
object.
If set, a compatible response_mime_type must also be set.
Compatible mimetypes:
application/json: Schema for JSON response.
include_thoughts (optional)
Optional. Config for thinking features. An error will be returned if this field is set for models that don't support thinking. Indicates whether to include thoughts in the response. If true, thoughts are returned only when available.
thinking_budget (optional)
Optional. Indicates the thinking budget in tokens. This is only applied when enable_thinking is true.
image_aspect_ratio (optional)
The desired aspect ratio for the generated images. The following aspect ratios are supported:
"1:1" "2:3", "3:2" "3:4", "4:3" "4:5", "5:4" "9:16", "16:9" "21:9"
Metric
A metric utilized to judge the response given by an AI Agent.
To scale it properly, the Judge will be an LLM itself
Full Specification
judge: GenaiClient
template: string
judge
The GenaiClient that will judge the response according
to the template above.
template
Metric templates can contain three fields:
actual_output- Which will be replaced with the answer of the agent, node or other.input- Which will be replaced by the input, extracted from the dataset.expected_output- An optional value, that would also be extracted from the example.
They will produce the following outputs:
label- A single-word verbal equivalent of the score (e.g., 'Good', 'Bad', 'Hallucination'). Base this value on the instructions providedscore- The numerical value reflecting the quality of the evaluation, assigned as per the instructionsexplanation- A verbal explanation for the score and labels given
For example:
Your job is to judge whether this sentence:
{{actual_output}}
(1) a good answer th the following question:
{{input}}
and (2), whether contradicts this reference answer:
{{expected_output}}
Give it a score between 0 and 2 (one point for each criteria), explain your reasoning behind the score, and indicate whether it is Horrible (0 points), Bad (1 point) or Good (2 points)
Node
A Node is the key of Forma Agents' execution. They are the ones that call LLMs, process their response, and decide whether tools should be called. It always does the same thing:
- Triage – an LLM takes the context decides what to do next, based on the full conversation context. It might choose to respond right away, or call tools.
- Tools (optional) – If the LLM decided that one of its available tools would be useful to comply with the client's request, the node will call them.
- Summarisation – If tools were invoked, the node will call an LLM again, in order to respond to the client appropriately, with the new information provided by the tools. (Note: This can be skipped if only a single tool is called, and such tool is marked as
not-summarize. This is useful in many situations, as will be explained in the Tools section)
Full Specification
id: string
llm: GenaiClient
system_prompt: string
summarization_llm: GenaiClient # optional
summarization_prompt: string # optional
tools:
	- TemplateField
	- ...
evals:
	- Eval
	- ...
triage_evals:
	- Eval
	- ...
summarize_evals:
	- Eval
	- ...
id
The ID of the node. If absent, one will be provided. The value given here is used to identify the output of this node in subsequent nodes within a workflow, allowing for template interpolation
llm
The main LLM and settings to use for triage and
system_prompt
The main instruction given to the LLM.
summarization_llm (optional)
An optional LLM for summarisation. If this is not there, summarisation will be done using the main llm.
summarization_prompt (optional)
An optional instruction for summarization. If absent,
the system_prompt will be used
tools
The tools that the LLM can decide to call.
evals
The evaluations used to test this specific node as a whole (different from Triage- and Summarize-specific evals)
triage_evals
The evaluations used to test the triage LLM specifically
summarize_evals
The evaluations used to test the summarize LLM specifically
Tool
Tools are instruments that allow AI Agents do things. They way they operate is that we send an LLM a request, and in that request we include the possible actions we have available for taking. The LLM will not execute any action (Forma does it afterwards) but it can decide which tool and its arguments.
The purpose of this Tool object is to describe the possible actions to the LLM, so it can decide.
Full Specification
name: string
description: string # optional
tool: ToolRunner
just_for:
	- string
	- ...
confirm_before_calling: boolean
name
The name of the tool. Should be descriptive to the LLM so it can discriminate between tools.
(Misleading names just cause confusion)
description (optional)
A more detailed description of the tool, for the LLM to discriminate between options.
tool
The Tool that will be executed if the this tool is selected.
just_for
The roles that are allowed to use this tool. If empty, everyone is allowed to use it; if not, only the specific roles in here are allowed to use it.
confirm_before_calling
Whether the user should be asked to confirm before calling this tool.
ToolRunner
A tool runner lets you select one of the several tools that are built into Forma. They will handle the communication with the LLM (in terms of inputs and outputs)
Supported Variants
🎯 Variants are identified by using the
typefield. For instancetype: name-of-variant
template
Takes a template, asks the LLM to generate its fields, and returns a String with the rendered template
workflow
Runs a workflow as if it was a tool, using a fresh state (i.e., does not receive the whole conversation)
TemplateTool
This tool asks an LLM to fill the missing fields on a template.
It will take a template with certain field specifications, and will ask the LLM to populate it.
Full Specification
template: string
template
The template to fill. For instance,
"hello {{name: string "the name of the user" }}, nice to meet you! The time is {{time: string "the current time"}}"
WorkflowTool
Takes a workflow and turns it into a Tool.
This workflow receives a fresh session. This means that it is not aware of previous messages or the contributions made by other nodes to the state.
After its execution, a Workflow returns an object with the results of its output nodes.
Full Specification
id: string
nodes:
	- Node
	- ...
output: WorkflowOutput # optional
input_prompt: string
evals:
	- Eval
	- ...
id
The ID. If absent, one will be provided.
nodes
The nodes within the Workflow. All nodes needed to generate the outputs are guaranteed to run.
output (optional)
The IDs of the nodes that will end up in the output provided by this workflow.
input_prompt
Determines the template for the message that will be used to trigger this workflow execution as a tool. The fields required will be generated by the LLM of the node that decides to call this tool.
evals
The names of the evaluations to be ran for this workflow
Workflow
Workflows are a mechanism to break down large tasks into smaller—more focused—tasks. This is beneficial because complicated tasks—which require very large system prompts—and thus the AI Models will struggle to follow those instructions faithfully. By breaking down a big task into smaller bits, you can provide more precise, prevent contadictions in your prompts. Like people, LLMs perform better with clear and focused instructions.
A Workflow is a set of nodes that depend on each other (for the Geeks, it is a Directed Acyclic Graph of nodes).
After its execution, a Workflow returns an object with the results of its output nodes.
Full Specification
id: string
nodes:
	- Node
	- ...
output: WorkflowOutput # optional
evals:
	- Eval
	- ...
id
The ID. If absent, one will be provided.
nodes
The nodes within the Workflow. All nodes needed to generate the outputs are guaranteed to run.
output (optional)
The IDs of the nodes that will end up in the output provided by this workflow.
evals
The names of the evaluations to be ran for this workflow